Naturally Dyed Easter Eggs
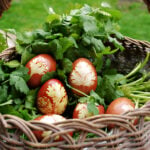
Beautiful, Naturally-dyed Easter Eggs are a traditional part of the holiday celebration in countries across the globe.
Servings 12 eggs
Calories 63kcal
Equipment
- 1 Medium Stockpot
- 1 large spoon
- 1 pair of nylon stockings Rips, runs, and tears are all OK.
- twist ties or yarn or twine
- paper towels
Ingredients
- 1 dozen eggs
- 12-15 brown onion skins or red
- ¾ cup red wine vinegar or plain vinegar
- 3 quarts water more or less
- olive oil
- cilantro, parsley or anything else you thing will look pretty
Instructions
Prepare the Dye
- This step can be done a day or two ahead of time.Fill a medium stock pot with 3 quarts of water. Add the vinegar and stir.Add the onion skins and push them down into the water. The stockpot should be about two-thirds full.Over medium heat, bring the onion skin mixture to a boil. Reduce heat to low and simmer for 20 minutes.Remove from heat and allow dye to cool.
Add a Leaf Design
- This step is optional. If you just want red eggs, you can skip this.Use scissors to cut the legs of the nylons into 4-5” tubes. Tie a tight knot at the end of each tube.Use a little water to adhere a small leaf or flower to an egg.Carefully insert the egg into the nylon tube and draw the nylon tightly up and around it. Secure the end of the tube with a twist tie, yarn, or twine.
Dye the Eggs
- Put raw eggs into the cool dye. Make sure they are completely submerged.Bring dye to a gentle boil, then turn off the heat and allow the eggs bathe in the dye for 20 minutes, or until they reach the lovely brick-red color you want.Remove eggs from dye bath and allow them to cool completely.
Polish the Eggs
- Remove the nylon tube from each egg. (You can use these again.) Carefully peel off leaves or flowers.Polish eggs with a little olive oil and a paper towel.
Notes
We recommend leaving the onion skins in the dye while the eggs are boiling, using the skins to separate and cushion the eggs as they boil.
Nutrition
Serving: 1egg | Calories: 63kcal | Carbohydrates: 1g | Protein: 6g | Fat: 4g | Saturated Fat: 1g | Polyunsaturated Fat: 1g | Monounsaturated Fat: 2g | Trans Fat: 1g | Cholesterol: 164mg | Sodium: 62mg | Potassium: 61mg | Sugar: 1g | Vitamin A: 238IU | Calcium: 25mg | Iron: 1mg