

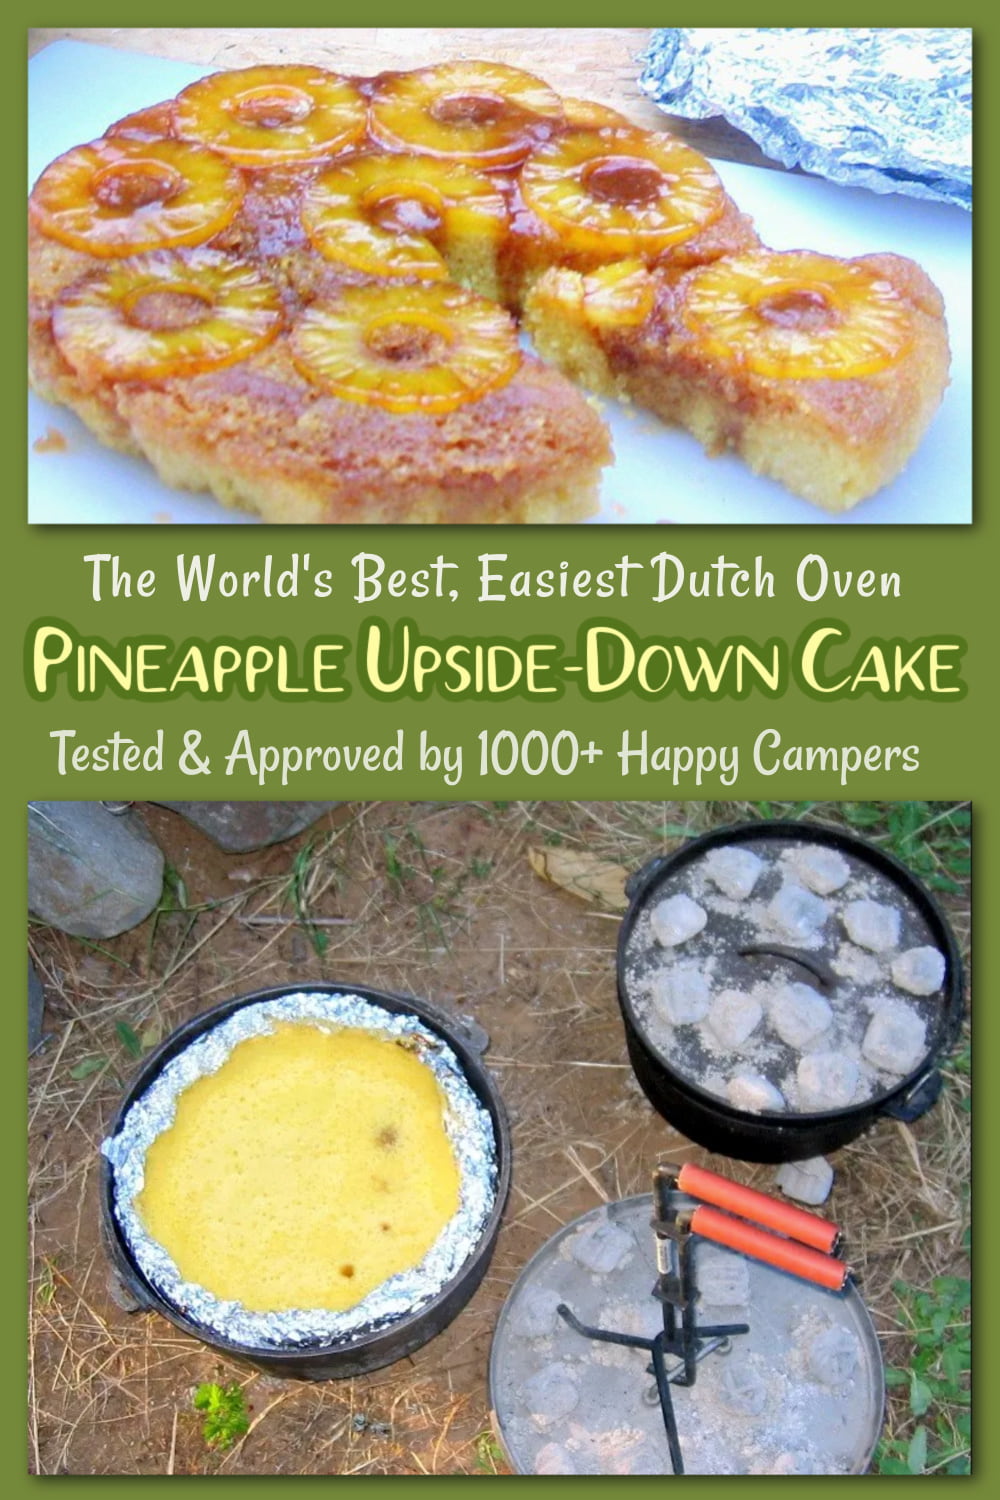
This Dutch Oven Pineapple Upside-Down Cake is a longtime camping favorite - simple, reliable, and baked right over the coals with a buttery caramel finish.
Jump to:
- Why You'll Love This Cake
- The Story Behind This Recipe
- What Makes Dutch Oven Baking Different?
- Essential Equipment for Dutch Oven Cooking
- Ingredients You'll Need
- How to Make Pineapple Upside-Down Cake in a Dutch Oven
- Dutch Oven Temperature Guide
- Tips for the Best Pineapple Upside-Down Cake
- Can You Make This in a Regular Oven?
- Troubleshooting
- Storage & Leftovers
- Make It Your Own
- More Easy Camping Recipes
- Dutch Oven Pineapple Upside-Down Cake
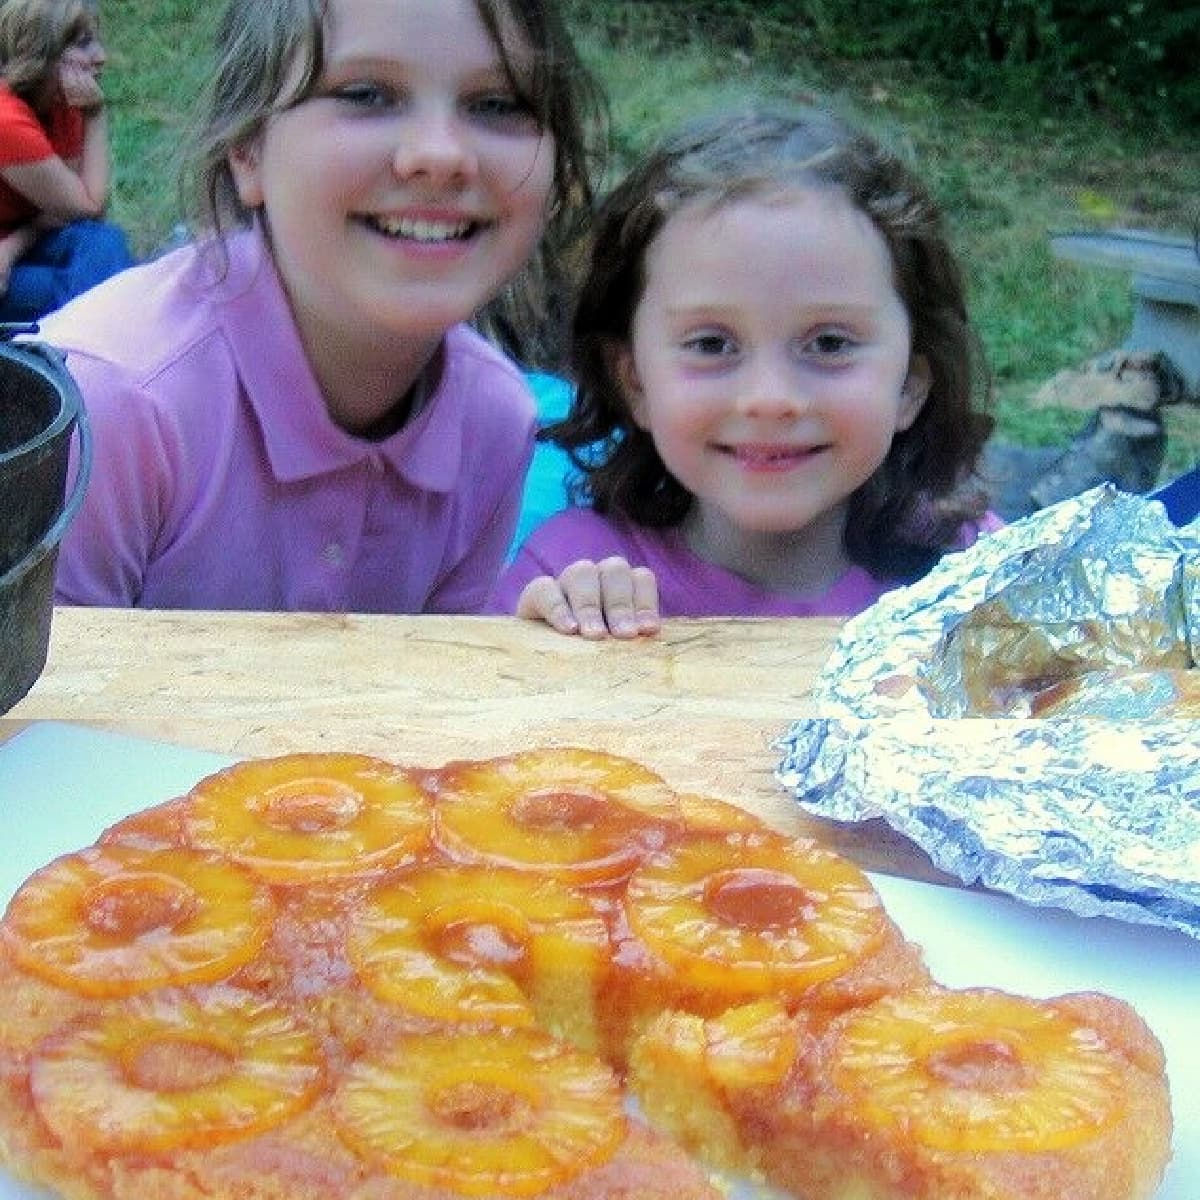
Whenever we go camping, there's always a moment in the evening, after the dinner plates are empty and the fire begins to settle, when someone asks, "When are you making the cake?"
Not if, but when.
This Dutch oven pineapple upside-down cake has been showing up at campfires since I was a child. My kids expect it. Their friends expect it. A decades-long procession of campers and counselors-in-training have come to expect it...and I love all of that.
This is one recipe I never tire of making. It's easy, it's dependable, and it never fails to get that quiet, appreciative "whoa" when I flip it out.
Why You'll Love This Cake
- It's about as close to foolproof as campfire baking gets
- Uses a simple boxed cake mix (no hauling half your pantry into the woods)
- Bakes beautifully over charcoal or campfire coals
- Feeds a group without much fuss
- That caramelized pineapple top never stops feeling a little magical
The Story Behind This Recipe
By conservative estimates, I've probably taught over a thousand people how to make this cake.
Teenagers, kids, adults who claimed they couldn't cook - give me a Dutch oven and a bag of charcoal, and we'll fix that. Somewhere along the way, this cake became the thing I make when I'm feeding a crowd outside. It's reliable. It's forgiving. And it turns a handful of basic ingredients into something that feels like more than it should.
Also, cooking dessert over a fire makes people pay attention: they can feel something special and delicious about to happen.
What Makes Dutch Oven Baking Different?
A Dutch oven isn't just a pot with a lid.
Once you set it up with coals on top and underneath, it becomes a little oven you can carry with you. Heat comes from all sides, not just the bottom. That's the trick.
When you're baking, most of your heat should come from the top. That's what gives you an even bake instead of a burned bottom and a raw middle.
It takes a little practice, but once you get a feel for it, you can regulate the temperature of your Dutch oven just as you do your home oven.
Essential Equipment for Dutch Oven Cooking
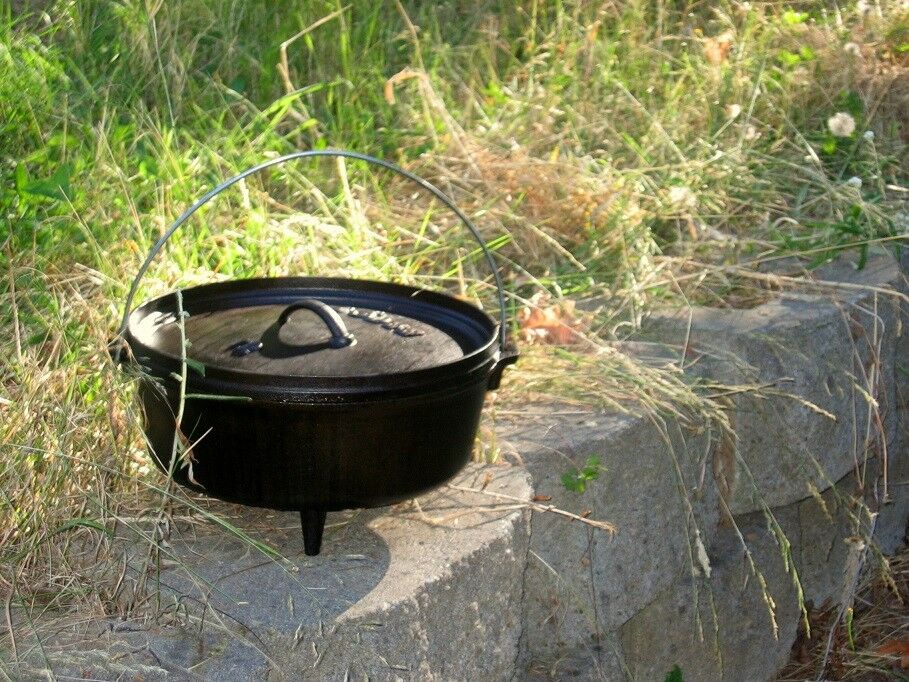
Dutch Oven (What to Look For)
If you're cooking outdoors, you want a Dutch oven with legs and a flat lid with a lip around the edge. The legs lift it above the coals so air can circulate, and the lid holds your top coals in place.
Size-wise, a 10-inch works well for most small groups. If you're feeding a crowd, go bigger.
Unpopular Opinion: At the risk of suffering the wrath of all that is holy in the camping and Dutch oven baking worlds, I have to admit that my favorite Dutch oven for baking is...aluminum. Yep. There, I said it.
Cast iron gives you that deep sear and heat retention, but aluminum is much lighter to tote, and a little easier to control, too. Especially when you're juggling dessert after a long day outside.
Lid Lifter (or a Simple Hack)
A lid lifter keeps things steady and keeps ash out of your food. If you don't have one, a claw hammer works surprisingly well.
Heat Resistant Gloves
Because fire is hot.
Nice-to-Have Extras
Ingredients You'll Need
The ingredients for this recipe are simple.
- Yellow cake mix
- Eggs
- Oil
- Large can of pineapple rings (juice reserved)
- Butter
- Brown sugar
- Water
Optional: maraschino cherries, if you're feeling traditional
How to Make Pineapple Upside-Down Cake in a Dutch Oven
Step 1: Prepare the Coals
Start about 25-30 charcoal briquettes and let them ash over.
For a 10-inch Dutch oven, you're aiming for roughly 14 coals on top and 8 underneath. That gets you close to a 350°F (175°C) bake.
If it's cold or windy, go ahead and light a few extra. You'll probably need them.
Charcoal vs. Campfire Coals (What to Use and Why)
This is one of those choices that feels small until you're halfway through baking and wondering why your cake is taking forever.
Both work. They just behave differently.
Charcoal Briquettes (Steady and Predictable)
If you want consistency, charcoal is your friend.
Briquettes burn at a fairly even rate, and they're easy to count. Once you learn how many you need for your Dutch oven, you can repeat that setup almost anywhere and get the same result. That's a big deal when you're baking.
They also stack neatly on the lid, which helps keep your heat where you want it-especially important for cakes.
If I'm teaching someone for the first time, this is what I hand them. It takes a lot of the guesswork out.
Campfire Coals (Rustic and a Little Unruly)
Coals from a wood fire will absolutely get the job done. In fact, that's how this was done long before bags of charcoal showed up at the grocery store.
But they're less predictable.
Different woods burn at different temperatures. Coals can be uneven in size. Heat tends to shift more, and you'll need to pay closer attention as things bake. You might find yourself rotating the oven or swapping coals around to keep things even.
That said, there's something satisfying about pulling it off with nothing but the fire you built yourself. The flavor doesn't really change much for a cake like this-but the experience does.
So Which Should You Use?
If you want easy and reliable, go with charcoal. If you're comfortable managing a fire and don't mind adjusting as you go, campfire coals work just fine.
And if you're somewhere in the middle, you can always use both - start with charcoal for steady heat, then supplement with fire coals as needed.
No matter which way you go, the goal is the same: steady heat, mostly from above, and just enough patience to let the cake do its thing.
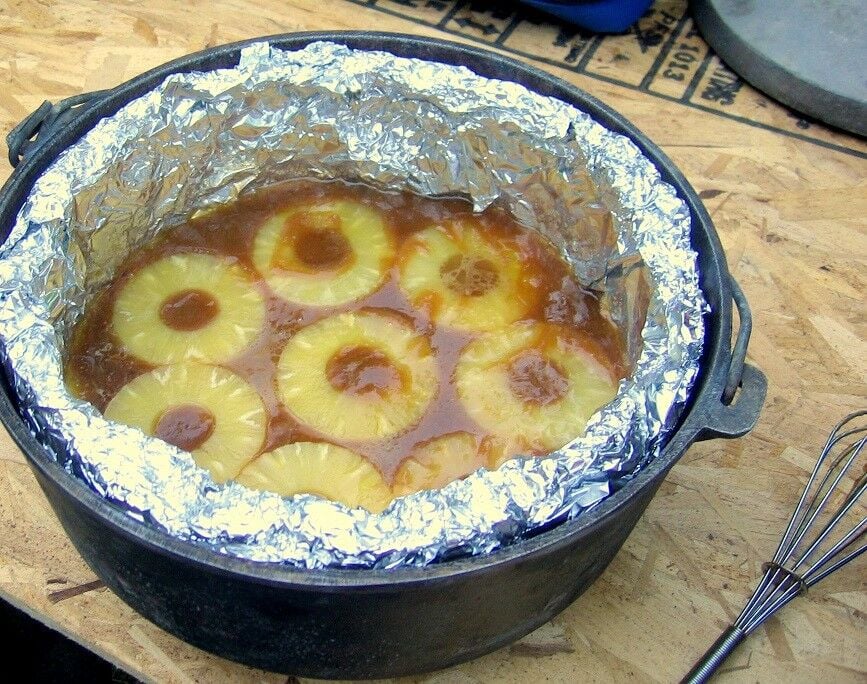
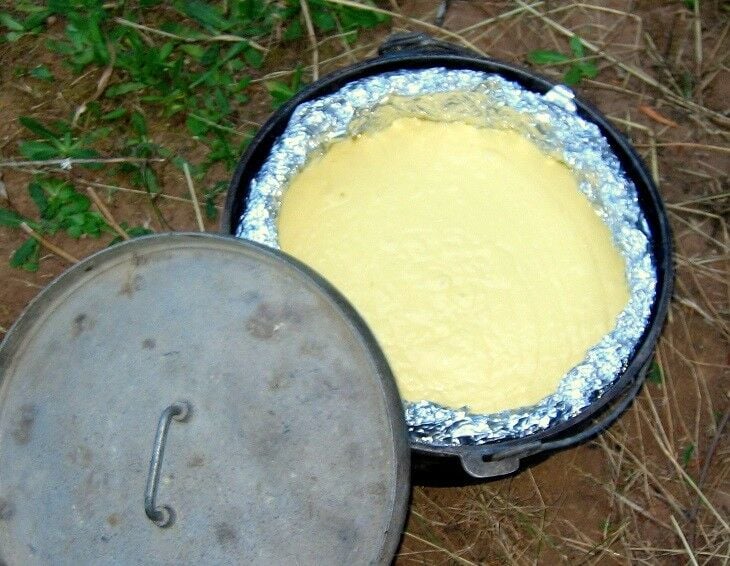
Step 2: Line the Dutch Oven
Double-line your Dutch oven with extra-wide aluminum foil.
Note: For this cake,we do not recommend using Dutch oven liners. They require the cake to drop too far when it is flipped, and this can end in disaster.
Step 3: Prep the Caramel
Melt one stick of butter in the foil-lined Dutch oven, either by sitting it over coals or on top of a camp stove. (If you put it on a camp stove, watch carefully where you place the legs of the Dutch oven.)
Use a wooden spoon to stir to avoid piercing a hole in the foil lining.
Stir in the brown sugar until it melts into a thick, smooth mixture. It should look glossy, not grainy. Remove the Dutch oven from the heat.
Arrange the pineapple rings over the top. Set aside the juice: you'll use it in the batter.
PRO TIP: If you are using a 10-inch Dutch oven, you will have one extra ring of pineapple. Give the extra pineapple slice to your favorite child.
Step 4: Mix the Cake Batter
In a bowl, mix the cake batter according to the package directions - but use the reserved pineapple juice instead of water. (If you come up a little short, just add enough water to make up the difference.)
Pour the batter gently over the pineapple layer.
TIP: I always use the pineapple can to measure the liquid - one less dish to wash.
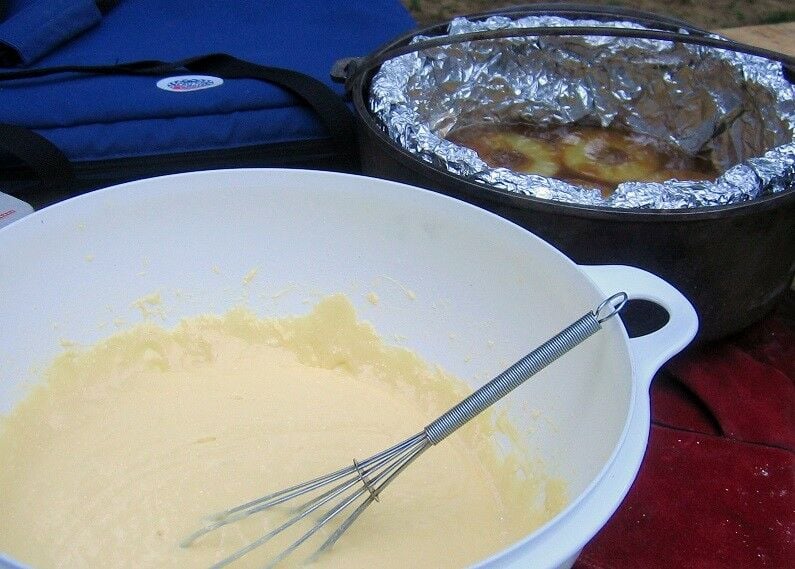
Carefully pour the cake batter over the pineapple and brown sugar mix in the Dutch oven. Pour gently to avoid disrupting the pineapples and brown sugar too much.
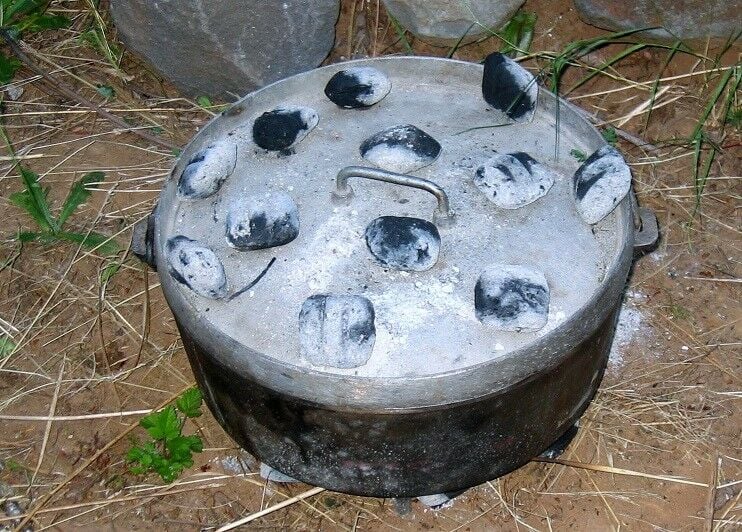
Step 5: Bake the Cake
Put the lid on the Dutch oven, and use a pair of long tongs to place briquettes on top of your Dutch oven. (On a calm, temperate day, you'll need about 14 coals on top and 8 underneath for a 350°F (175°C) bake in a 10-inch Dutch oven.
For more about how to regulate the temperature inside your Dutch oven, see the Dutch Oven Temperature Guide below.
Let the cake bake for about 30-40 minutes. Avoid checking it for at least the first 20 minutes: every peek lets heat escape, and it adds up.
You'll usually smell it before it's ready. That's your cue to take a look. The cake is done when the top feels set and springs back lightly.
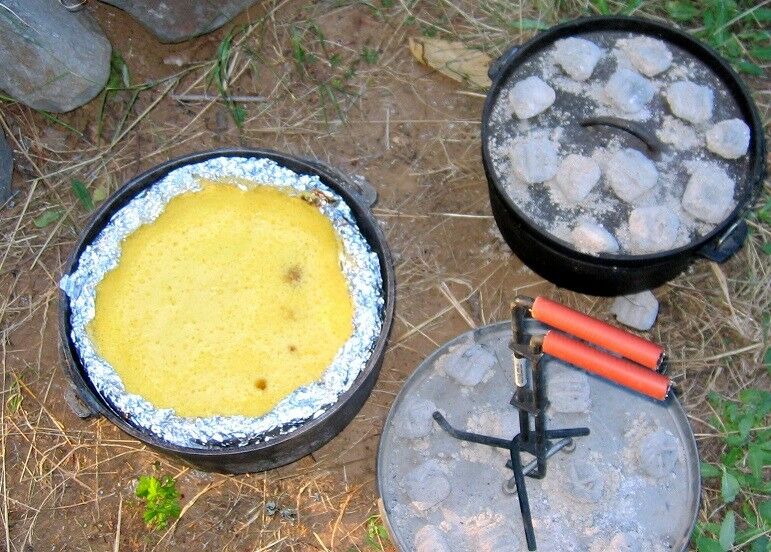
Step 6: Flip the Cake
Flipping the cake is the tricky, magical part.
DO NOT WAIT until the cake cools or the magic won't work! Do this step immediately after removing the Dutch oven from the coals.
→ The next step involves some HOT WORK! Protect your hands, and any other body parts you're concerned about.
With two hands and heat-resistant gloves or potholders, use the edges of the aluminum liner to carefully lift the cake out of the Dutch oven. Mr B and I often do this together so that we can lift the cake evenly from four points.

Set the cake, in the foil liner, on the first big flat thing.
You now need another big flat thing to put on top. For this, I usually cover my camp cutting mat with foil, because this second surface is ultimately what your cake will be served from.
Roll the sides of the aluminum liner down until it is even with the top/bottom of the cake.
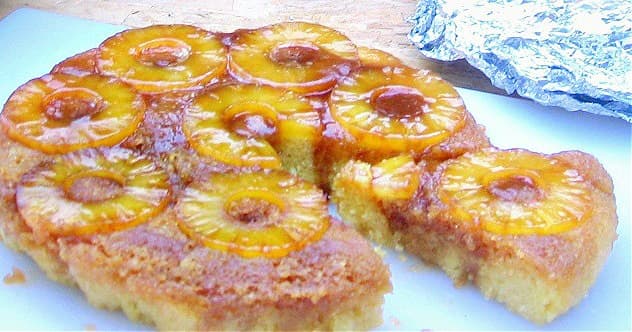
Now, gather all the kiddos around, because this part is usually pretty impressive.
Peel back the edges of the foil from the cake sides, but leave the bottom alone. Set the second big flat thing gently on top of the cake.
Put one hand underneath and one hand on top.
Say "1-2-3" and flip the cake in one smooth, fluid motion. (Flourish is optional.) Carefully peel away the foil from the now top, stand back, and enjoy the appreciative "oohs" and "aawws."
Dutch Oven Temperature Guide
~350°F (175°C) = 12-14 briquettes on top + 7-9 underneath (10-inch footed Dutch oven)
Like your oven at home, you can regulate the temperature of a Dutch oven by carefully counting the number of charcoal briquettes you use.
On calm, moderately warm day with little or no wind, I use 12-14 briquettes on top and 7-9 on the bottom for my 10-inch Dutch oven. Add briquettes as needed if the weather is colder. (Once you get to know your Dutch oven, regulating the heat will become easier and easier.)
If there is a lot of wind blowing directly on your Dutch oven, the coals will burn down faster. (This happens frequently when baking a cake on the beach. Been there; done that.) In this case, you may want to start a few extra coals about 10 or 15 minutes into the baking process so that you have some to swap out for the spent ones.
Tips for the Best Pineapple Upside-Down Cake
A few small things make this go smoothly.
Don't rush the coals
If they aren't fully ashed over, your heat will be uneven from the start.
Keep most of the heat on top
This surprises people at first. But baking in a Dutch oven works more like a real oven when the heat comes from above.
Trust your nose
You'll smell the cake before it's ready. That's usually when I check it the first time.
Flip it while it's still hot
This is the one rule you don't want to break. Wait too long and the caramel sets up, and suddenly you're negotiating with gravity.
Wind changes everything
A breezy beach or open campsite will burn through coals faster than you think. I almost always start a second batch about halfway through.
Can You Make This in a Regular Oven?
You can.
Prepare everything the same way, then bake it in a 350°F (175°C) oven according to the cake mix directions.
That said, I almost never do. I only make this when we have a campfire: that's one of the things that makes it special.
Troubleshooting
Cake stuck to the foil
It probably sat too long before flipping. Next time, flip right away.
Bottom too dark
Too many coals underneath. Shift more heat to the top.
Center undercooked
Heat dropped too soon; add fresh coals earlier next time.
Storage & Leftovers
This cake is best warm, right after flipping. If you do have leftovers, cover them and keep for a day or three.
Make It Your Own
- Add cherries in the center of the pineapple rings
- Use crushed pineapple for a more rustic top
- Swap in spice cake mix for something a little deeper
More Easy Camping Recipes
If you're already cooking over coals, make a night of it! Our favorite camping dinner, by far, is Foil Stew (i.e., foil packet dinners) followed by this cake for dessert. Life really doesn't get any better.

Dutch Oven Pineapple Upside-Down Cake
Equipment
- 24-35 Briquettes
- 1 Pair Heat Resistant Gloves
Ingredients
For one 10-12 inch Pineapple Upside Down Cake, you will need:
- ½ cup butter
- 2 cups brown sugar
- 20 ounces pineapple slices (1 large can) reserve juice
- 1 box Yellow Cake Mix
- 3 large Eggs or as cake mix requires.
- ½ cup Vegetable Oil or as cake mix requires.
- Water see directions for amount
Instructions
- Prepare 25-30 charcoal briquettes and let them ash over.
- Line a 10-inch Dutch oven with heavy-duty foil, shaping it to fit smoothly.
- Melt butter in the Dutch oven. Stir in brown sugar until smooth and glossy.Arrange pineapple rings evenly over the sugar mixture. Reserve the juice.
- In a bowl, mix cake batter using eggs and oil as directed, replacing water with reserved pineapple juice (add water if needed).Pour batter gently over the pineapple layer.
- Cover and bake with about 14 coals on top and 8 underneath for 30-40 minutes.Avoid opening the lid for at least 20 minutes. Cake is done when set and springy.
- Remove from heat and immediately lift out using the foil liner.Flip onto a flat surface, peel back foil, and serve warm.
Notes
- Use pineapple juice instead of water for better flavor
- Keep most of the heat on top for even baking
- Flip the cake while it's still hot so it releases cleanly
- Start extra coals if it's windy or cold
- Don't stress - this recipe is very forgiving
Nutrition
This website provides approximate nutrition information for convenience and as a courtesy only. You are solely responsible for ensuring that any nutritional information provided is accurate, complete, and useful.
Love it? Pin it!

Rochelle says
My teenage son has made this cake a few times already at his boy scout camp weekends and it ALWAYS delivers! Such an easy and tasty recipe, especially delicious on a cold camp night. The pineapples help the cake cook without burning the bottom. We follow the recipe instructions as is, no changes. Thanks for an amazing camp dessert recipe!
Renée B. says
That’s so wonderful to hear! It makes me so happy to know that this cake has become a camp tradition for your son and his troop. A warm, homemade dessert enjoyed under the stars is a memory to treasure.Thanks so much for sharing your experience, and happy camping! ⛺🔥🍰
Robert Reeder says
Thanks have made a few love them but i have a problem not getting the cake cooked completely but i think my messup is i use moist cake mix
Renée says
You may just need to add a couple of coals on the top, or let it cook a little longer. We've never had a problem using "moist" cake mixes.
The cake should spring back to a gentle touch before you remove it from the coals/heat.
Jeff says
I tried this with 2 boxes of Jiffy Cornbread Mix. I forgot the Cake mix and was planning on cooking Cornbread anyway. Was in my mind a grim failure. While everything proceeded pretty much as has been described here the syrup mix was too much and turned the cornbread into a coarse syrupy mixture with albeit a cornbread crust. One other notable point I was camping at 12,000 ft in Colorado. Haven't tried Upside down cake in a dutch oven in over 25 years. Was supposedly what sealed the deal when I proposed to my wife.
Renée says
That is definitely a different twist, Jeff! I'm glad the cake worked out way back when. Thanks for sharing!
Gary Cole says
I put marichino cherries in the holes of the pineapple rings. It just looks good!
Renée says
Great addition!
Nathan says
This recipe just helped me win a Dutch oven dessert competition! Amazing recipe!!!
Renée ♥ says
Congratulations, Nathan!! I'm so glad it's a winner for you! ?
don nall says
i have thought about using a blueberry cake mix or cinnamon cake mix
Amanda says
Never heard of this before, but it looks so good!
Xx,
Amanda || http://www.fortheloveofglitter.com
Ashleigh says
This cake recipe looks wonderful, thank you for sharing! I can't wait to try it!
Renée ♥ says
Thank you for stopping by, Ashleigh!
Carmen Baguio says
I love using my dutch oven! I will be posting an easy dutch oven peach cobbler recipe tomorrow. I shared and pinned your recipe!
Renée ♥ says
Thanks for sharing, Carmen! I will be sure to return the favor. ?
lesley sullivan says
that looks heavenly! what a great idea. If you don't mind me asking, what plugin do you use for your "sharing is caring" button? Have a great day:)
Renée ♥ says
Thanks, Lesley! I'm always happy to help when I can - I use Shareaholic for everything. The "Sharing is Caring" at the bottom of the post is set up under "Settings→Share Buttons→Post/Below Content→Customize." Hope that helps! .
Joules (from Pocketful of Joules) says
We have a bonfire pit in our backyard and I think I'm going to have to try making this ASAP! YUM!
Renée ♥ says
You definitely should! You are going to love it!!
Laura Kathleen says
This looks like such a fun summer activity! Crazy how many people you've taught how to do this over the years!
Laura | Laura Aime Vous
Sia says
I've honestly never heard of Dutch over maybe because I am not a camping person, but this looks like something that could come in handy. The pineapple cake looks delicious!
Renee says
This is such a fun outdoor camping memory for your children! And Pineapple Upside Down is a favorite of mine 🙂
Lori Lynn says
I would love to try it this weekend while we are camping. Do you think it would be ok to do on an open fire???? I would think as long as it wasn't high flames it would be but really am not sure.
Thanks,'
Lori
Linda says
I just bought a dutch oven and got it in the mail last week. I need to try this recipe with it. Thanks for the idea.
EasterDebi says
Last week, I cooked the cake over a campfire - and it was quite spectacular and delicious. Your instructions are spot-on.
Randy Jones says
The foil liner looks "bulky" as if it's wrapped around a pan (or something). Is that true?
Renée ♥ says
No. The foil is rolled at the top to allow the lid to sit flush. The liner is pressed directly into the Dutch oven. There is no other pan.
Joe says
I love pineapple upside down cake; I always thought it makes a great presentation without the need for frosting or decoration or anything else. I recently saw, but forgot where, a recipe for a large skillet upside down cake with chopped pecans, that I wish I could find and try.(not sure if it was oven or stove top prepared, but whatever the case, the end result appeared a dark golden caramelized and sugar crust on the upside with, interlaced with chopped pecans, that had been ried on medium heat, in butter and rum; to drizzle over the cake, after turning over.
My questions are:
1. when do I turn the cake over: while it's still hot, warm,. or room temp?
2. Are the pineapple rings baked in the brown sugar to lightly brown, before the cake batter is poured onto the pineapple and/or cherry.
I've made the cake a few times,, (not Emeril's}, with hit or miss results, like the pineapple sticking to the bottom of the pan.
Also ,3. which is preferable: cast iron,, stainless steel, or glass?
4. Is the pan supposed to be greased and floured, or is that a ba-a-ad thing?
Foodie Working out the Details
Renée ♥ says
Thanks for your detailed comment, Joe! Most of the answers to your questions can be found in the text:
When to flip the cake: Instruction [9] OK, this is the tricky, magical part. (And do not wait to do it until the cake cools or the magic won't work!) You need to put the cake on a pan or a board or a cutting mat or something big and flat that you can lift easily. Using two hand, carefully lift the cake out of the Dutch oven and set it, in the foil liner, on this first big flat thing. (Be sure to use something to protect your hands - this is hot work!)
Browning Pineapple Rings: Instruction [3] Set the pineapple rings in the bottom of the Dutch oven on top of the brown sugar mixture, reserving pineapple juice. If you are using a 10-inch Dutch oven, you will have one extra ring of pineapple. Give this to your favorite child.
Greasing the Pan: Instruction [2] The pan is greased when you melt the butter in the pan/liner. You can grease it more if you want, but I never do, and I've never had a problem in over 100 cakes.
Lindsay says
I am going to try this with a Gluten Free cake mix while we are camping this week. I can't wait for it!!! 🙂
Renée ♥ says
Let me know how that turns out - I've never tried it with a gluten-free mix.
m e l says
Just found your page and am excited to try this recipe with my girls camp next week. Instead of foil it should be fine to use Dutch oven liners, shouldn't it? I have some of those and hear they are great.
Monica S says
Wondering about this myself!
Renée ♥ says
Dutch oven liners should work fine.
Cookware Jack says
Looks delicious, I must admit that I'm tempted to try it. Just one more reason to love my dutch oven. Is there anything they can't do?
Renée ♥ says
Dutch ovens can do practically anything! The trick is that when the lid is on, you need to always think of it as an Oven and not as a Pot. You can bake bread, pies, casseroles - anything. You can slow-cook, braise, boil - you name it!!
Deanna says
Thanks for your recipe and helpful tips! I remember doing this at an adult training weekend for Girl Scout leaders. Now I will try it with my Junior troop at our camping trip this weekend. Wish me luck!
Renée ♥ says
Good Luck! I just made one on a camping trip last weekend - in the rain and wind and cold. Still turned out fantastic. Yours will too!!
Deanna says
Thanks, that is great to know!
shirley says
can i use a cast iron skillet instead of a dutch oven?
Renée ♥ says
I don't think a skillet will allow for enough headroom above the cake for it to rise properly, and I know it isn't designed to circulate heat the way a dutch oven is; however, if you give it a try, please stop back in and let me know how it turns out.
Jodi says
I have used a cast iron skillet (tall one) to bake this cake for years and it works well in the oven at home. I am sure it can be used as is and baked in a skillet-no foil needed.
Renée ♥ says
Absolutely. I don't see a problem with that at all. I just prefer the foil because it makes flipping and removing in a large dutch oven much easier. Also, clean-up 🙂
Sharon says
Yes, you can do it in a cast iron skillet - I've done it many times on the grill, with the lid closed. It's a very forgiving recipe.
katbiggie says
Oh that looks amazing! Stopping by from SITSSummer and now I'm following!
Renée ♥ says
Thank you for checking out my blog!!
Kristen says
if you weren't camping, what temp would this be baked at and for how long? I dislike anything to do with camping....
Renée ♥ says
Probably at about 350 for 30-40 minutes.
Kristen says
Thanks!