
This Classic Crème Brûlée recipe is smooth, creamy, and topped with a crisp caramelized sugar crust. With just four simple ingredients, it's an elegant yet easy French dessert you can make at home.
Jump to:
- Classic Vanilla Bean Crème Brûlée: Deliciously Simple
- What Is Crème Brûlée? A French Dessert Made Easy
- Ingredients You'll Need
- Equipment You'll Need
- Step-by-Step: How to Make Classic Crème Brûlée
- Tips for Perfect Crème Brûlée
- Troubleshooting Common Issues
- Storage & Make-Ahead Tips
- FAQs About Crème Brûlée
- How to Serve Crème Brûlée
- More Custard Recipes You'll Love
- Classic Vanilla Bean Crème Brûlée
Classic Vanilla Bean Crème Brûlée: Deliciously Simple
Vanilla bean crème brûlée is creamy and light, with just the right amount of sweetness. It's a timeless dessert that feels special and is perfect for celebrating life's little moments.
I've always enjoyed making custards, so crème brûlée shouldn't have ever felt intimidating. But I'll admit - once upon a time, the idea of caramelizing sugar with an open flame sounded more like a dare than a dessert.
As it turns out, the torching is the fun part - and the rest of this French classic is surprisingly simple. With just cream, egg yolks, sugar, and vanilla, you get a custard that's silky and rich, topped with that signature caramelized sugar crust. It's elegant, impressive, and easier to pull off at home than you might think.
What Is Crème Brûlée? A French Dessert Made Easy
Crème brûlée (literally, French for "burnt cream"), is a classic dessert that's been delighting diners for centuries. Its origins are a bit murky - both France and Spain claim early versions - but by the 17th century, it had become a staple in French kitchens and high-end restaurants.
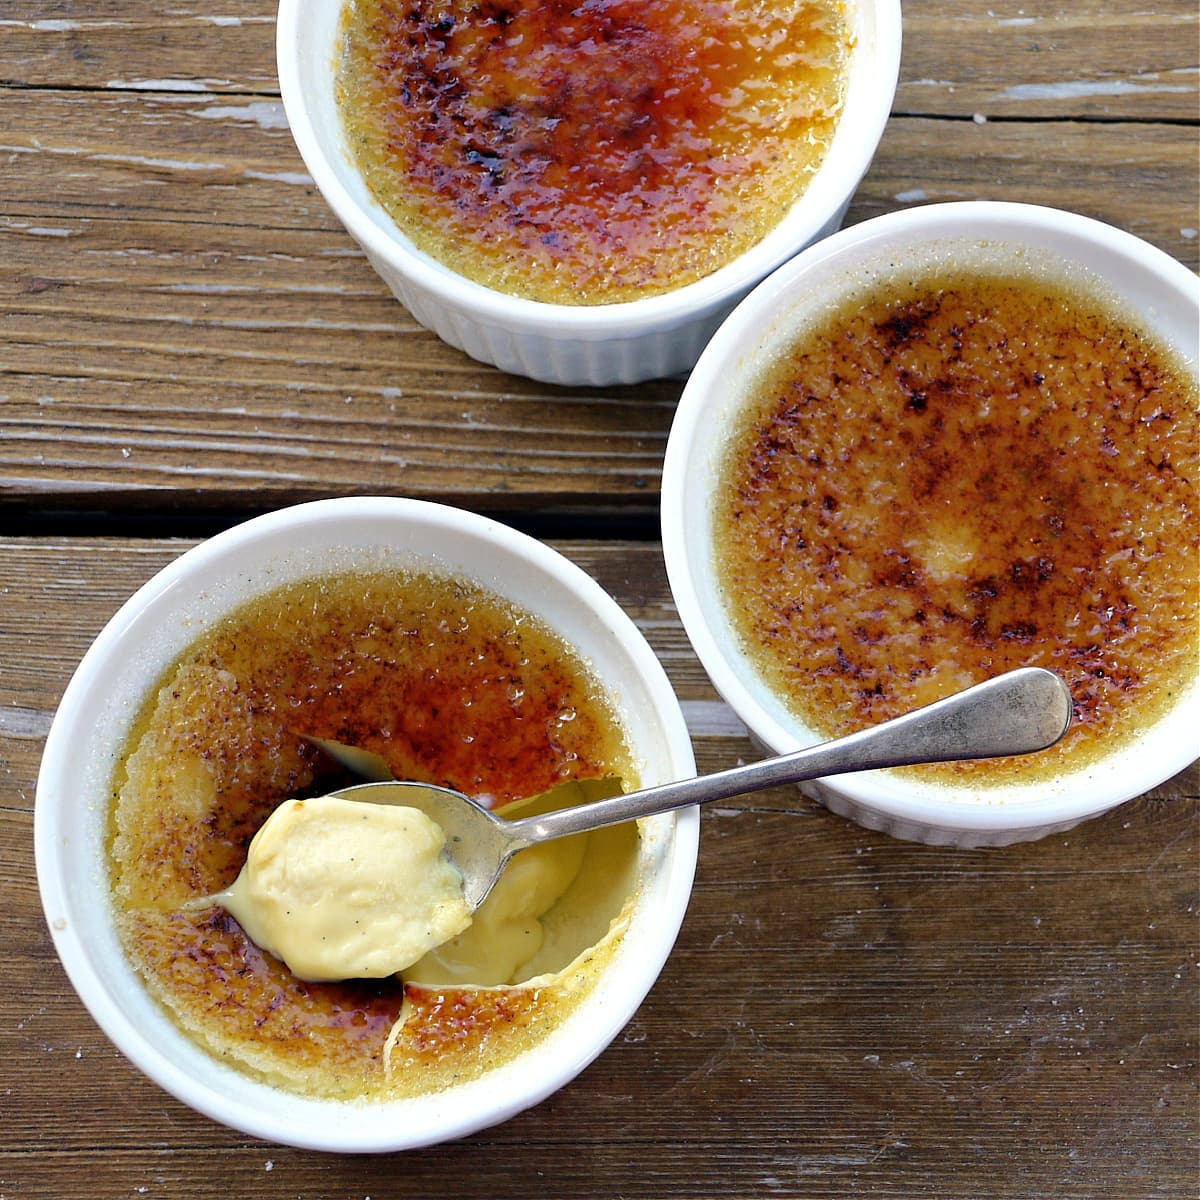
At its core, crème brûlée is a simple custard: rich egg yolks, cream, sugar, and vanilla come together to create a silky, creamy base. What sets it apart is the final flourish - a thin layer of golden caramelized sugar on top. It's the crack of that crust we all remember, right before the first velvety bite. Heaven.
This combination of smooth custard and crunchy caramel is part of why crème brûlée is so beloved. Elegant yet approachable, it's a dessert that can elevate any meal, whether you're celebrating a holiday, a dinner party, or just treating yourself to something special at home.
Why You'll Love This Recipe
- Only 4 simple ingredients.
- Make-ahead friendly.
- Easy to pull off at home.
- Perfect for impressing guests or enjoying quietly.
- Vanilla bean adds authentic flavor and those signature flecks; vanilla extract works as a convenient substitute.
Ingredients You'll Need
Crème Brûlée requires just four simple (but non-negotiable) ingredients: heavy cream, egg yolks, sugar, and vanilla.
- Heavy cream: We find that the results are better when using heavy whipping cream, versus regular whipping cream. (Heavy cream is higher in fat.)
- Egg yolks: Use large egg yolks. If you are using different size eggs, you need about ½ cup of egg yolks total.
- Sugar: Use granulated white sugar. Castor sugar will also work.
- Vanilla: We usually use a vanilla bean as detailed in this recipe; however, you can substitute vanilla extract; or better yet, vanilla bean paste.
Equipment You'll Need
To make creme brulee at home, you will probably want to use a culinary torch. But is it worth it? We think so!
A kitchen torch is a useful, versatile tool, and quite handy for many things besides melting sugar on top of custard. You can use a torch to brown to top of casseroles and meringues, roast peppers and tomatoes, finish French onion soup, and even toast marshmallows!
Step-by-Step: How to Make Classic Crème Brûlée
Preheat oven to 310°F (155°C).
1. Prepare the Vanilla Cream
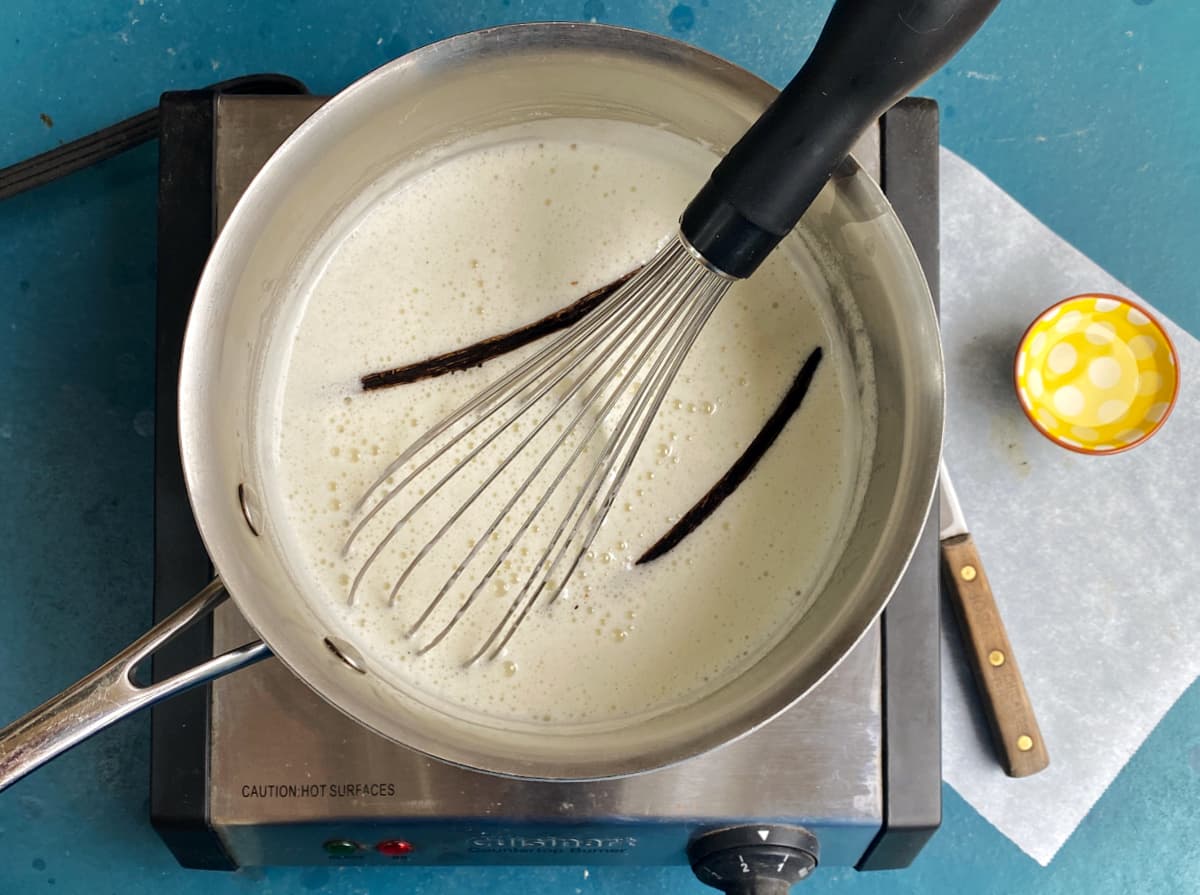
In a small saucepan, whisk (almost) constantly and bring cream to barely a simmer over medium-high heat. Remove from heat immediately when you begin to see bubbles forming around the sides of the pan.
Cut the vanilla bean in half lengthwise and scrape the seeds.
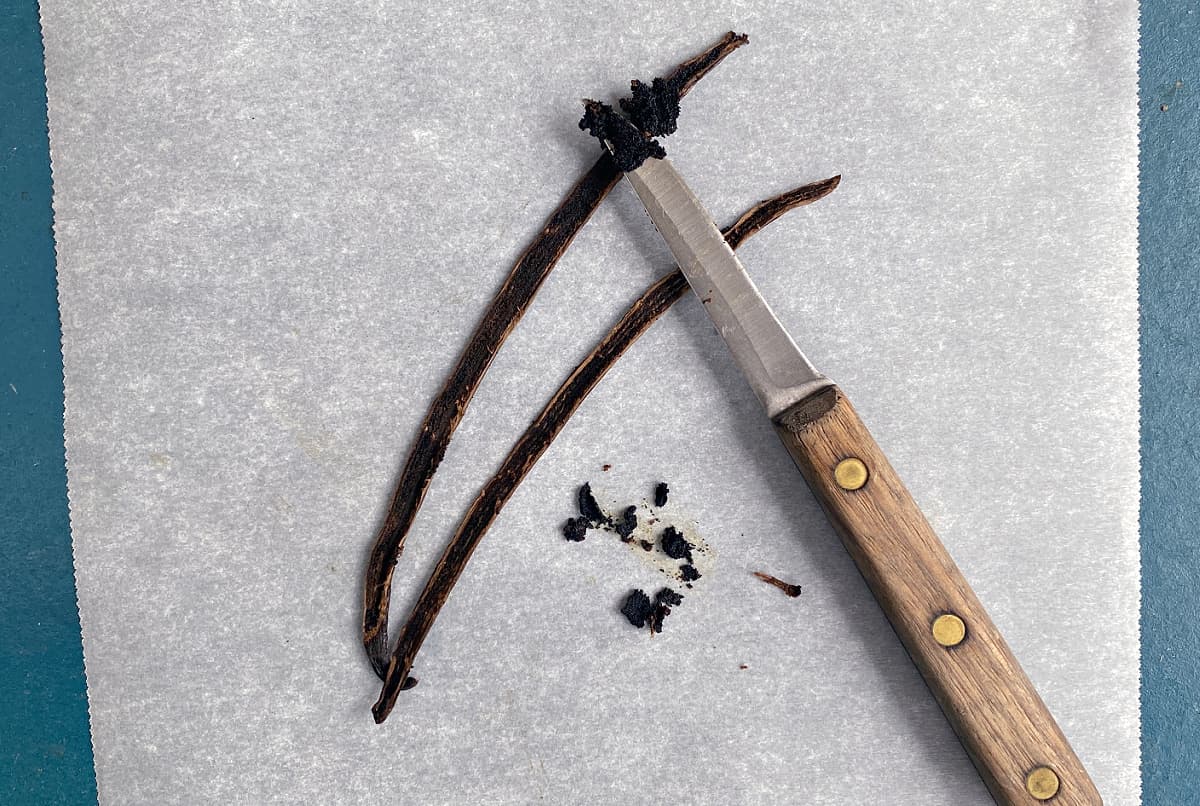
Whisk the vanilla bean seeds and vanilla shell to the warm cream. Let vanilla beans stand in cream for 30 minutes.
2. Make the Custard
Bring a teakettle or large saucepan of water to a boil.
Combine egg yolks and sugar in a bowl and beat until pale yellow and thick. Pour the vanilla and cream mixture into the egg mixture and whisk thoroughly to combine.
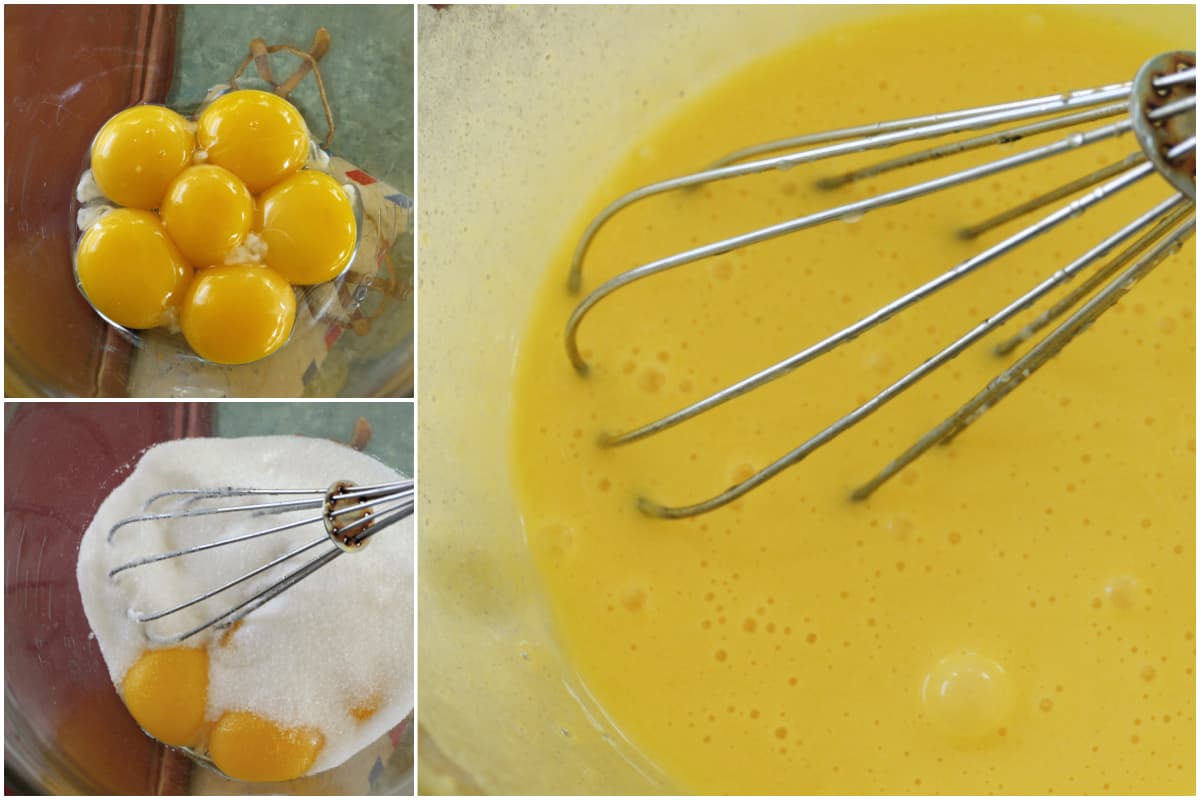
Place a fine mesh sieve over a bowl and strain the custard mixture. (I do this twice.)
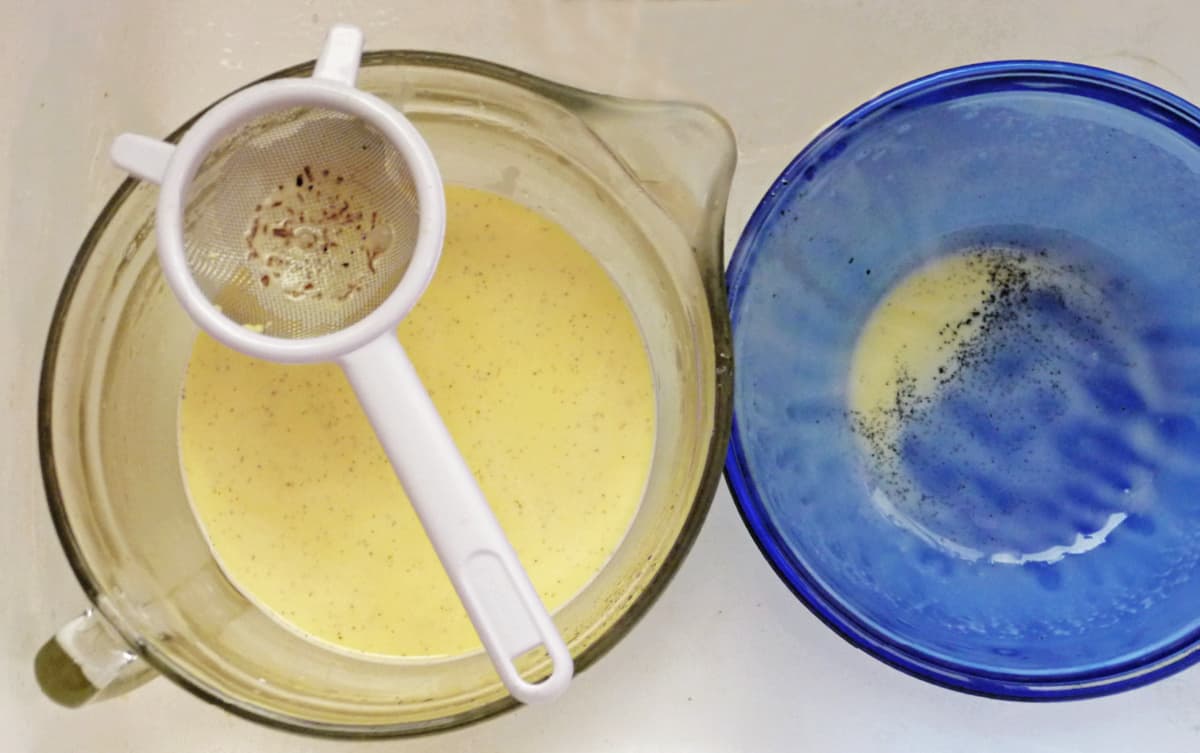
Blend strained mixture with a whisk one more time. (There will still be tiny vanilla seeds in the mixture. They are supposed to be there.)
3. Bake in a Water Bath
Place a paper towel on the bottom of a large baking pan. This keeps the ramekins from slipping. The pan needs to be large enough to hold four 6-ounce ramekins.
Set the ramekins on the paper towel. Fill each ramekin with equal amounts of the custard mixture.
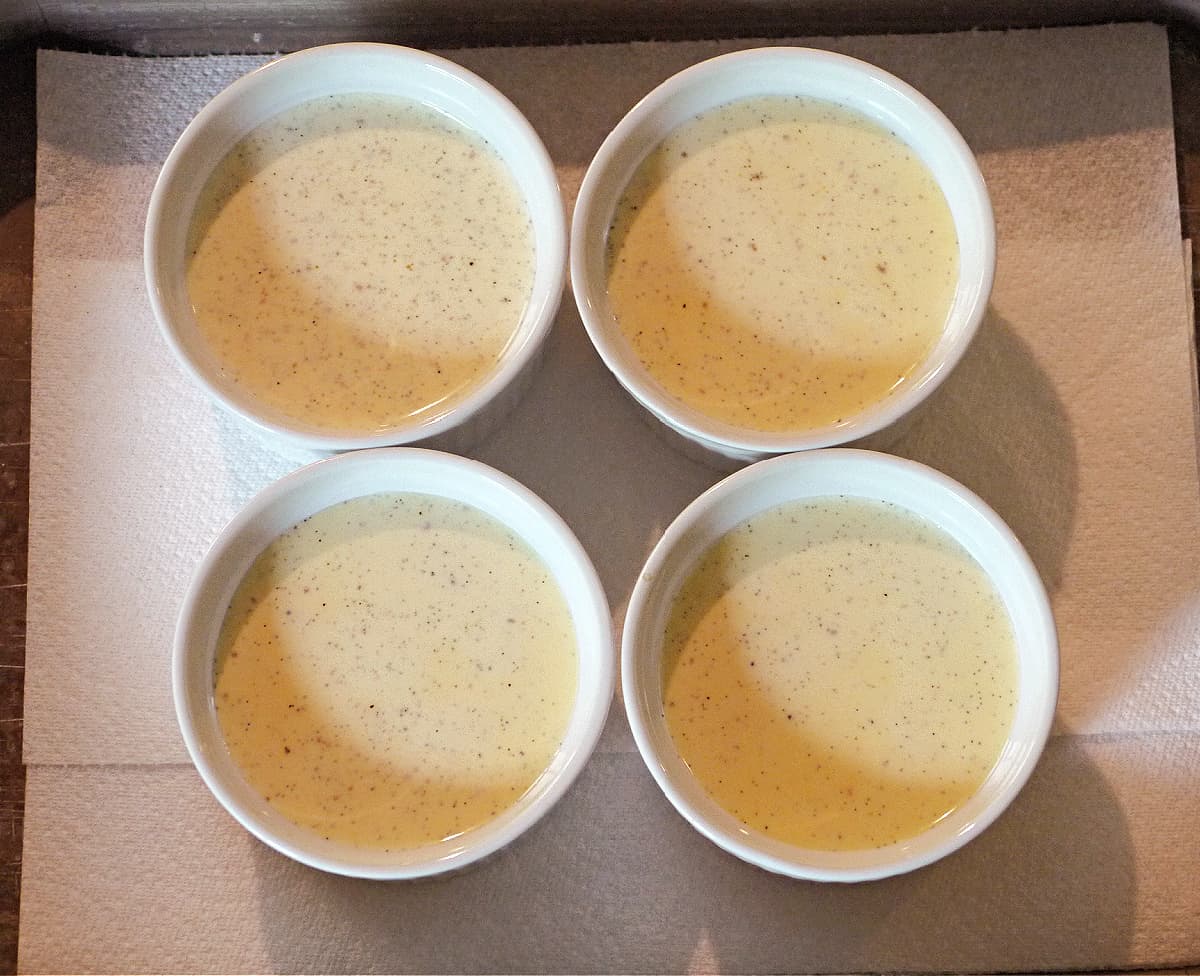
Carefully place the pan on the oven rack, and then pour about one inch of very hot tap water into the pan around the ramekins. The water should come about halfway up sides of the ramekins, but no more. Avoid splashing or sloshing water into the custard mixture at all costs.
Bake 25-35 minutes, depending on the depth of your ramekins. Custards should appear set around the edges but slightly loose in the center.
Turn off the oven, crack open the oven door, and allow custard to cool in the pan for 15 minutes.
4. Chill
Transfer ramekins to a wire rack and cool to room temperature. Place in the refrigerator for 2 hours to chill completely.
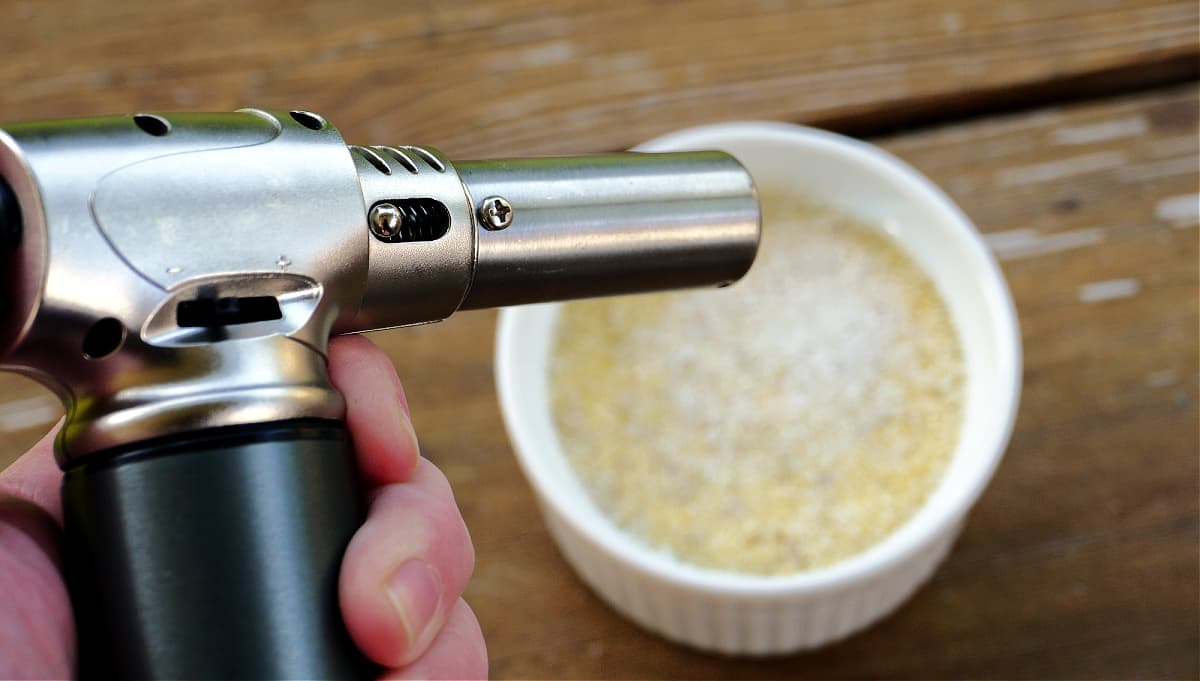
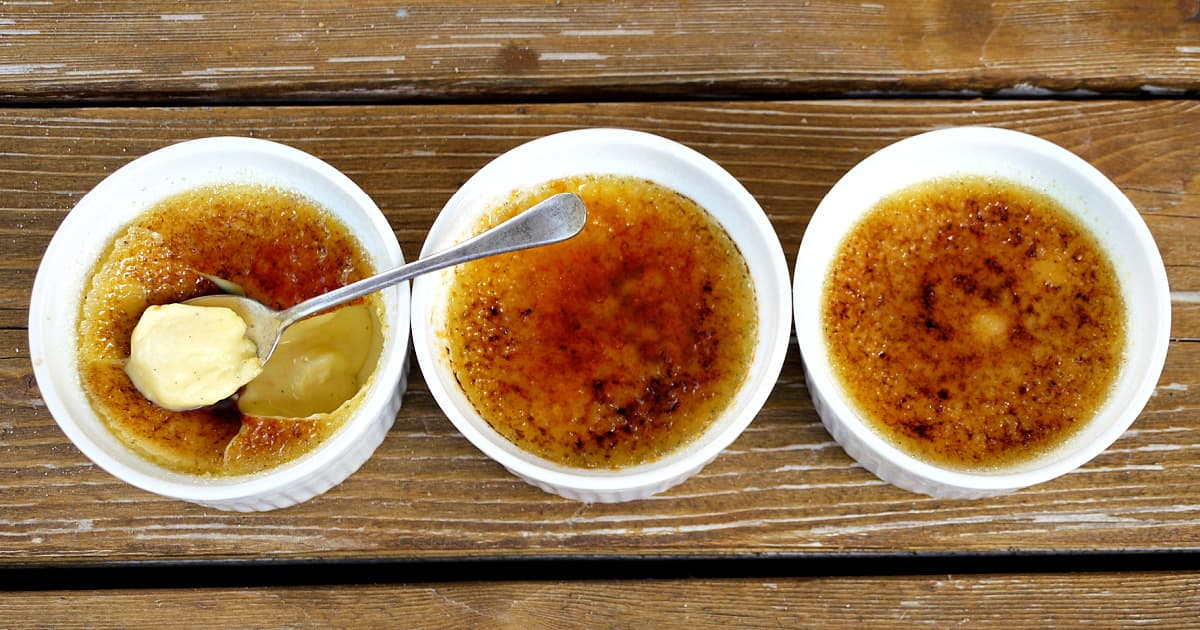
5. Caramelize the Sugar (Torch the Top!)
When custards are completely cool, sprinkle the top evenly with granulated sugar.
In my experience, distributing the sugar one thin layer at a time will yield better results than putting it all on at once.
Sprinkle a small amount of sugar on the top. It will stick to the moisture in the custard. Carefully shake off any excess sugar so there is just a thin layer on top.
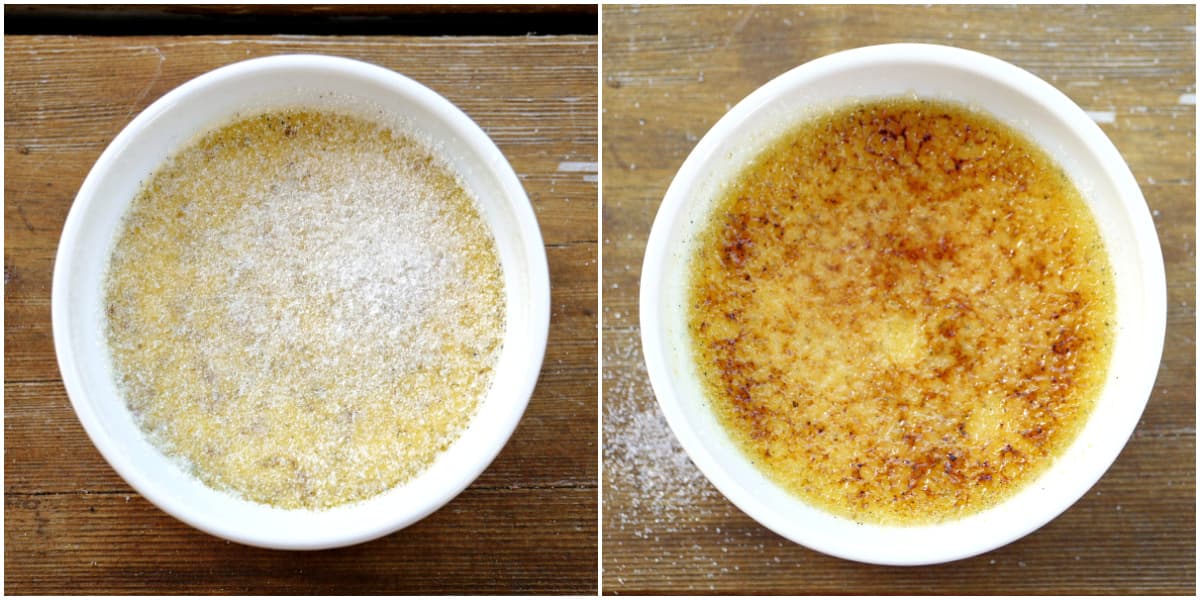
Using a kitchen torch, carefully brown the top to caramelize the sugar. Keep the torch constantly moving to avoid scorching or burning sugar.
Add a second layer of sugar, shake off the excess, and caramelize with the torch.
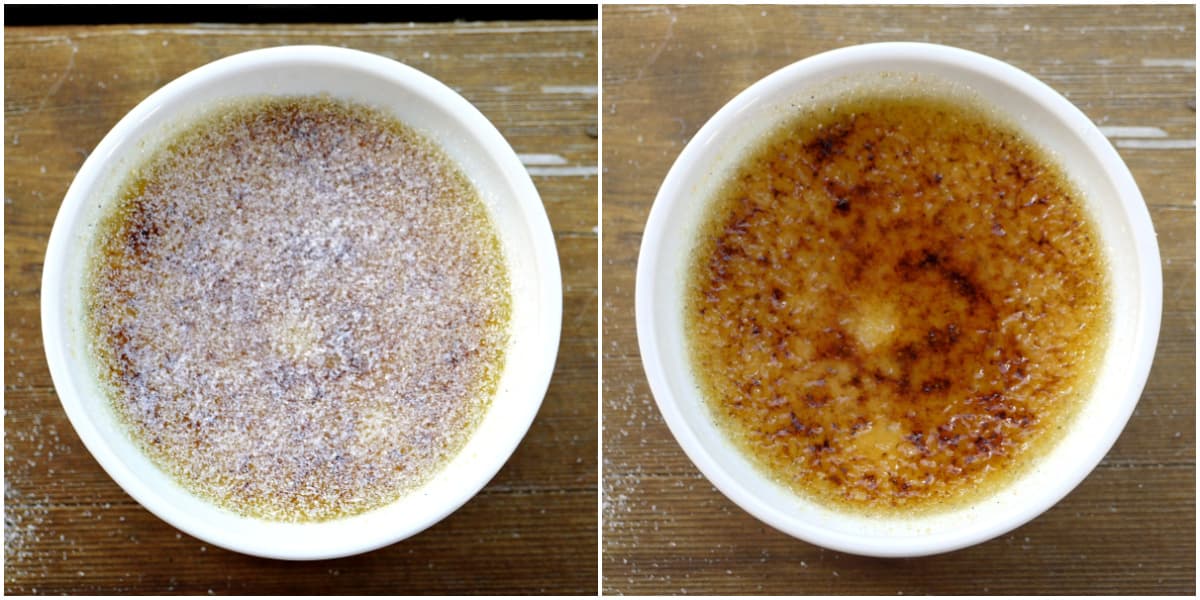
Repeat with additional layers of sugar until you achieve the results you want.
Serve immediately.
Tips for Perfect Crème Brûlée
- Use the right ramekins - Shallow for even baking.
- Strain custard - For silky texture; tiny vanilla specks are fine.
- Temper eggs carefully - Pour cream slowly to avoid curdling.
- Chill fully before torching - Prevents sugar melting into custard.
- Torch sugar in thin layers - Steady motion, repeat if needed.
- Optional flavor tweaks - Citrus zest, espresso, or liqueur (lightly).
Troubleshooting Common Issues
| Problem | Cause | Quick Fix |
|---|---|---|
| Custard is grainy or curdy | Eggs scrambled; cream too hot | Temper eggs by adding warm cream slowly while whisking; strain custard before baking |
| Custard won’t set | Ramekins too deep, baking time too short, or water bath too shallow | Use shallow ramekins, bake until edges set, ensure water bath comes halfway up sides |
| Sugar top won’t caramelize | Custard not chilled, sugar layer too thick | Chill custard at least 2 hours; sprinkle thin, even sugar layers; torch steadily |
| Sugar crust melts too quickly | Custard still warm, uneven sugar | Fully chill custard; apply thin sugar layers; shake off excess before torching |
| Custard cracks or overcooks | Oven too hot, no water bath | Bake at 310°F (155°C) in a water bath; cool gently before removing ramekins |
| Caramelized sugar burns | Torch held in one spot, sugar layer too thick | Keep torch moving; apply multiple thin sugar layers |
| Vanilla flavor too weak | Vanilla extract added too early or beans not steeped enough | Steep vanilla beans 30+ min; add extract after heating cream |
| Crust soggy after storage | Sugar added too early, custard not chilled | Store custard chilled; sprinkle sugar and torch just before serving |
💡 Pro Tip: Gentle handling, full chilling, and thin sugar layers solve most problems.
Storage & Make-Ahead Tips
This crème brûlée recipe should be made at least 4 hours ahead of time, and can be baked up to two days ahead of time. If you make it ahead, do not torch it after it cools; just cover and refrigerate, then sugar and torch it right before serving. This will keep the top crisp.
FAQs About Crème Brûlée
A kitchen torch is the best tool for the job; however, you can caramelize sugar under a preheated broiler. Watch closely; sugar can burn in seconds.
Bake up to 2 days ahead. Refrigerate and torch sugar just before serving.
Sprinkle sugar in thin, even layers, chill the custard completely, and keep the torch moving in small circles. Repeat thin layers if needed for a glossy, crisp top.
Overbaking, hot oven, or shallow water bath. Bake gently at 310°F (155°C) in a water bath.
How to Serve Crème Brûlée
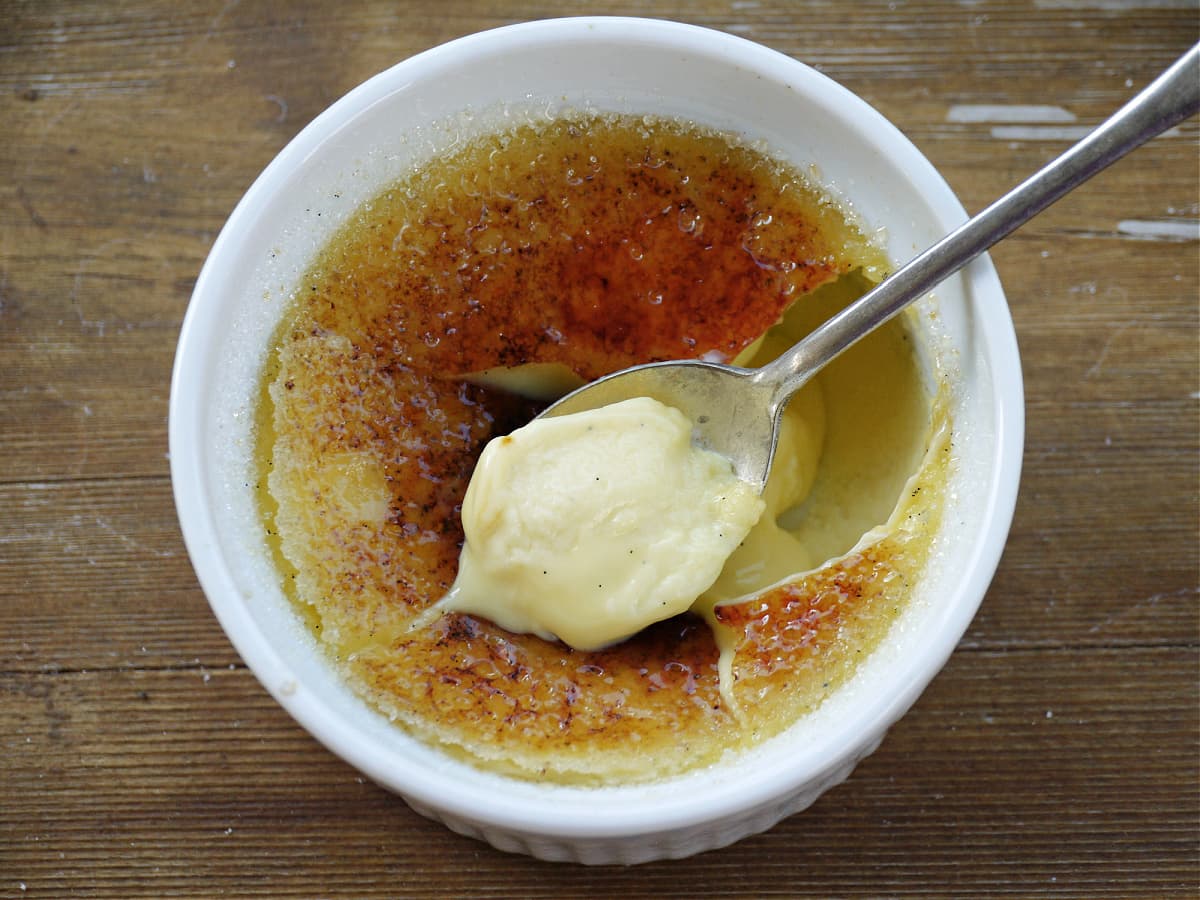
Serve creme brûlée chilled, with a small dessert spoon. Traditionally, a firm crack of the spoon is used break the caramel crust, which makes a deliciously memorable sound.
- Optional garnishes: fresh berries, mint, or light powdered sugar. (We especially enjoy it with raspberries!)
- Pair with dessert wine, champagne, or coffee.
- Perfect for dinner parties, birthdays, romantic evenings, holidays, or celebrating small victories.
More Custard Recipes You'll Love
If you enjoy classic crème brûlée, you'll love these other custard-based desserts:
- Classic Flan - Smooth, caramel-topped custard that's perfect for any occasion.
- Fresh Peach Custard Tart - Buttery tart crust filled with silky custard and fresh, juicy peaches - a delightful summer dessert.
- Classic Cherry Clafoutis - Light, custardy French dessert baked with tart cherries, perfect as an elegant classic dessert.
- Easy Coconut Cream Pudding Shots - Creamy coconut custard in individual servings, an easy and fun custard dessert for parties or gatherings.
- Homemade Vanilla Ice Cream - Rich, creamy custard-based vanilla ice cream made from scratch, a classic dessert you'll love.

Classic Vanilla Bean Crème Brûlée
Equipment
Ingredients
- 2 cups heavy cream
- 1 whole vanilla bean
- 6 large egg yolks
- ½ cup sugar plus more for caramelized topping
Instructions
- Preheat oven to 310°F (155°C). Place a kettle of water on to boil.
- Split vanilla bean, scrape seeds, and add both seeds and pod to warmed cream. Let steep 30 minutes.
- Whisk egg yolks and sugar until pale and thick. Slowly add cream mixture, whisking to combine.Strain custard through fine mesh sieve into a bowl.
- Place ramekins in a 9x13 baking dish lined with a towel. Divide custard evenly into ramekins.Pour hot water into the pan until halfway up ramekins.
- Bake 25-35 minutes, until set around edges but slightly jiggly in center.Cool 15 minutes in oven with door ajar, then transfer to wire rack. Chill in the refrigerator for at least 2 hours (and up to 2 days).
- Sprinkle tops with sugar. Using kitchen torch, caramelize in thin layers until golden and crisp.
Notes
- Strain custard twice for silky texture.
- Always torch just before serving for best crunch.
- If using broiler instead of torch, watch carefully-sugar burns fast!
Nutrition
This website provides approximate nutrition information for convenience and as a courtesy only. You are solely responsible for ensuring that any nutritional information provided is accurate, complete, and useful.
Love it? Pin it! 📌

Did you like this recipe? Please leave a star ⭐️⭐️⭐️⭐️⭐️ rating below in the comments section! You can also stay in touch with us by following us on Pinterest, Facebook, and Instagram.

Fabien Berger says
Personally, I order the brand “katbite” aluminum disposable ramekins with lids, from Amazon and I use this recipe. This is legit and easily the best recipe I’ve found! It made the best Crème Brûlée! I have made this for guests and parties multiple times, and everyone loves it. Thanks for sharing!!
Renée B. says
Thank you so much! I’m so glad to know this recipe has become your go-to - and great tip about the Katbite aluminum ramekins with lids, too. So smart for parties!
Caroline says
I cooked literally according to directions. My ramekins were 6oz. I actually got 5 not 4 out of this mixture. My crème brûlée was runny like a watered down milkshake. What did I do wrong??
Renée B. says
Thanks for trying the recipe and for your feedback! If your crème brûlée turned out runny, a few things might have caused it – even if the ingredients and measurements were correct:
Baking Time: The most common reason is underbaking. The custard should be set but still have a very slight jiggle in the center when you take it out of the oven. If it is more than just a tiny bit jiggly, it needs more time. Baking times are a guideline, not a hard and fast rule.
Ingredient Temperature: The starting temp of your ingredients can drastically affect the cooking time. Starting with cold cream or eggs will require longer cooking time.
Water Bath Temperature: Make sure the water bath is hot enough. Always start with boiling water. If the water bath starts out too cool, that will slow the cooking process.
Oven Temperature Accuracy: Some ovens run cooler than the dial says, and this can have a real impact on delicate bakes like custards. An oven thermometer can help double-check if the temperature is accurate.
Hope this helps – let me know if you give it another shot!
Rian Draper says
You can also use a food safe blow torch 🙂
Renée says
I'm not sure what the "also" refers to: that is precisely what a kitchen torch is - a food safe blow-torch.
heather @french press says
I LOVE LOVE LOVE creme brulee, and I am with you on the flan - I hate having to flip a dessert
Lila Rose says
You are awesome, precious daughter. Every day, you amaze me more. This is such an easy recipe, I think I can do it.
Bianca says
That looks extremely easy and so delicious !! Thanks for sharing
Brenda says
I so want my own mini blow torch for creme brûlée! It's one of my absolute favorite desserts. Yours look great!
Barbara | Creative Culinary says
Absolutely love cream brulee. I have a small kitchen torch but thought I needed more so I bought a small home one. I was wrong and now see why the kitchen one is a good idea. 🙂
Charlene Asay says
I have always wanted to make Creme Brulee. I need to get myself a torch!
Jaime says
Oh wow, that looks delicious!
Aubrie LeGault says
Oh my- Creme Brulee is one of my all time favorite desserts. Thanks for the easier recipe. (Where did you get your torch?)
Renée ♥ says
I got mine on Amazon for less than $20 during a flash sale. There's a note at the end of the post with a link.