

Beautiful, naturally-dyed Easter eggs are a traditional part of holiday celebrations in many countries across the globe, including Armenia, Ukraine, Serbia, Russia, and Greece. Make them part of your spring traditions, too!
Jump to:
What's the Story Behind this Recipe?
Many European, Mediterranean, and West-Asian countries share this tradition of making naturally-dyed Easter eggs, including Armenia, Ukraine, Serbia, and Greece.
My closest ties (which is to say my three oldest grandchildren) are half Armenian, so guess who's getting top billing today‽
It is fitting, too, because Armenia was the first country in the world to adopt Christianity as its official religion, doing so in 301 CE. Since that time, Easter has been a beloved and much anticipated holiday for its people.
Armenian Easter now supersedes even Christmas in importance and popularity in Armenia and in the Armenian diaspora. Today it is celebrated with many traditional events, dishes, songs, and greetings.

Three of the most adorable Armenian-Americans ever! (Says their Nana.) 2015 ^^^
What You Will Need for this Kitchen Craft
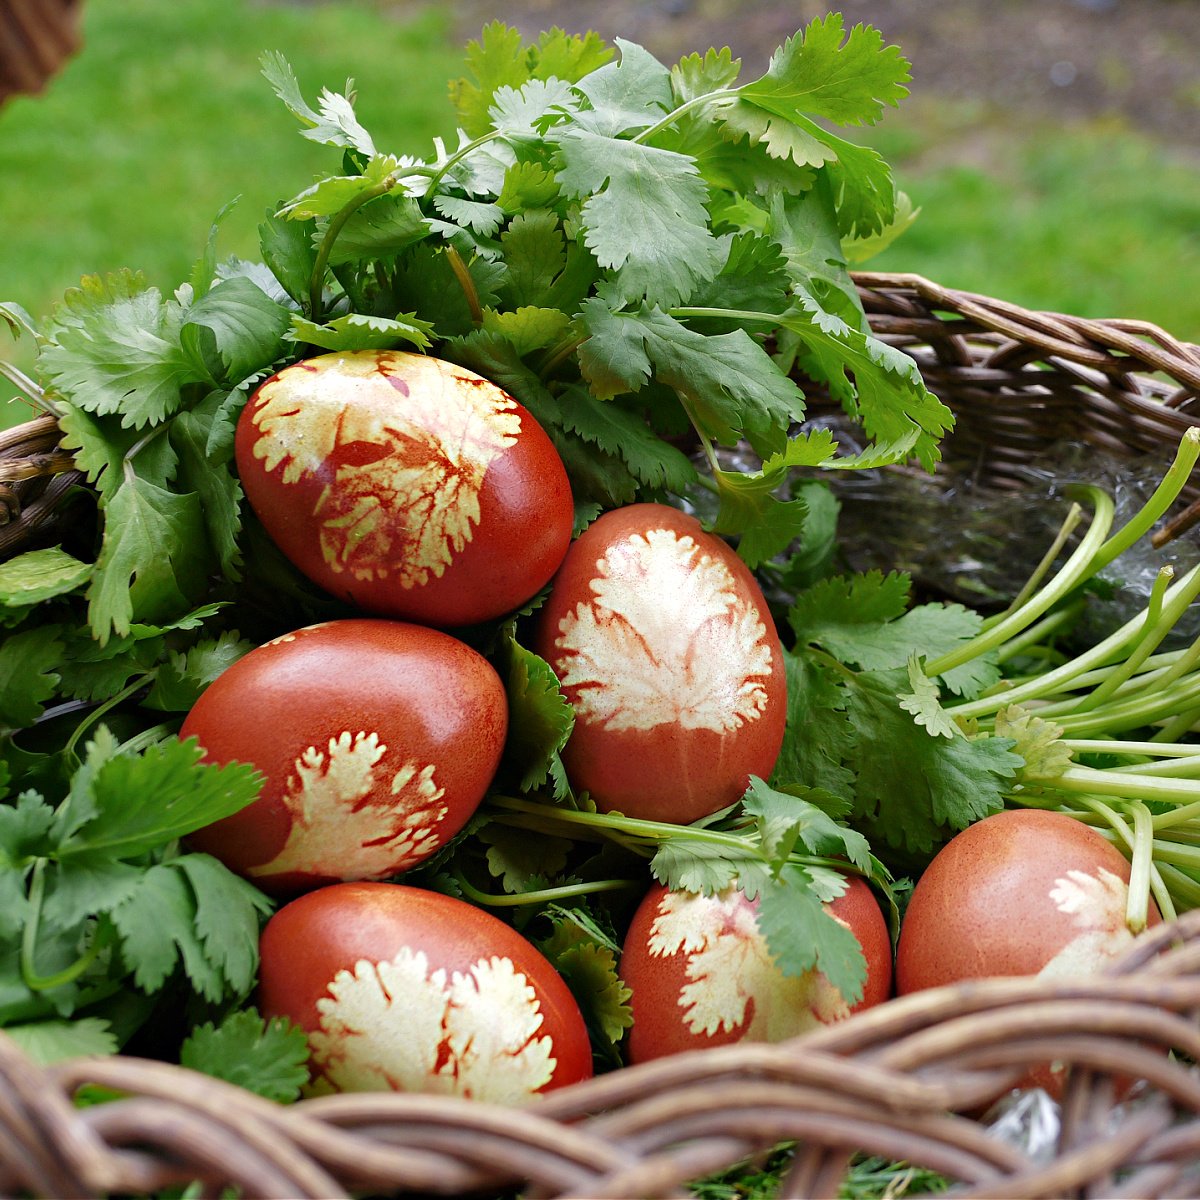
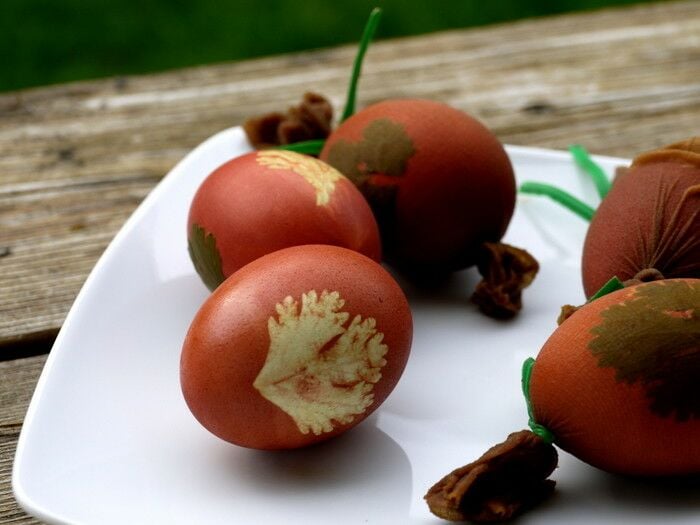
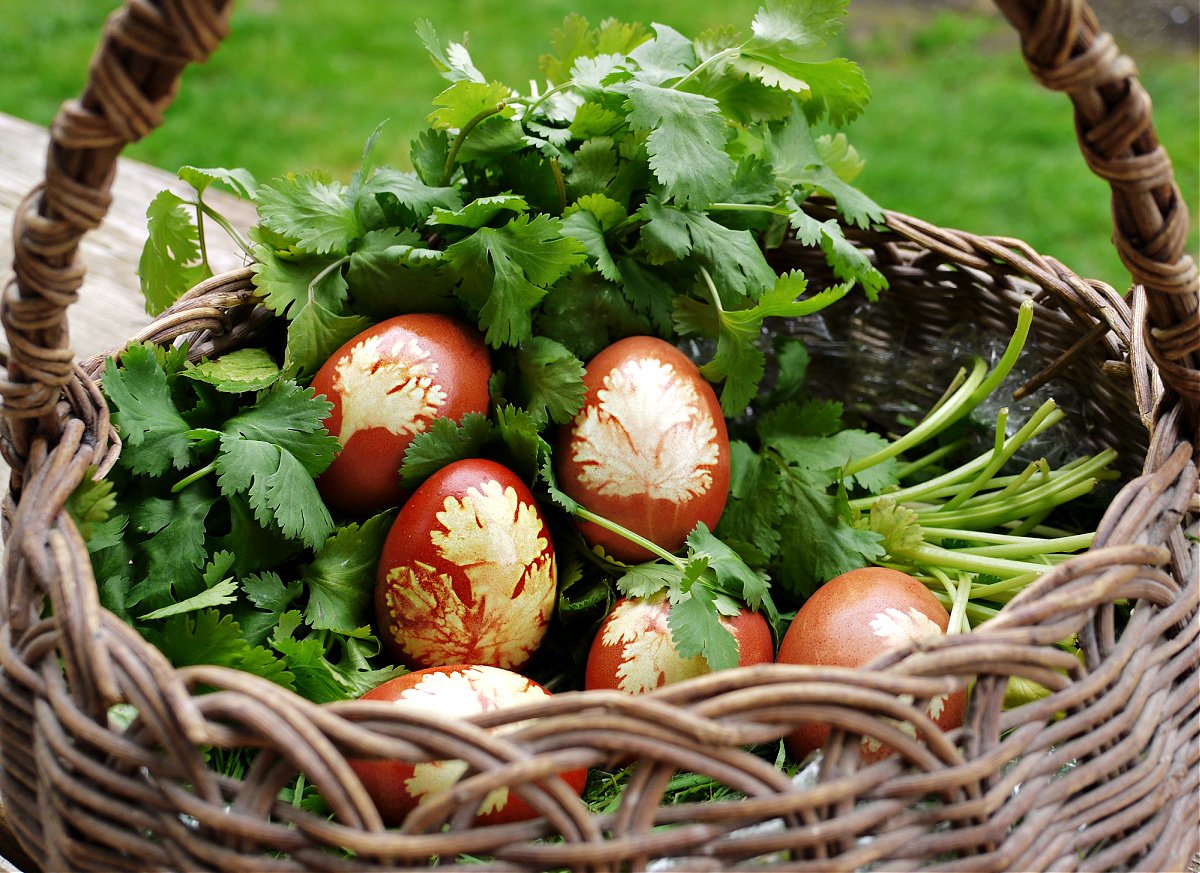
These beautiful red Easter eggs are very easy to make. The most difficult part of making them is collecting the onion skins.
Eggs: If you want the lacy leaf designs to show up in high contrast, it is best to use white eggs. If you don't want to add a design, brown eggs will work, and even enhance the red dye color.
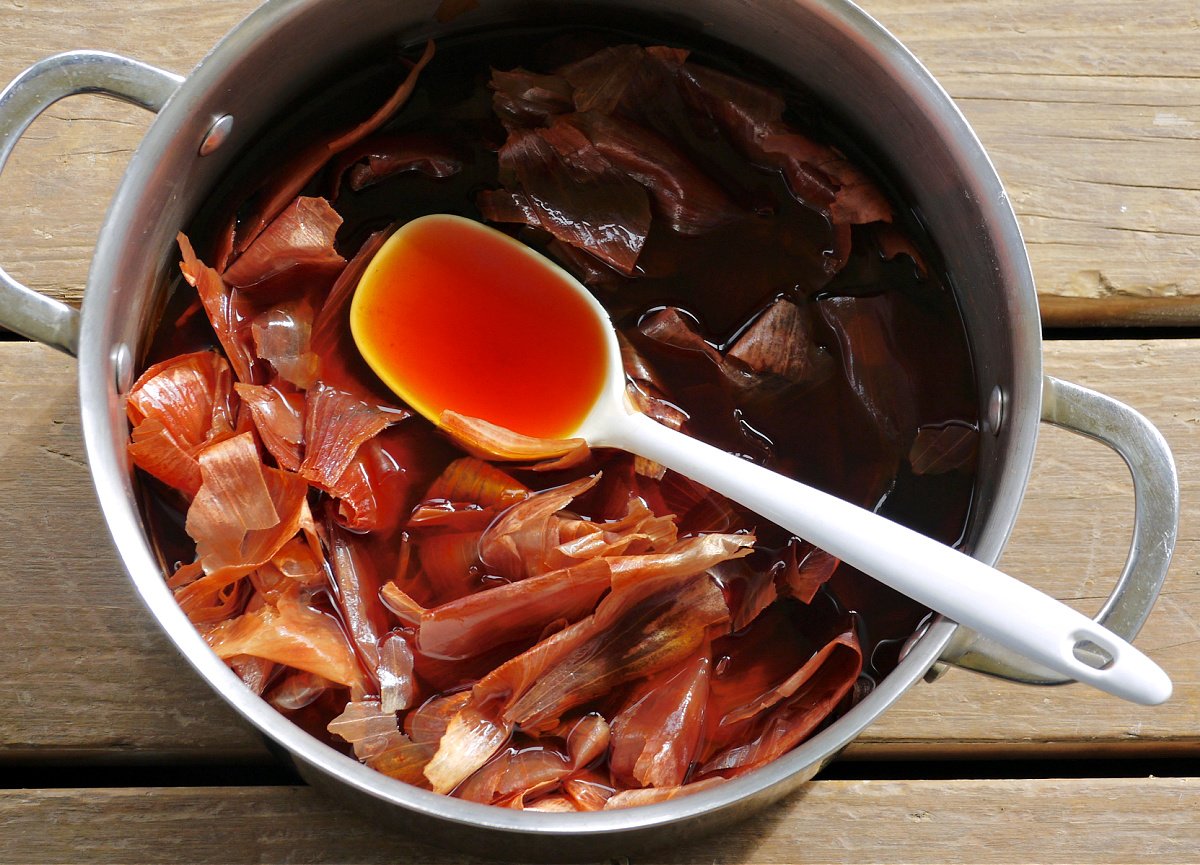
Onion skins: You will need the skins from at least 12 onions.
If you plan ahead, you can just save your onion skins as you use them. However, the easiest way is to go to your local grocery store and clean out the bottoms of the onion bins. You can also ask your local produce manager to save them for you.
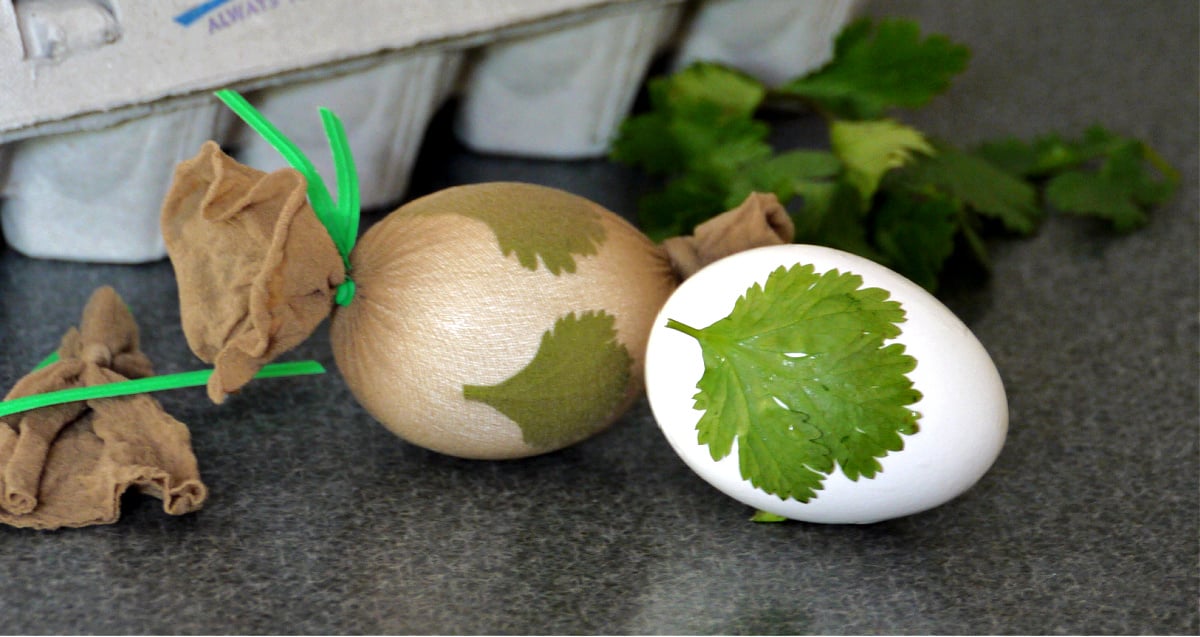
Lacy, interesting leaves: Cilantro, parsley, dill all work well. You need a leaf that is delicate enough to bend, allowing it to form and adhere to the egg.
Nylon stocking: This is used to keep the leaf firmly attached to the egg. You can use old ripped and run stockings.
Twist ties, yarn, or twine: Anything to secure the nylon around the eggs. We find twist ties work best.
Olive oil: This is used for polishing the eggs after they have been dyed.
You will also need a stockpot and a spoon.
How to Make Onion-skin Dyed Eggs
Prepare the Dye Bath
You can do this step a day or two ahead of time if you want.
Fill a medium stock pot with 3 quarts of water. Add the vinegar and stir.
Add the onion skins and push them down into the water. The stockpot should be about two-thirds full.
Over medium heat, bring the onion skin mixture to a boil. Reduce heat to low and simmer for 20 minutes.
Remove from heat and allow dye to cool.
You don't have to let it cool, but we find that the strength of the dye intensifies if given a chance to rest before proceeding.
Add a Leaf Design
This step is optional. If you just want red eggs, you can skip this.
Use scissors to cut the legs of the nylons into 4-5" tubes. Tie a tight knot at the end of each tube.
Use a little water to adhere a small leaf or flower to an egg.
Carefully insert the egg into the nylon tube and draw the nylon tightly up and around it. Secure the end of the tube with a twist tie, yarn, or twine.
Dye the Eggs
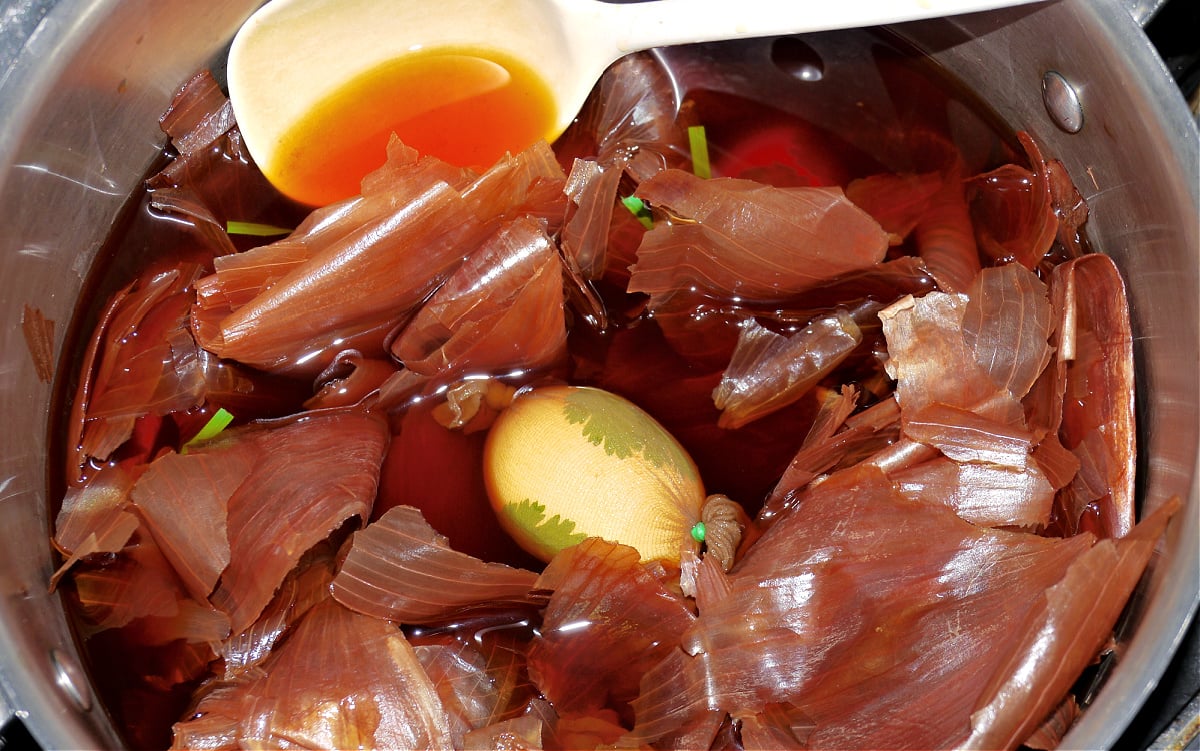
We leave the onion skins in the dye and use them to separate and cushion the eggs as they boil.
Put raw eggs into the cool dye. Make sure they are completely submerged.
Bring dye to a gentle boil, then turn off the heat and allow the eggs bathe in the dye for 20 minutes, or until they reach the lovely brick-red color you want.
Remove eggs from dye bath and allow them to cool completely.
Polish the Dyed Eggs
Remove the nylon tube from each egg. (You can use these again.) Carefully peel off leaves or flowers.
Polish eggs with a little olive oil and a paper towel.
Expert Tips & FAQs
The intensity of the color on onion-skin dyed eggs depends on a number of factors:
- The kind of onion skins. We prefer using brown onion skins. We find that red onion skins can muddy the colors, but this is just our experience.
- The ratio of water to onion skins. We've given some guidelines about how much of each to use, but you can adjust those amounts to meet your needs. When we do this at home, we tend to use way more onion skins than necessary, because we love those deep, intense brick-reds.
- The color of eggs that you use. If you want the lacy leaf designs to show up in high contrast, it is best to use white eggs. If you don't want to add a design, brown eggs will work, and even enhance the red dye color.
- How long the eggs stay in the dye. This is why the suggested time for dyeing the eggs is longer than cooking hard-boiled eggs. We like our red eggs to be richly colored.
The egg itself has long been a symbol of the Resurrection. Just as Jesus rose from the tomb, the egg symbolizes new life emerging from the eggshell.
In the Orthodox Christian tradition, eggs are painted red to symbolize the blood that Jesus shed on the cross.
The custom of coloring eggs red for Easter has its roots in the biblical lore regarding red eggs and cheorek (sweet bread):
"When Christ was crucified, his mother took some eggs and bread wrapped in the shawl. When the Mother saw her Son crucified and his arms bleeding, she knelt down and cried. The Mother's tears and Son's blood dropping on the shawl colored the eggs and bread. Then the Mother put the shawl on her head." (Source:
Greece may have the most well known Easter traditions around red eggs. They play a game with them called tsougrisma, which tests the eggs' strength.
The word tsougrisma means "clinking together" or "clashing." (Greek: τσούγκρισμα, pronounced TSOO-grees-mah.) The cracking symbolizes Christ's resurrection from the dead and birth into eternal life.
The red egg tradition is also celebrated in Ukraine, Serbia, and Russia among others.
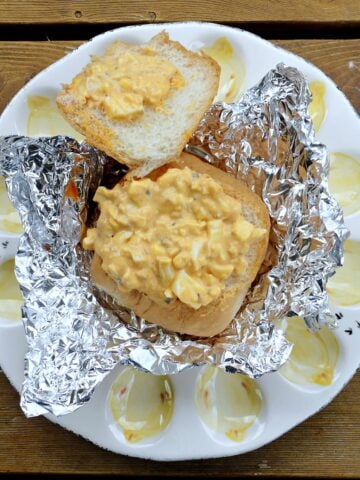
You can. They will be very hard-cooked, so are best used for chopped salads or egg salad sandwiches.
Related Recipes


For more recipes and cozy living tips, subscribe to our newsletter and follow us on Instagram, Pinterest, and Facebook for all of the latest updates.
Naturally Dyed Easter Eggs
Equipment
- 1 Medium Stockpot
- 1 large spoon
- 1 pair of nylon stockings Rips, runs, and tears are all OK.
- twist ties or yarn or twine
- paper towels
Ingredients
- 1 dozen eggs
- 12-15 brown onion skins or red
- ¾ cup red wine vinegar or plain vinegar
- 3 quarts water more or less
- olive oil
- cilantro, parsley or anything else you thing will look pretty
Instructions
Prepare the Dye
- This step can be done a day or two ahead of time.Fill a medium stock pot with 3 quarts of water. Add the vinegar and stir.Add the onion skins and push them down into the water. The stockpot should be about two-thirds full.Over medium heat, bring the onion skin mixture to a boil. Reduce heat to low and simmer for 20 minutes.Remove from heat and allow dye to cool.
Add a Leaf Design
- This step is optional. If you just want red eggs, you can skip this.Use scissors to cut the legs of the nylons into 4-5” tubes. Tie a tight knot at the end of each tube.Use a little water to adhere a small leaf or flower to an egg.Carefully insert the egg into the nylon tube and draw the nylon tightly up and around it. Secure the end of the tube with a twist tie, yarn, or twine.
Dye the Eggs
- Put raw eggs into the cool dye. Make sure they are completely submerged.Bring dye to a gentle boil, then turn off the heat and allow the eggs bathe in the dye for 20 minutes, or until they reach the lovely brick-red color you want.Remove eggs from dye bath and allow them to cool completely.
Polish the Eggs
- Remove the nylon tube from each egg. (You can use these again.) Carefully peel off leaves or flowers.Polish eggs with a little olive oil and a paper towel.
Notes
Nutrition
This website provides approximate nutrition information for convenience and as a courtesy only. You are solely responsible for ensuring that any nutritional information provided is accurate, complete, and useful.
Many thanks to Maria for all her help and encouragement.
Շնորհակալություն, Մարիա, բոլորի համար, ձեր օգնության եւ քաջալերանքի.
Disclosure: This post may contain affiliate links, including Amazon affiliate links, which means we may receive a commission if you click a link and purchase something that we have recommended. Please check out our disclosure policy for more details.

Robyn says
Is it ok once you prepare the onion shells to leave this for four or more days before you add the eggs to colour??
Renée ♥ says
Yes, the dye can be prepared many days ahead of time.
Michelle says
I absolutely love these! Natural, beautiful, they're perfect!
Renée ♥ says
Thank you so much for the kind words, Michelle!
Kimberly Ann @ Bake Love Give says
These are STUNNING. Love the natural dye ingredients and the leaves make such gorgeous patterns! Such a sophisticated result.
Kira says
They turned out beautiful!
Danielle says
I've already shared this post with two friends today. I absolutely love this method for dying eggs. Haven't tried it yet, but now I am determined to. Thanks for sharing, cheers!
Renée ♥ says
Thank you for sharing, Danielle! Be sure to come back and let me know how your eggs turn out!
Monica Louie says
What a fun way to naturally dye Easter eggs. Love this!
mae says
The eggs are beautiful. This month I'm also remembering the 100th anniversary of the Armenian Genocide, though it's a sad thing to bring up during a happy holiday. But it's worth thinking about, and hoping that our generation and our century can do better.
Renée ♥ says
That heartbreaking and tragic part of Armenian history is little known to the average American, yet it foreshadowed things to come a generation later, and continues to have lasting impact on the country’s people and their culture. I thought about including a paragraph about it, and even wrote it up, but removed it at the last minute to keep the focus on Easter. Nevertheless, the symbolism of the holiday – renewal and hope – is profoundly moving when coupled with an even a rudimentary understanding of what the Armenian people have transcended.
Ali says
Wow, gorgeous! We may have to try this.
Renée ♥ says
Thank you! You should definitely give it a go - it was so easy to do!
Rachel says
These are beautiful! I love the markings. Great story to accompany as well. Well done!
Renée ♥ says
Thank you, Rachel. The history of Armenia is a testimony to the strength and character of its people. They have been through so much.
Pech says
I love that you shared the history along with the very practical advice on how to create these beautiful eggs (never would have thought to get onion skins that way!)
Renée ♥ says
Thank you, Pech. You should have seen the lady at Winco when I plopped that big bag of onion skins on the counter and asked her what she wanted for them. When I told her what they were for, she just laughed and said, "Well, I don't have a code for that, so I guess you should just take them."
Christine from Cook the Story says
These are absolutely beautiful, Renee, and what a fun project for the weekend!
Renée ♥ says
Thank you, Christine. They were so much easier to make than I expected.
Marlynn [UrbanBlissLife] says
These are BEAUTIFUL, Renee! Those three kids are even cuter than the eggs, though 😉 I love the leaf pattern - so creative!
Renée ♥ says
Thanks, Marlynn. The results remind me somewhat of solar printing, so next year I want to experiment more with other flora - flowers, other herbs, etc, and see what I can come up with.
Camilla says
Thank you for sharing this wonderful post, such a lovely idea for Easter:-)