

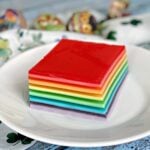
Bright and whimsical, this Layered Rainbow Jello (vintage ribbon salad) is a make-ahead dessert that's perfect for parties, holidays, and celebrations.

Jump to:
Why You'll Love this Rainbow Jello Recipe
Layered Rainbow Jello is the kind of retro treat that never goes out of style. With its bright, colorful stripes and creamy ribbons, this vintage "Jello Ribbon Salad" is just as fun to make as it is to eat.
It's a cheerful addition to spring gatherings, Easter brunch, Pride parties, unicorn-themed birthdays, or any celebration that calls for a little whimsy. Best of all, rainbow Jello can be made ahead, so it's ready to wow your guests the moment dessert is served.
- Bright, colorful layers that make any party or celebration feel extra festive
- Retro, nostalgic dessert that brings back childhood memories
- Easy to make and fun to assemble, even for beginners
- Can be made ahead of time, so it's stress-free for entertaining
- Versatile - perfect for holidays, birthdays, Pride parties, and themed events
- Kid-friendly and appealing to all ages
- Endless opportunities to customize colors and flavors for any occasion
- Can be served as a side dish, appetizer, or dessert with a dollop of Cool Whip
Ingredients You'll Need
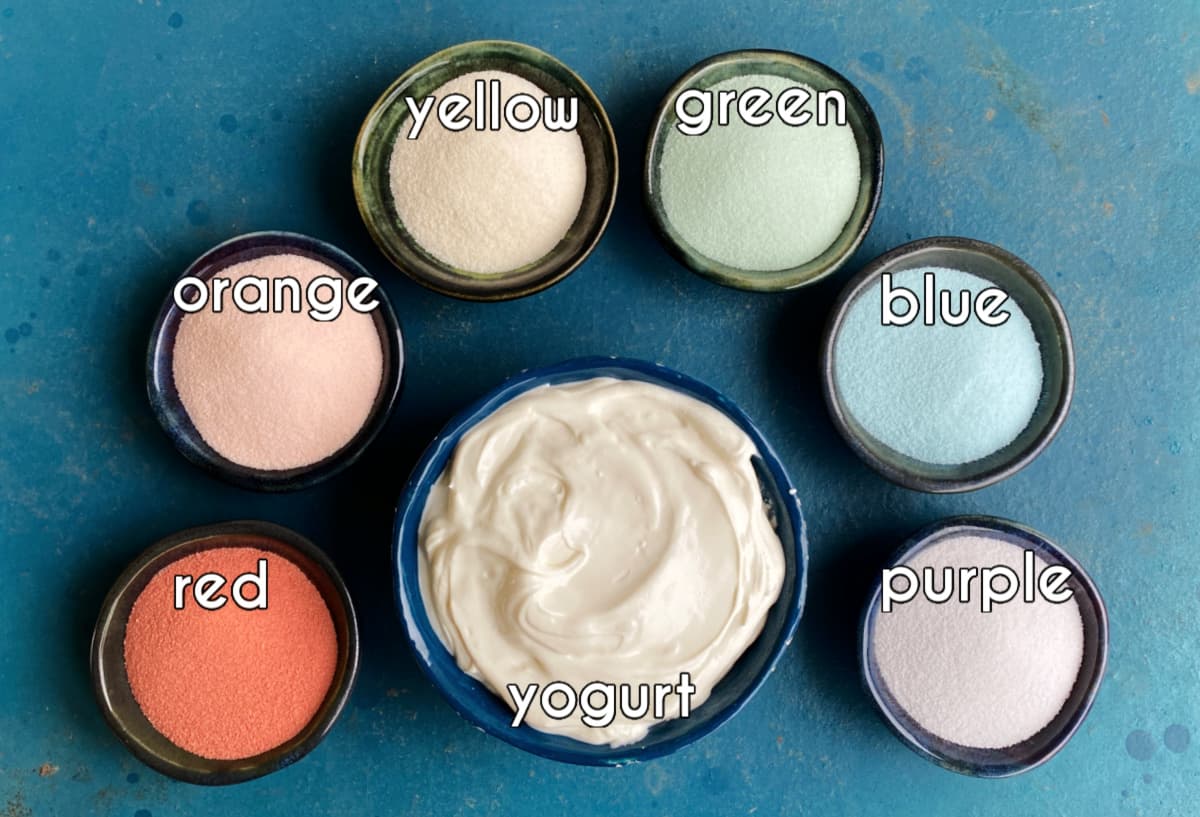
Making layered rainbow Jello is simple, with just a few basic ingredients:
Rainbow Gelatin Layers (6 flavors, 3 ounces each)
- Grape (purple)
- Blueberry (blue)
- Lime (green)
- Lemon (yellow)
- Orange (orange)
- Raspberry or Strawberry (red)
Creamy Yogurt Layers
- Vanilla or honey yogurt (Greek yogurt works best)
Other Essentials
- Boiling water
- Cold water for setting layers
Optional substitutions: Use sugar-free gelatin if desired, or dairy-free yogurt alternatives like coconut or almond yogurt for a different twist.
See recipe card for quantities.
How to Make Layered Rainbow Jello
Prep
Clear space in your refrigerator for your pan or bundt mold. A 9×13 glass baking dish works best; a 10-12 cup bundt pan makes a show-stopping centerpiece.
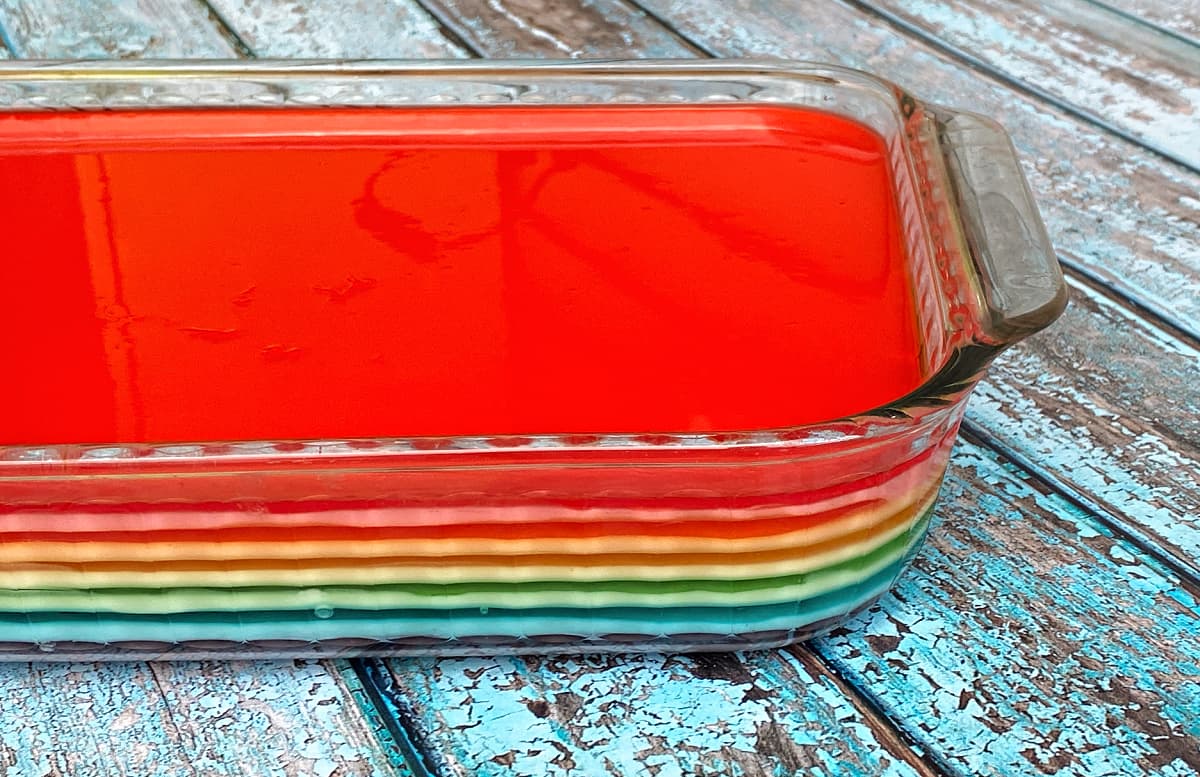
Layering Steps
Dissolve Gelatin: Add 1 cup boiling water to one flavor of gelatin (3 oz) and stir until fully dissolved. Divide in half.
First Yogurt Layer: Stir ½ cup yogurt into one half of the gelatin mixture. Pour gently into the prepared dish. Refrigerate 30-35 minutes until set.
Clear Layer: Stir ¼ cup cold water into the reserved gelatin half. Using a spoon, gently layer it over the set yogurt layer. Tap the dish to remove bubbles. Refrigerate 30-35 minutes.
Repeat Layers: Continue alternating yogurt and clear gelatin layers with the remaining colors:
Purple → Clear Purple → Blue → Clear Blue → Green → Clear Green → Yellow → Clear Yellow → Orange → Clear Orange → Red → Clear Red
You will have a total of 12 layers when finished: 6 with yogurt and 6 without.
Set Completely: Refrigerate until all layers are firm before serving.
If you have a lot of bubbles on the top of the clear layer, try gently tapping the dish on the counter before refrigerating to release some of the air.
You can also get rid of bubbles using a culinary torch to pop them. Do this by quickly passing the flame over the surface of the gelatin.
Tips for Perfect Jello Layers
- Use a spoon: Always spoon clear gelatin gently over set layers to prevent pitting and sliding.
- DO NOT pour liquid Jello directly onto the set gelatin. Use a large spoon to gently spoon it on, using the back of the spoon to spread it evenly across the previous layer like thin icing.
- Use a timer: Add each layer as soon as the former layer is set (30-35 minutes).
- In order for the "ribbons" to be clearly defined, each layer must be set up well before proceeding. However, it is also important not to wait too long, or the layers will slide apart when you cut them. Use a timer to keep layers even and well-defined.
- Remove the bubbles:
- Gently tap: If you have a lot of bubbles on the top of the clear layer, try gently tapping the dish on the counter before refrigerating to release some of the air.
- Culinary torch: You can also get rid of bubbles using a culinary torch to pop them. Do this by quickly passing the flame over the surface of the gelatin.
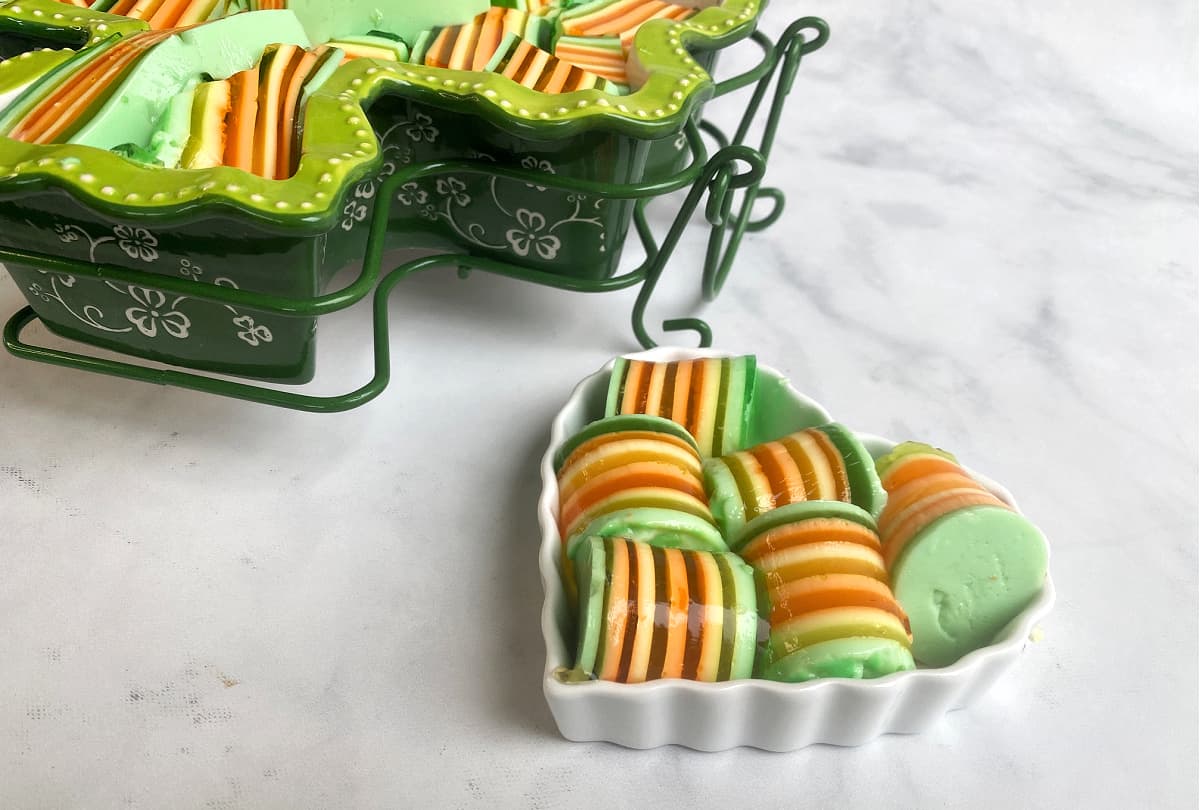
Fun Variations for Any Occasion
Layered Jello is incredibly versatile - just swap colors and flavors to match your event:
- St Patricks Day - This beautiful green and gold ribbon Jello is light, refreshing, and just the thing to brighten up your Saint Patrick's day table!
- Easter & Spring: Pastel shades for a cheerful springtime dessert
- Christmas: Classic red and green layers for holiday gatherings
- Valentine's Day: Pink, red, and white layers for a sweet, romantic touch
- Independence Day (US): Red, white, and blue layers to celebrate the Fourth of July
- Halloween: Black cherry, grape, and orange for spooky seasonal fun
- Team Colors: Customize with your favorite sports team's colors for tailgates or parties (Need a savory team snack? Try our easy Team Colors 7-Layer Dip!)
- Special Occasions: Baby showers, gender reveals, Pride events, or unicorn-themed parties
Equipment
Tip: Use clear or glass pans to show off all the rainbow layers.
9x13 Pyrex baking dish: Ideal for showcasing the colorful layers.
Bundt Pan (10-12 cups): Makes a vibrant, festive molded centerpiece.
Storage & Make-Ahead Tips
- Cover tightly with plastic wrap and refrigerate.
- Layered Jello stays fresh for up to 2 weeks, though it's best within the first week.
- Make-ahead friendly: assemble the layers 1-2 days in advance for stress-free entertaining.
What to Do with Leftover Jello
This recipe makes a lot of Jello, and we often have leftovers. Leftover ribbon Jello is perfect for making a variation of a delicious (albeit polarizing) concoction known as Namanu Delight.
Namanu Delight
For generations, Camp Namanu in Sandy, Oregon has served Namanu Delight to campers every Friday night. It is so ingrained in camp culture that even as adults, we still enjoy it on banquet night at our annual Reunion.
To make this modified version of Namanu Delight, cut any leftover layered jello into ¼- to ½-inch cubes. Throw in a handful or two of mini-marshmallows (depending on how much jello you have). Drain a can of fruit cocktail and add the fruit (optional: this is old-old-school), and then fold in enough whipped cream or Cool Whip to hold everything together. Yumm!
FAQ
Yes! While Jello® is the classic choice, any powdered gelatin will work for this recipe.
You can prepare it 1-2 days ahead. It keeps well in the fridge for up to 2 weeks, though layers look and taste best within the first week.
No, yogurt adds creaminess and contrast, but you can skip it for a fully clear gelatin version.
Absolutely. Use coconut, almond, or other plant-based yogurt alternatives. Flavor may vary slightly, but the layers will still be creamy and delicious.
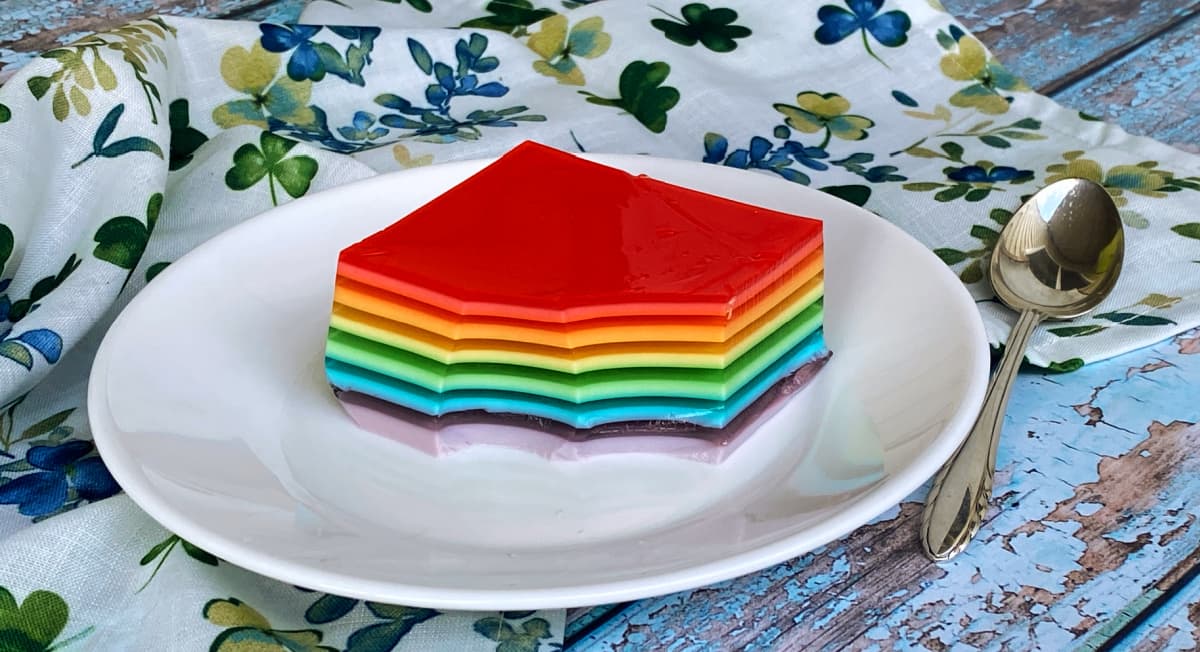
Serving Ideas
There are a number of ways to serve this colorful, whimsical treat.
- Side Dish: Serve it straight from the pan, with a spatula or slotted serving spoon.
- Appetizer or Finger-food: Cut it into cubes, stacks, or other small shapes and serve it like old-school Jello-jigglers.
- Dessert: Slather a layer of Cool Whip on top before serving for a delightful rainbow Jello dessert!
- Leftovers: Turn into a fun treat like (modified) Namanu Delight by adding whipped cream, marshmallows, and fruit cocktail.
Layered Rainbow Jello (Vintage Ribbon Salad Recipe)
Equipment
- 1 Whisk
- 1 large serving spoon
Ingredients
- 1 small box grape gelatin purple; 3 ounces
- 1 small box blueberry gelatin blue; 3 ounces
- 1 small box lime gelatin green; 3 ounces
- 1 small box lemon gelatin yellow; 3 ounces
- 1 small box orange gelatin orange; 3 ounces
- 1 small box raspberry or strawberry gelatin red; 3 ounces
- 3 cups vanilla yogurt or honey yogurt
- water
Instructions
- First, make space in your refrigerator for whatever dish or pan you are using.
- For each double layer (yogurt & clear), dissolve 3 oz gelatin in 1 cup boiling water; divide in half.Mix ½ cup yogurt into one half, pour into pan; chill 30-35 min.Stir ¼ cup cold water into remaining gelatin; carefully spoon over set layer. Chill 30-35 min.
- Repeat Layers: Continue alternating yogurt and clear gelatin layers with the remaining colors in this order (bottom to top):Purple → Clear Purple → Blue → Clear Blue → Green → Clear Green → Yellow → Clear Yellow → Orange → Clear Orange → Red → Clear Red
- Add each layer as soon as the former layer is set (30-35 minutes). Use a timer for best results.
- Chill until ready to serve.
Notes
- Sugar-free gelatin works just as well if you prefer a lighter version.
- Dairy-free yogurts (coconut, almond, soy) can be used for the creamy layers.
- Make-ahead friendly: prepare up to 2 days in advance for best results.
Tips for Success
- Use a timer so each layer sets evenly (about 30-35 minutes).
- Always spoon new layers gently over the back of a spoon to avoid breaking the layer below.
- Tap the pan lightly to release bubbles before chilling.
- For the brightest colors, use a clear glass dish.
Nutrition
This website provides approximate nutrition information for convenience and as a courtesy only. You are solely responsible for ensuring that any nutritional information provided is accurate, complete, and useful.
Love it? Pin it! 📌

Did you like this recipe? Please leave a star ⭐️⭐️⭐️⭐️⭐️ rating below in the comments section! You can also stay in touch with us by following us on Pinterest, Facebook, and Instagram.


Carol says
Why does the top say ingredients needed 1.5 cups yogurt then recipe is 3cups? There are 6 layers x 0.5 c each. I don’t buy enough at the grocery store because I looked T the top part and not the recipe!
Renée B. says
Thank you so much for catching that! You’re right – I made a mistake in the ingredient list at the top. You’ll notice that no other ingredients in that upper list had amounts; I unfortunately forgot to remove the yogurt amount there, so it should have only appeared in the recipe card. It has now been corrected to match the recipe. I’m really sorry for any inconvenience this caused when you were shopping, and I truly appreciate your careful reading and letting me know!
Neha says
My 5 year old had so much fun making this dessert!
One tip is to make the dark layer right before adding it vs at the same time that you make the light yogurt layer. Simply adding cold water to the jello mix is not sufficient to turn it back to liquid so my dark purple layer was really just purple clumps. After that I made each layer as it was needed and it turned out beautifully.
Renée B. says
There seems ot be a misunderstanding of the process and/or directions. You don’t use cold water to dissolve the jello. Instead, you use the reserved half of the previously dissolved jello from the yogurt step.
Step 1: “Add 1 cup boiling water to one small package of purple gelatin and stir until completely dissolved. Divide the gelatin in half into two separate containers.”
You then go on to mix the yogurt layer, and reserve the other half for the clear layer. The reserve mixed Jello doesn’t fully set during the 30 minutes while the yogurt layer is chilling. By then, it’s cooled enough that it won’t be too warm to pour over the yogurt layer.
Nancy says
Does it matter if you use Greek yogurt or regular yogurt? Thanks
Renée B. says
I've tried both, and while regular yogurt might give a slightly smoother texture, the difference isn’t really noticeable.
Mimi says
This Layered Rainbow Jello is a perfect spring dessert! Love low-calorie desserts.
Farah Abumaizar says
So beautiful and precise! I can't wait to try this out with my kids, thanks for the beatiful recipe!
Amanda Wren-Grimwood says
This looks so difficult but the instructions are so clear for this that it looks totally doable. The layers and colours are amazing.
Renée B. says
Thank you! It looks like layered glass, doesn't it?
Gina says
I love jello and this tasty treat was so pretty to look at! My family really enjoyed this!
cyndy says
The kids are loving this and love helping make it - we will make it again for Easter! Such a fun idea.