
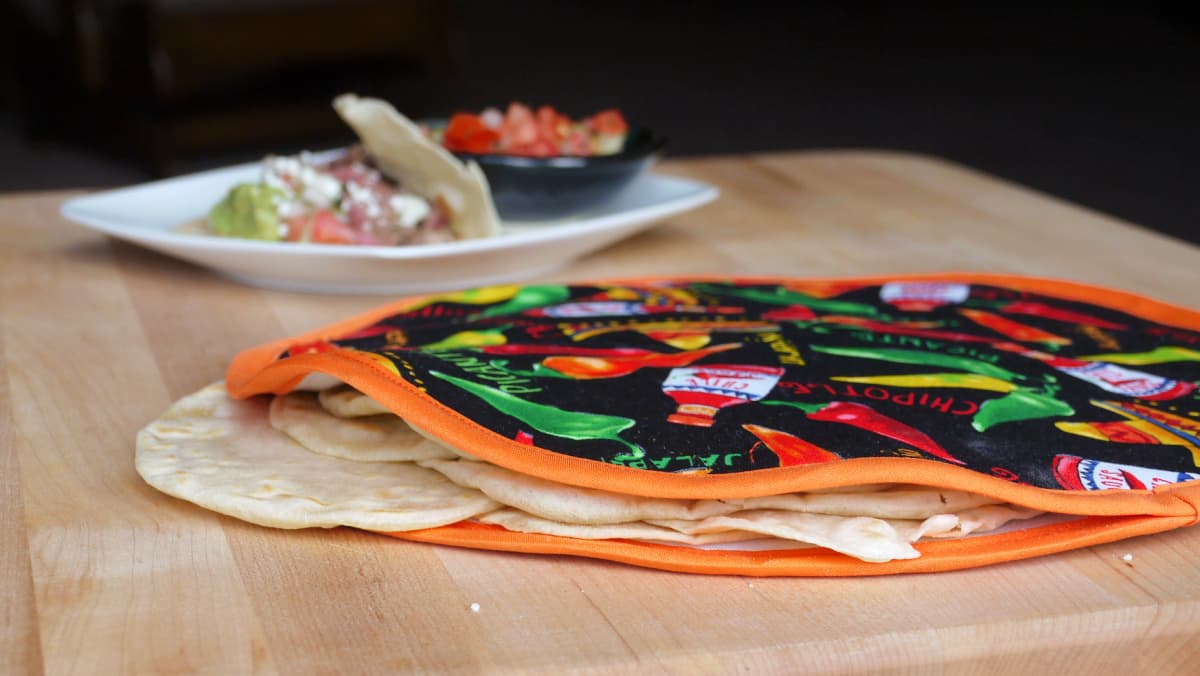
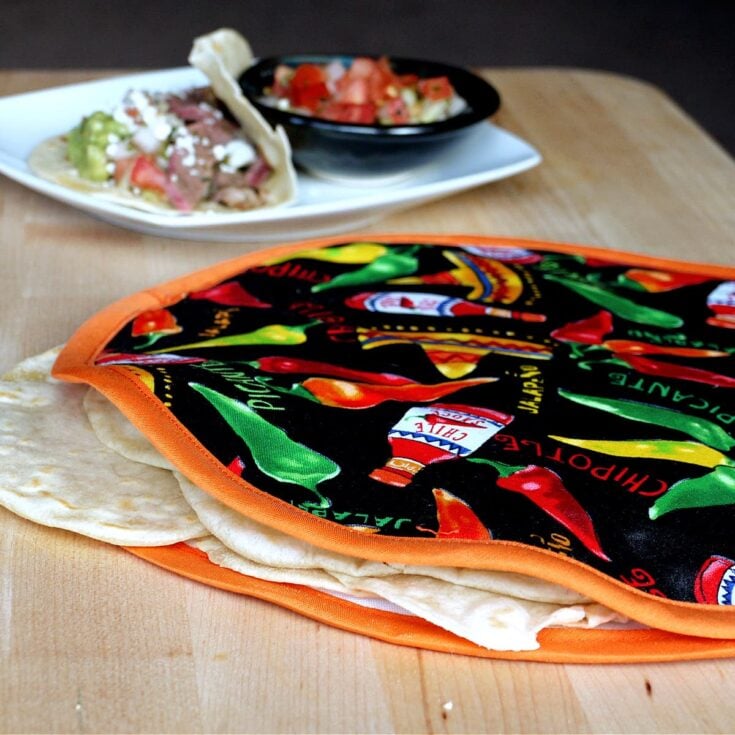
DIY Fabric Tortilla Warmers are inexpensive and easy to make, and can be sewn - start to finish - in less than an hour! To use, just slip tortillas into the pocket, where they stay warm until you're ready to eat! Makes a thoughtful hostess gift, too!

Jump to:
I discovered these insulated fabric tortilla warmers at Portland's Saturday Market some years ago, and have used one nearly every day since. When my first tortilla warmer started wearing out, I learned to make them on my own. I can't imagine life without one now!
It nearly goes without saying that my tortilla warmer is an essential part of the process when I make homemade flour tortillas. I stack them in, fresh and hot right out of the pan, and the heat and steam softens them perfectly by the time we are ready to eat.
You may be able to find fabric tortilla warmers at your local farmers market, but if you have a sewing machine and about an hour, you can easily make one for yourself. Once you make one of these fabric tortilla warmers yourself and see how fast and easy they are (not to mention how incredibly useful they are), you will be sewing them for everyone you know!
Fabric Tortilla Warmers - Not Just for Tortillas!
These insulated, microwave-safe tortilla warmers aren't just for tortillas! It seems like I find a new use for mine every week.
- Microwave potatoes in one and they turn out fluffy and delicious.
- Place a bowl of vegetables in one and steam in the microwave for easy lunch prep.
- Keep foods of all kinds warm.
- Use it as an emergency pot holder.
NOTE: My kids have been known to make quesadillas in our tortilla warmer, but I do not recommend this. Not at all.
Excellent Hostess Gift
A fabric tortilla warmer makes make an excellent, inexpensive, and thoughtful gift! Wrap one around a bottle of salsa for a great hostess gift, add one to a festive gift basket, or pack one with warm tortillas for your next picnic.
Tortilla Warmer Materials
For this project, you will need:
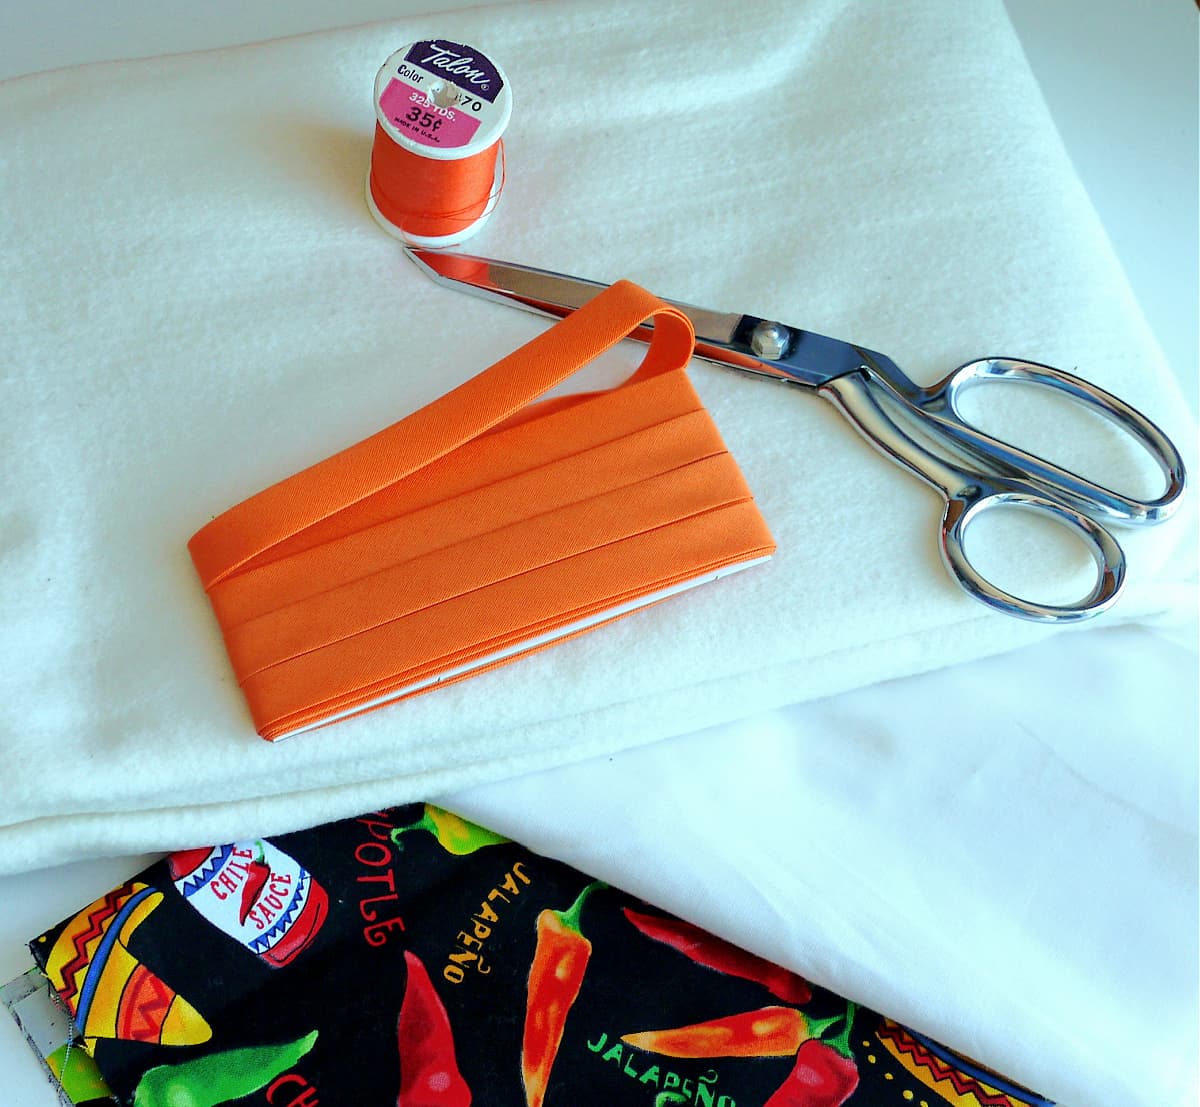
★ Fabric: ⅓ yard each patterned fabric and muslin. Use 100% cotton fabric only.
You really just need two 12-inch squares of each fabric, patterned fabric and muslin, so scraps work just fine.
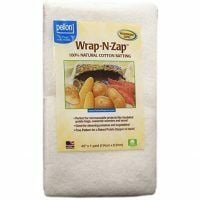
★ Batting: Two 12×12-inch pieces microwave-safe; 100% cotton batting. I recommend using Pellon Wrap-N-Zap; this batting is specifically made for microwave heating.
Important: DO NOT use any batting containing any type of metal! It needs to be microwave-safe.
★ Bias Tape: Two 16-inch lengths, and one 25-inch length of extra-wide 100% cotton double-fold bias tape.
When I first started making these warmers, I used cotton/poly bias tape (Wright's) with no problems: one of those is still going strong after four years. (I do wonder if it makes a difference that this particular warmer is used exclusively for warming tortillas: it never gets that hot.) That being said, I do now make all of my own bias tape for these, and use 100% cotton to do so.
If you want to make your own bias tape, it is very easy to do! (Check out this great tutorial for making your own bias tape from The Seasoned Homemaker.)
★ Thread: Use 100% cotton thread. Avoid using cotton-poly, as it can melt under high temperatures.
Equipment
For this DIY Project, you will need:
- Sewing machine
- Sewing pins
- Scissors
- Large bowl (~11-inch diameter) or drawing compass
How to Make a Fabric Tortilla Warmer
These easy-to-make DIY Fabric Tortilla Warmers can be made from scrap fabric, and ready to go in just 30 minutes! To use, just slip tortillas into the pocket, microwave for a few seconds, and your tortillas are ready to go! (Works great for bread and baked potatoes, too!)
Since this is not a project that requires meticulous cutting precision, I cut all the fabric and batting pieces at once. (I'm a quilter and a bit of a perfectionist to boot, so if you lean that way too, trust me - everything will be OK.)
Using a compass or the rim of a large serving bowl, draw an 11-inch circle on one piece of the batting. This is your pattern.
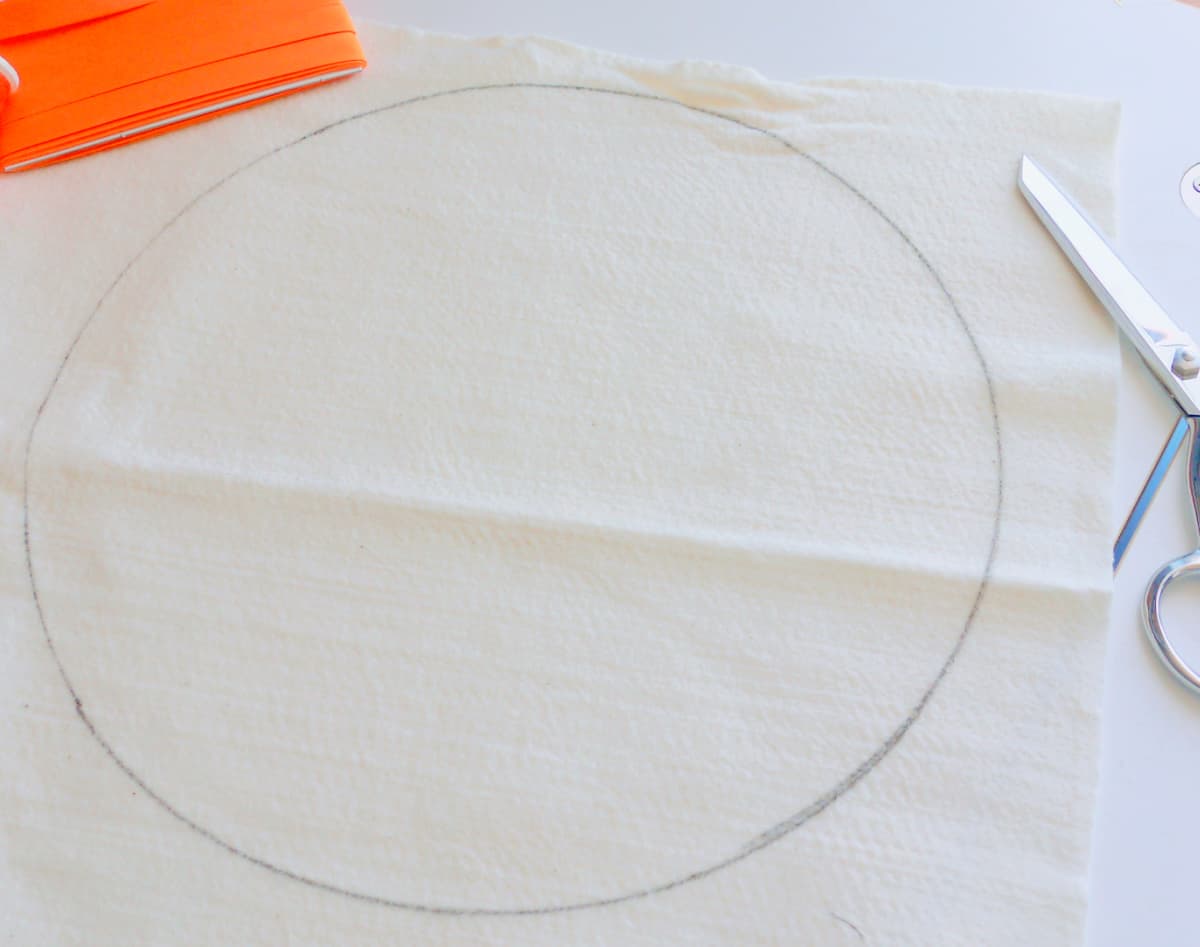
With the batting pattern on top, stack two layers of patterned fabric, two layers of muslin and both pieces of cotton batting.
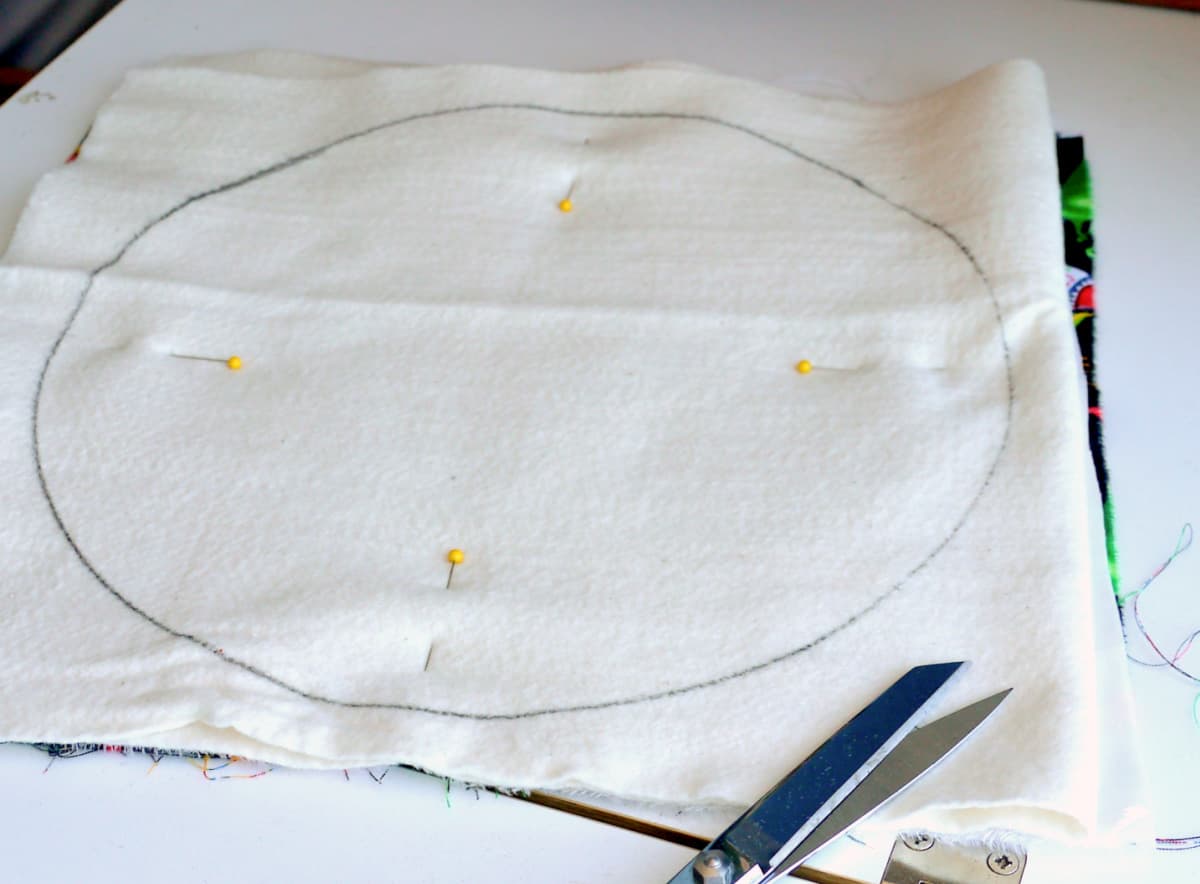
Cut out all the pieces so that you have two patterned fabric circles, two muslin circles and two batting circles.
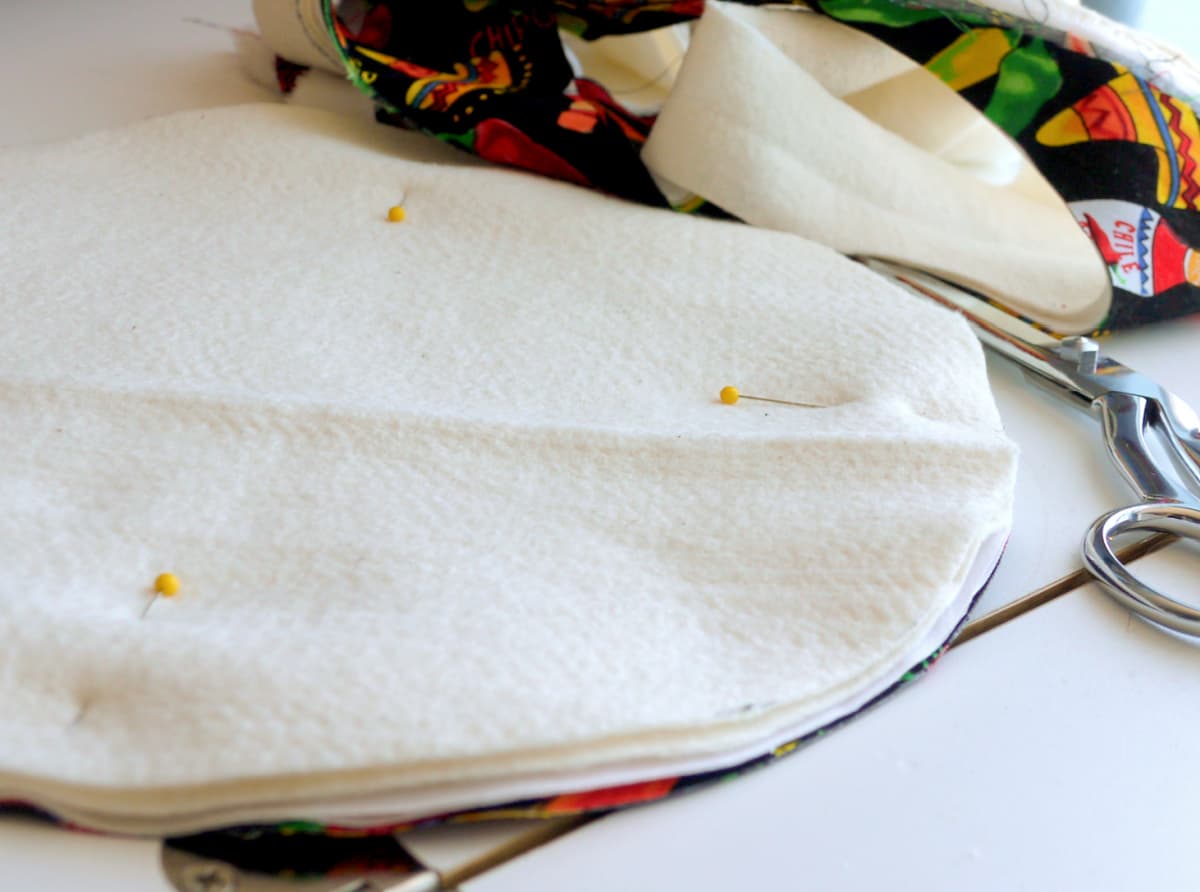
Next, make the two fabric-circle sandwiches. For each sandwich, stack one of each - muslin, batting, and patterned fabric. (Right sides out!)
Sew a ¼" seam around the edge of each separate fabric sandwich.
Each side now has a ¼-inch seam around the edge.
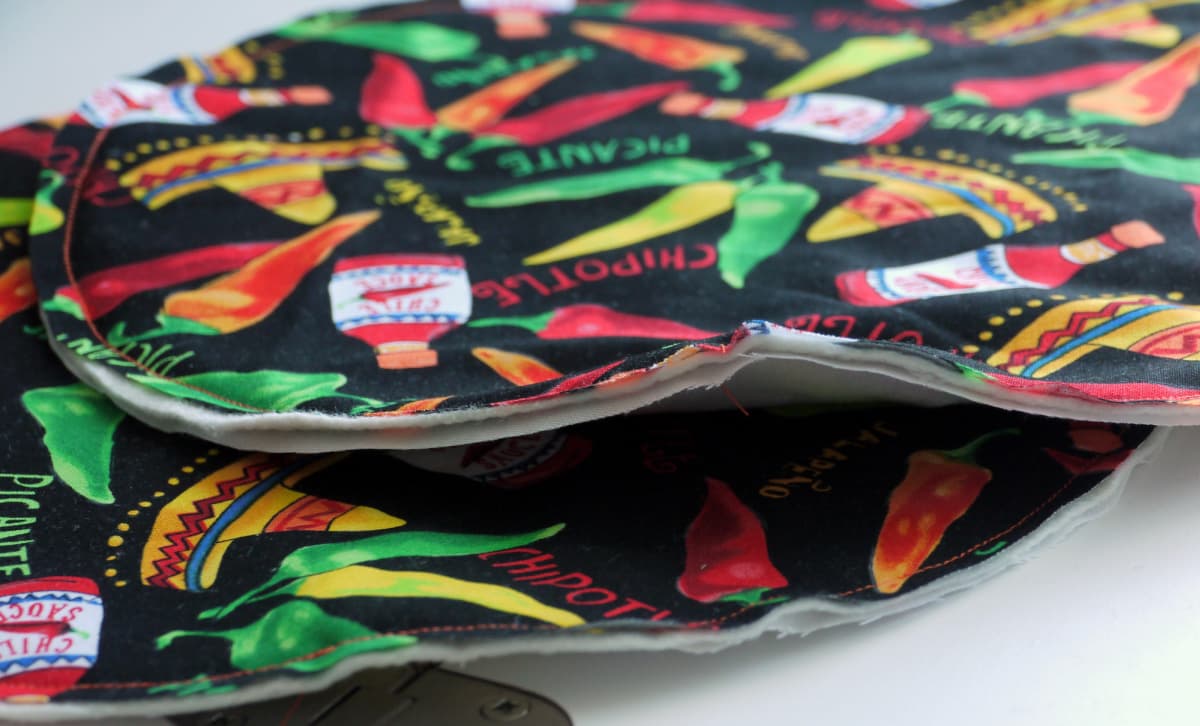
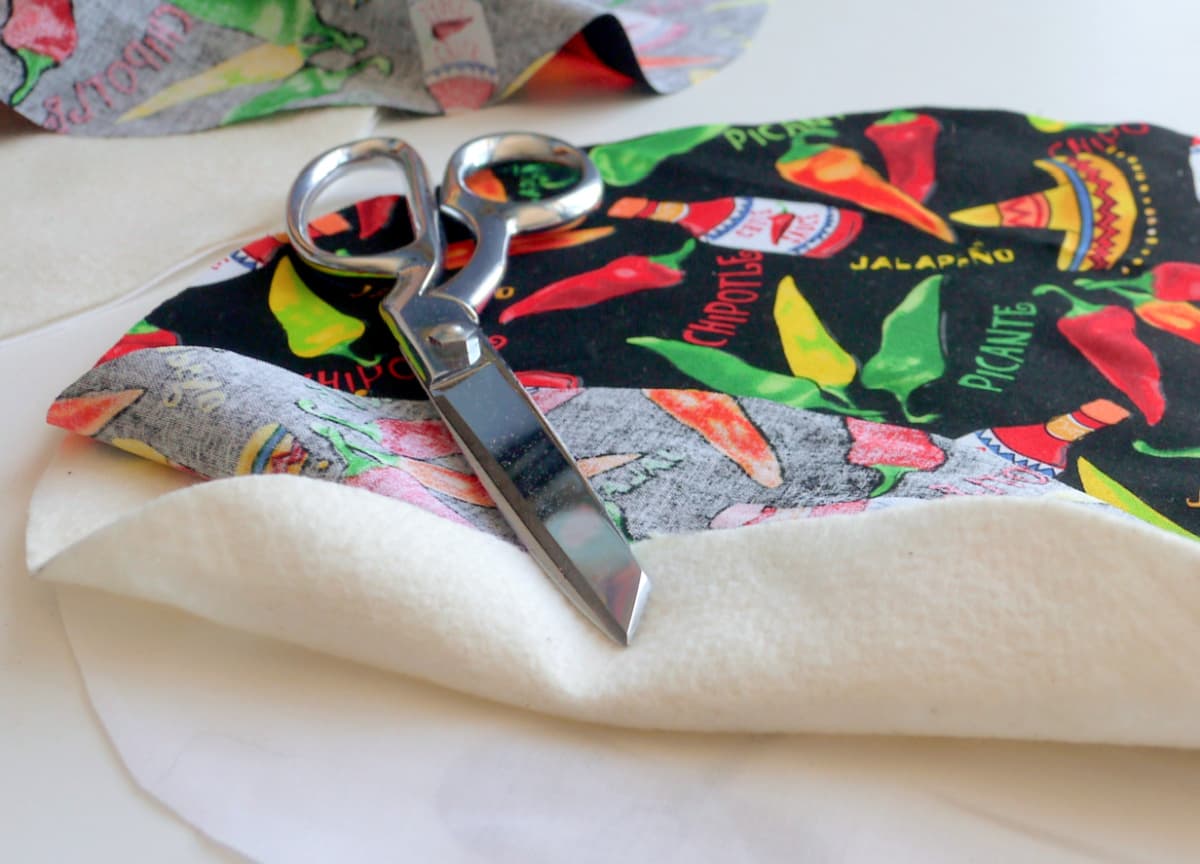
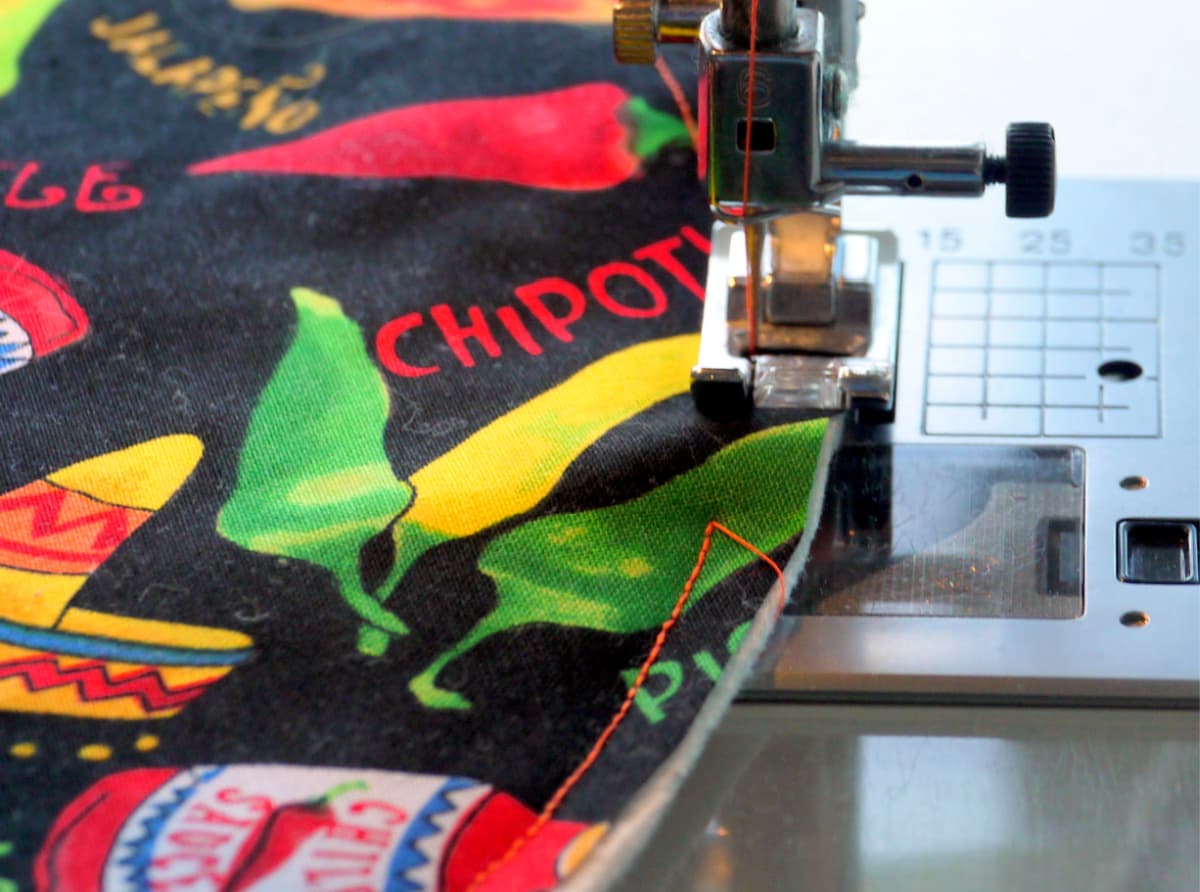
Attached one 16" piece of bias tape to the edge of each fabric sandwich. (To clarify, each fabric sandwich is still separate at this time.)
I use a straight stitch for this, but I've seen tortilla warmers sewn with a zigzag stitch too. It's just a matter of personal preference.
Now it's time to sew the two fabric sandwiches together!
Pin the two circles together, right-sides out, with the bias taped edges aligned. Trim any bits of overhanging, mismatched edge fabric on the raw "unbiased" edges.
This will all get covered up, but having them even makes attaching the final piece of bias tape much easier.
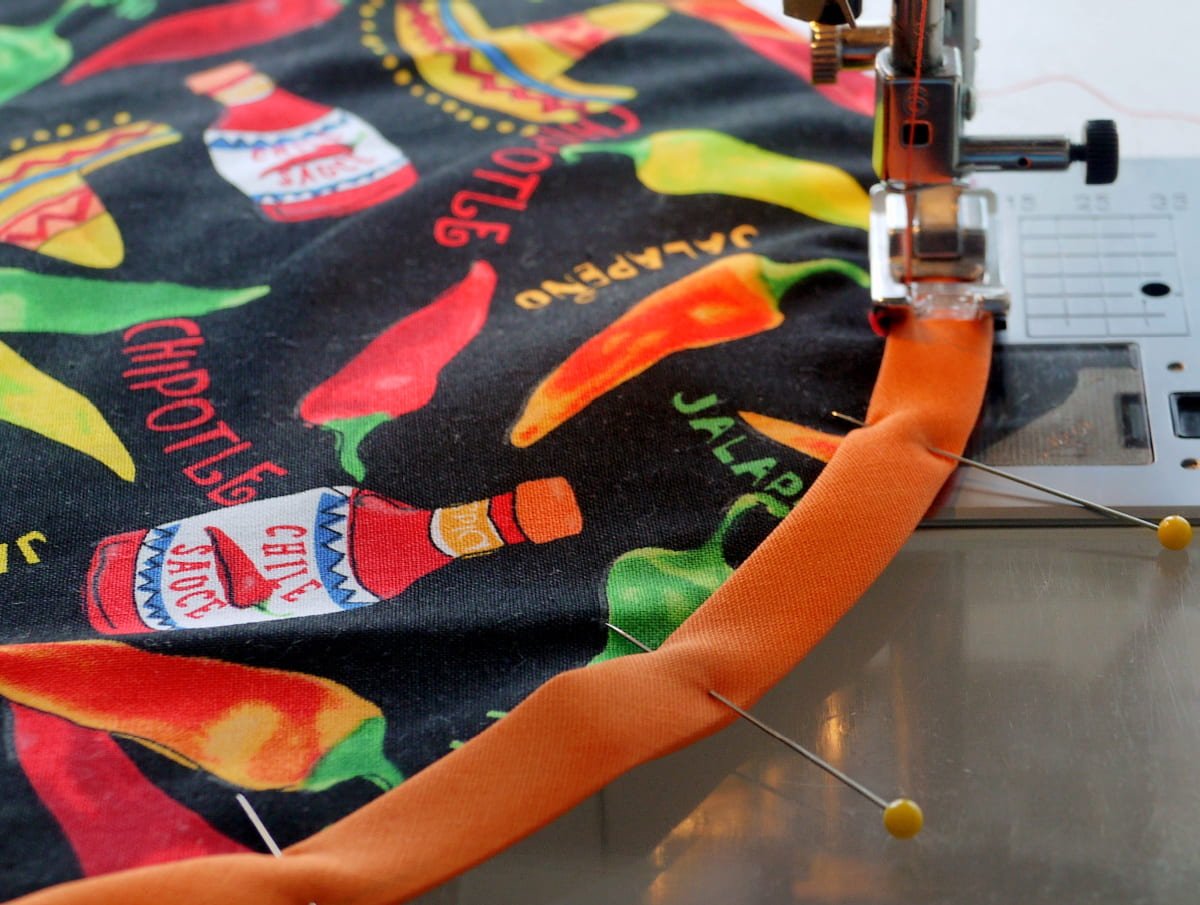
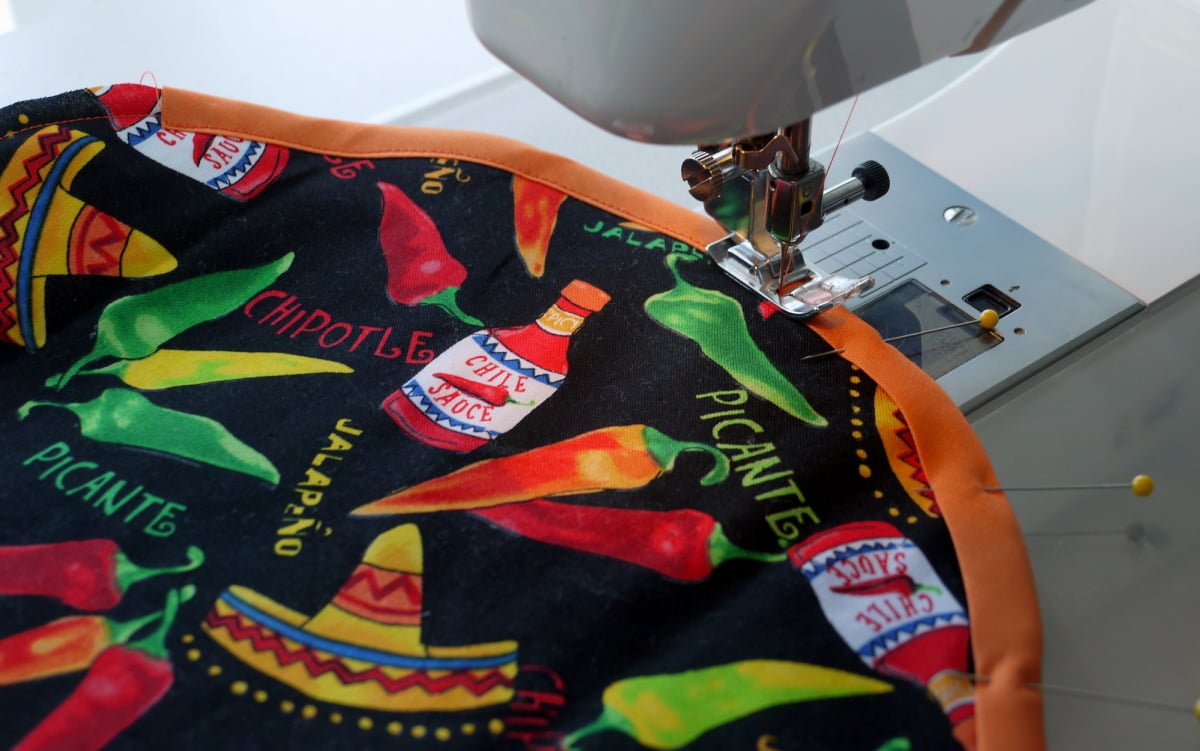
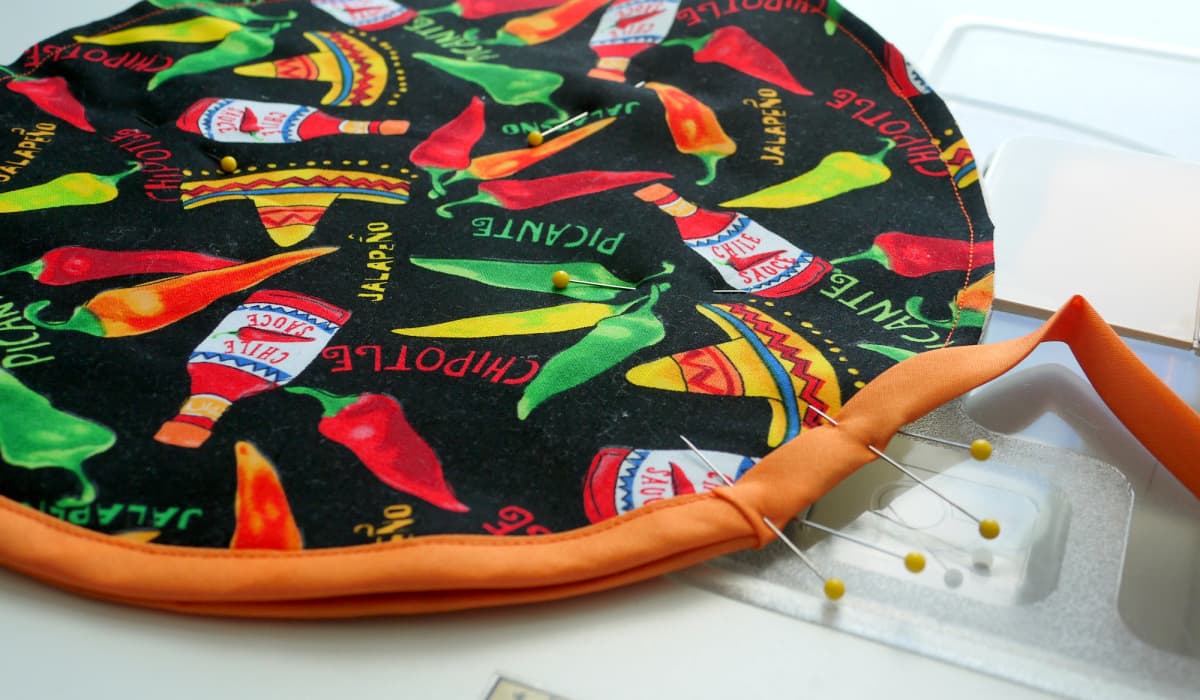
Attached the 25-inch piece of bias tape to both circles at the same time. Be sure to turn under ½" of each end of the bias tape.
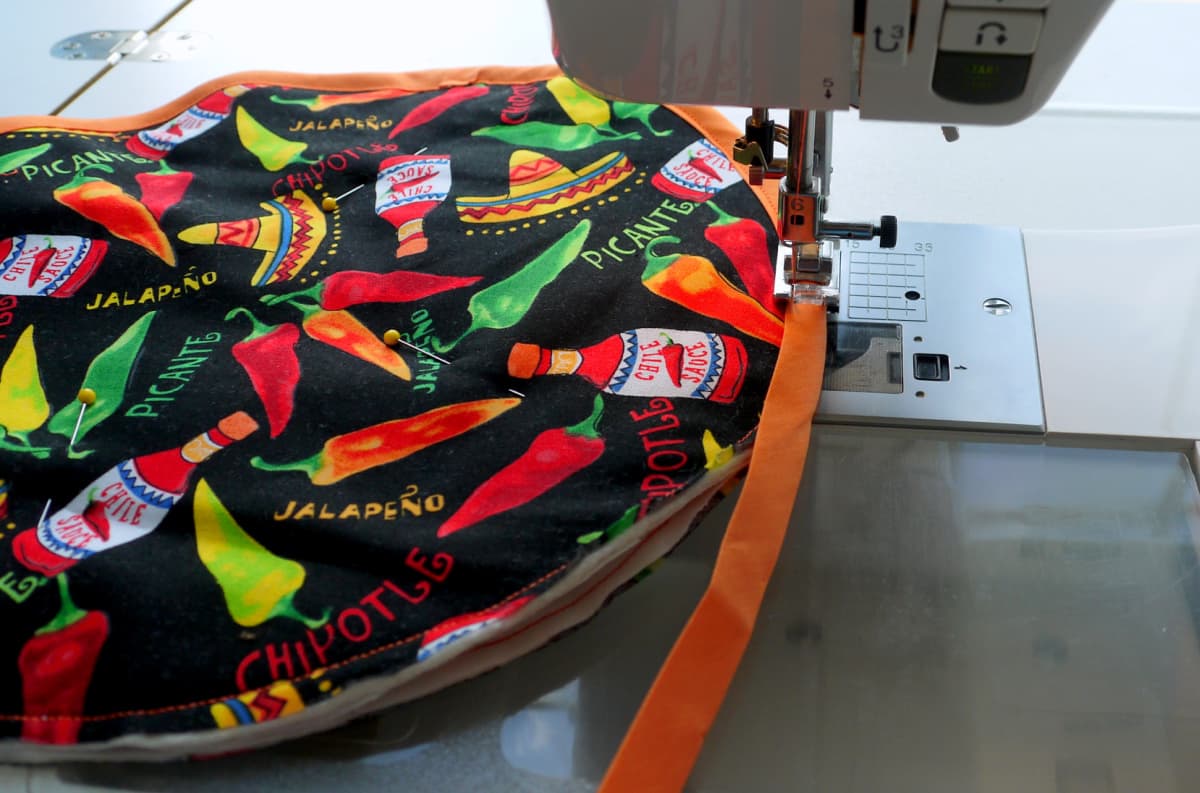
I could tell you that I pin these together carefully before I sew, but that would be a lie. I just pin the turned-under end in place, and then snug the bias tape onto the edge as I go around. I think this makes for a smoother bias-tape application.

Related Recipes
Homemade flour tortillas are surprisingly easy to make! With just a simple list of ingredients (no lard or shortening!), you can have warm, fresh tortillas ready in about a half an hour!
Want More Free Recipes?
Subscribe to our newsletter to get family-friendly recipes and cozy living ideas in your inbox each week!
Find us on Instagram, Pinterest, and Facebook, too.
Fabric Tortilla Warmer DIY
These easy-to-make DIY Fabric Tortilla Warmers can be made from scrap fabric, and can be done in under an hour.
Materials
- ⅓ yard patterned 100% cotton fabric
- ⅓ yard plain 100% cotton fabric (or muslin)
- 2 – 12×12-inch pieces Pellon Wrap-N-Zap (100% cotton batting)
- 2 – 16-inch lengths of extra-wide cotton double-fold bias tape
- 1 – 25-inch length of extra-wide 100% cotton double-fold bias tape
- Cotton thread
Tools
- Sewing Machine
- Sewing pins
- Scissors
- Large Bowl (see directions)
Instructions
Since this is not a project that requires meticulous cutting precision, I cut all the fabric and batting pieces at once. (I’m a quilter and a bit of a perfectionist to boot, so if you lean that way too, trust me – everything will be OK.)
- Using a compass or the rim of a large serving bowl, draw an 11-inch circle on one piece of the batting. This is your pattern.
- With the batting pattern on top, stack two layers of patterned fabric, two layers of muslin and both pieces of cotton batting.
- Cut out all the pieces so that you have two patterned fabric circles, two muslin circles and two batting circles.
- Next, make the two fabric-circle sandwiches. For each sandwich, stack one of each – muslin, batting, and patterned fabric. (Right sides out!)
- Sew a ¼” seam around the edge.
- Attached one 16” piece of bias tape to the edge of each fabric sandwich. (To clarify, each fabric sandwich is still separate at this time.) I use a straight stitch, but I’ve seen tortilla warmers sewn with a zigzag stitch too. It’s just a matter of personal preference.
- Now it’s time to sew the two fabric sandwiches together. Pin the two circles together, right-sides out, with the bias taped edges aligned. Trim any bits of overhanging, mismatched edge fabric on the raw “unbiased” edges. This will all get covered up, but having them even makes attaching the final piece of bias tape much easier.
- Attached the 25-inch piece of bias tape to both circles at the same time. Be sure to turn under ½” of each end of the bias tape. (I could tell you that I pin these together carefully before I sew, but that would be a lie. I just pin the turned-under end in place, and then snug the bias tape onto the edge as I go around. I think this makes for a smoother bias-tape application.)
Notes
You really only need two 12-inch squares of each patterned fabric and muslin, so scraps work just fine.
Recommended Products
This post may contain affiliate links, including Amazon affiliate links, which means we may receive a commission if you click a link and purchase something that we have recommended. While clicking these links won't cost you any extra money, they do help keep this site up and running.
![Chili Pepper Fabric [Black/Red]](https://thegoodheartedwoman.com/wp-content/uploads/2019/11/815a1Qsxt4L._SY450_-200x200.jpg)
Originally published August 5, 2014. This post has been updated with new images, content, and DIY instructions to improve reader experience.
Thank you for visiting the Good Hearted Woman. Remember to bookmark this site, and come back soon!


Ruby Angelo says
Hi Renee, thanks for your tutorial! I just started making both tortilla and potato warmers. I have been having a hard time buying 100% cotton thread and they don't have all the colors!
Any suggestions? are you able to mention any vendors, stores are so limited.
Thank You!
Ruby A
MK says
got fabric to make these! ( i have one that was gifted to me, that was from one of those fancy kitchen supply places but its not large enough to fit the tortillas we buy! ) i am going to gamble on the store bought bias tape- not dedicated enough to make my own!
Renée says
I always love starting a new project, too - Have fun! 🍀
Charlene says
This is such a great idea for a gift! So simple yet so useful!
Courtney says
Wow!!! I definitely need one of these in my life. Such a great idea!
Paula @ I'm Busy Being Awesome says
Such a fun DIY, I'll have to give it a go!
Renée ♥ says
You should! It's a fast and easy one!
Reese Woods says
My grandmother made something similar for Christmas one year, potato bags! They really are awesome!
Renée ♥ says
I have a potato bag as well - very handy to have around!
Angella says
This is a cute idea for the seamstress & tortilla lovers! How creative! Love the patterns too!
Renée ♥ says
Thank you, Angella! (You really don't need to be a seamstress to make it, though. Just super-basic sewing machine skills.)
Linda Schneider says
I'm making some tortilla warmers for gifts. I"m very enthused about them , but how in the world do you do step 8 (sewing the 25 in. bias tape on all layers ) and make it look neat ??? I'm having major stress ...on the bobbin side with the stitch not catching the tape!!!! I've tried all kinds of ways, only to rip again. It looked ok on top but turn over and wow!! maybe you will have to give some good pointers. when just sewing the short pieces on..... goes great...i know my family is going to LOVE them, we are all big on fiestas!!! thanks a million.. Linda Schneider...
Renée ♥ says
Hi Linda - Bias tape can definitely be tricky. One technique to make applying bias tape easier is to sew it down one side at a time. Do this by opening up the bias tape, pin it to all the tortilla warmer layers all the way around, and sew it all the way around on that side only. Once it's secure on one side, fold it over, pin it down, and sew the other side down. The stitching will show up on one edge-side as two lines of sewing, but if you sew it with a matching thread color, you won't notice it. Hope this helps.
Hoosier says
Zig zagging or serging the raw edges together to compact them before adding the tape helps.
Renée B. says
That's a great tip! Zig-zagging or serging the raw edges is an excellent way to prevent fraying and create a neat, compact edge before adding the binding tape. Thanks for sharing!
Courtney says
Hello,
This is such a great gift idea! I was actually working on making one for myself first. I was able to do everything just fine until I got to the final step. My sewing machine seems to have trouble getting the needle through all the layers of fabric. I'm fairly new to sewing. Could you give me some advice?
Thanks!
Renée ♥ says
Good question, Courtney. The first thing you want to check is the size of your needle. For sewing through many layers, you may want a heavy duty or denim needle, size 90 or 100. Also, you may need to adjust the tension - if it's too tight, it will cause the thread to break.
Stephanie says
How do you wash the tortilla warmer? Do you throw it in the dryer or let it air dry? I'm worried that because there is no quilting on the circles that the batting will bunch when it is washed.
Renée ♥ says
As a quilter, I understand your concern; however,I've been using the one I have now for more than five years. I've washed it about ten times, and it's a little faded, but otherwise just fine.
Stephanie says
Do you just throw it in the dryer?
Arleen Frost says
The bias tape I found is 60 percent polyester and 40 percent cotton. Can this be used on the tortilla warmer and put in the microwave? Or is there bias tape 100 percent cotton?
Renée ♥ says
I've used the 60/40 with no problems, but I also never heat it more than about a minute or two in the microwave. I don't know how it stands up to longer exposure. I also often make my own bias tape: it's pretty easy to do.
Wendy says
Hi!
I know I'm late to the party (as usual), but I'd swear I see 4 layers in picture 3.... I'm a little tired today, but I thought each half was 1 layer print fabric, one layer of Wrap and Zap and one layer of muslin?
Whanks!
Wendy
Renée ♥ says
Picture 3 is illustrating the Cutting step. I cut the Wrap-n-Zap circles at the same time. Image 4 illustrates how they are layered to sew. Hope this helps. Get some rest, Wendy 😉
Marie says
I bought one about 10 years ago and I love it!
Mine has a crinkly layer, too. Like maybe a plastic????
That keeps everything piping hot--
I must tell you that I use it for holding pancakes
Til they're all done and ready to serve. Perfection!
Keeps the pancakes hot without drying out like the oven would do.
Sara says
Can you please tell me where you found 100% cotton bias tape. I have searched all over and can only find a cotton/polyester blend. Thanks!
Renée ♥ says
I use the cotton/poly and it works fine for me, but as I have noted earlier, I don't do a lot of heavy-duty heating in my tortilla warmer. However, for my potato baker (I have one of those too!) I just make it myself. It's very easy to do, and for a project this small, it only adds a little extra work. This is a great tutorial for making your own bias tape.
Desiree says
Hi Renee, I was looking for a tortilla warmer pattern and came across yours. I work at a fabric store and had a customer come in from Hawaii that was visiting here and buying fabric. She showed me something about the warm and natural batting and wanted to share it with you I case you aren't aware. It is only 88 percent cotton and 12 percent polypropylene, which is nylon. If you read every bit of the brown label you will find it. I had already purchased mine for my tortilla warmers, so I was bummed! However, she showed me a batting that actually is 100 percent cotton and completely microwave safe. It is called " warm and zap" . It is made by Pellon and can be purchased on Walmart.com for about 20 bucks after shipping for a ten yard bolt. So it's pretty cheap. Also, warm and natural does not endorse using their batting in the microwave. I went to their website for more information. So, I just wanted to share what I learned since I was so surprised! Happy sewing!
Renée ♥ says
Thank you so much for sharing this, Desiree! So far, the W&N hasn't presented any problems for me, but it sound like the Warm&Zap is definitely a better solution. All these years, I have been under the impression that W&N was 100% cotton.
Nalva says
Thank you, very well detailed, easy to understand. I have a question about what kind bias tape did you use. 55% polyester e 45 %cotton, because polyester can not hold to much microwave haet. I am trying to find 100% cotton (bias tape) but unsuce.ss. Thank you. Have a Bless Day
Renée ♥ says
I haven't had any trouble with the 55/45, most likely because it never gets very hot. (Remember, you are just warming the tortillas, not cooking them.) You can always make bias tape though - it's very easy to do. (There are a number of great tutorials online.)
Sharon Eaton says
Greetings!
To clarify, the muslin will be what is against the tortillas when in use?
Renée ♥ says
Yes, Ma'am!
LubbyGirl says
So, I've been making these for a few years and have three on the sewing table right now, waiting for the binding. I ran out on one last night and just made my own from the fabric. I've used the same bias binding you use and have never had a problem - I think it's because the warmer is only in the microwave for a few seconds. I never have mine in more than 20 or 30 seconds. I've done the binding your way (before I found this tutorial) and another way I found on another blog. Yours is easier. I think I'll stick to what's easy. 🙂 Thanks so much - wish I'd found this sooner!!
Donna says
Thanks for the tutorial. I am new to sewing on a machine and want to make useful items. This tortilla warmer is something I need and would use. Love it as a gifting idea too.
Meghan says
i int have any muslin in my stash. Can I just use a piece of an old cotton sheet? I have one I've been cutting up and using for various projects.
Renée ♥ says
Of course. You can use whatever you want, as long as it is 100% cotton.
Melanie Duff says
I can't wait to make these and give to all my friends. Thanks for the pattern.
Ellen says
Hi,
Great tutorial however EVERYTHING should be 100% cotton. Bias tape and thread. I've sold over 2,000 microwave potato bags. Trust me.
Renée ♥ says
All I can say is that I've made a lot of these with poly-cotton blend (Wright's) bias tape with no problems. The one I have now has been in service for well over two years without any problems.
I wonder if it makes a difference that these are for warming tortillas. What I mean is, I have a potato bag too (I bought it) and because the time it spends in the microwave for any one job is so much longer, it endures much higher temperatures. Just a thought. Anyway, for the tortilla warmer the poly-blend tape hasn't been a problem, but I would definitely agree that the fabric & batting need to be 100% cotton.
Sue MacDuff says
I was told that everything must be 100% cotton for the microwave. All of the bias tape has polyester in it. Can that be used?
Renée ♥ says
It has never been a problem for me; however, best practices for anything going into the microwave is to make EVERYTHING 100% cotton: batting, fabric, and bias tape.
Crafty Staci says
These will be perfect to add to the kitchen set I'm making for an upcoming auction for a fallen police officer! I also just wanted to say hello from a former east side camp girl (Arrah Wanna) - my kids went to outdoor school at Namanu. Our house overlooks the Sandy River, and we appreciate the view every day!
Renée ♥ says
Thanks for stopping by, Staci! It's always great to connect with other campers - there is always a bond of shared experience there. Under the circumstances, I'm sorry to hear of your auction, but I'm glad to know that the tutorial is helpful. Is there anything local folks can do to help?
Crafty Staci says
Thanks Renee! There is going to be a silent auction and poker party for him on October 26th. He's a Troutdale officer and SWAT member who was injured by a driver while riding his motorcycle off duty back in June. He doesn't have the use of his legs, and very limited use of this hands. Thank you for asking! 🙂
Renée ♥ says
Great info, Staci! I will get it out on my channels. What a great cause.
Anne says
I'll be making some of these for Christmas gifts this year! I've got a Craft Gossip post scheduled for this evening that links to your tutorial:
http://sewing.craftgossip.com/tutorial-fabric-tortilla-warmer/2014/10/06/
--Anne
Renée ♥ says
Thanks, Anne! So glad you found the tutorial helpful!
Hope Mayles says
Do you use it in the microwave to heat the tortillas or just for storing them after you have heated them in a skillet?
Renée ♥ says
The warmer is for heating them in the microwave. Works like a charm! No more overcooked, tough tortillas.
Dorcas says
Hi I ran into this page while I was trying to figure how to make a tortilla warmer and yours is absolutely my favorite. my mom is going to have a get together and I thought it would be a cool idea to create at least 10 tortilla warmers to give out, however, im just so confused on the measurements I don't know how many yards is good enough to make 10 tortilla warmers if you could help me out on this confusion and also recommend me any good affordable fabric websites or stores that would be great ☺
Renée ♥ says
Everything is cut in 11" circles, so figuring the yardage really depends on how wide your fabric is. For example, You need a total of 6 circles for each warmer - 2 of the outside "pretty" fabric, 2 of inside liner fabric, and 2 of the batting. If your fabric is 44" inches wide, you could get 4 circles across if you cut very carefully. That means 4 circles = 1/3 yard. (Or just make it a bit smaller.) Let's take the case of the outside fabric - you will need 20 outside fabric circles for 10 warmers, so that means you need 1 2/3 yards of outside fabric. If all the fabric was the same width (which is won't be), that means you would need a combined total of 5 yards of outside fabric, liner fabric and batting. Just do the math - it's pretty easy. Good luck - it sounds like you have a fun project planned!
Annette says
Hey Renee,
I was just wondering what inexpensive gift I could give to my daughters and daughters-in-law for their birthdays this year. This sounds like it may fill the bill Thanx
Renée ♥ says
Glad to be of service!