

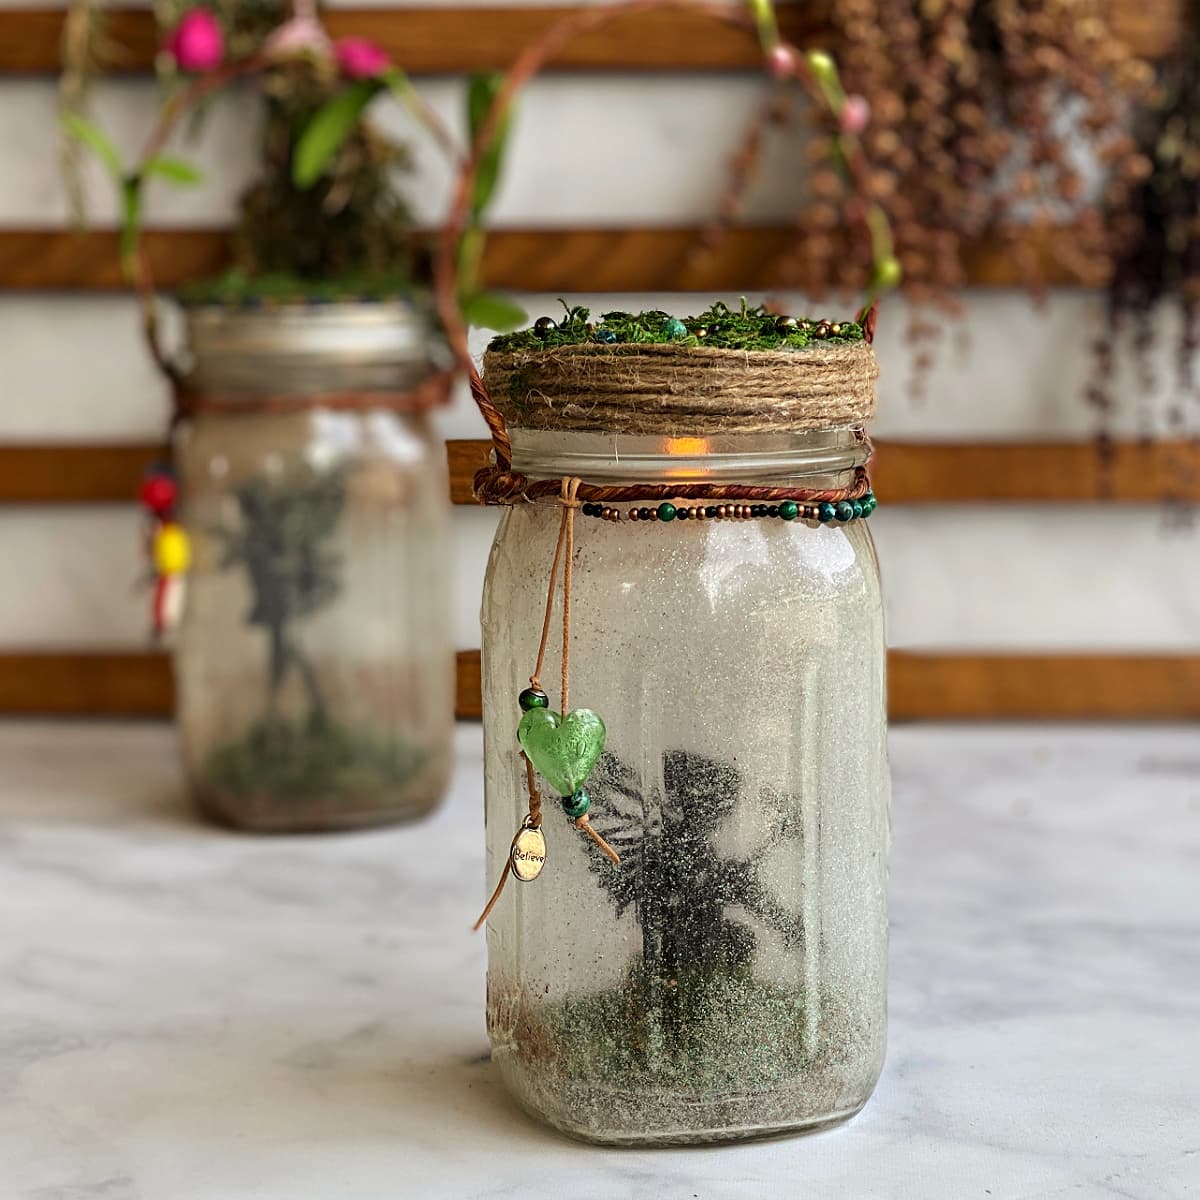
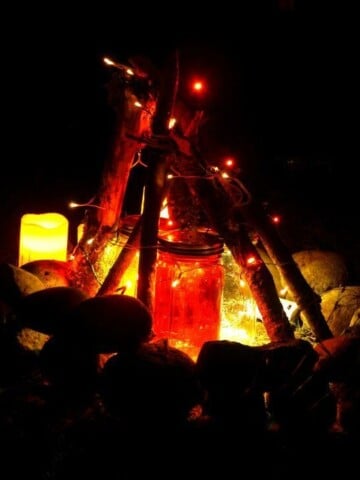
This whimsical fairy lantern brings enchantment to any space. Hang it in a garden, back porch, deck, or balcony; or use it as a nightlight. Easy, step-by-step tutorial.
Jump to:
Dedicated to Gertrude, and her Worcestershire Sauce bottle.
Why You Need a Mason Jar Fairy Lantern
Chances are, if you came here looking for a tutorial on how to make a Mason jar fairy lantern, you already know why you need one. However, just is case you need a little convincing before you run out and buy all the supplies, here are just a few good reasons:
- A fairy lantern is adorably whimsical, and the world needs more whimsy right now.
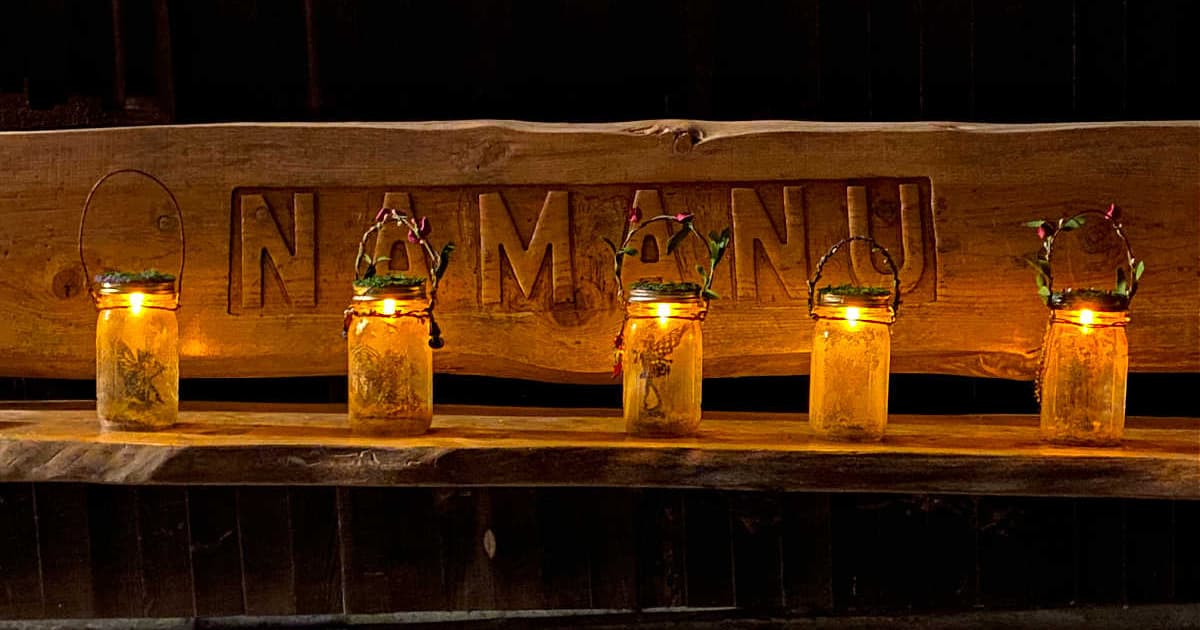
- Just one lantern will make your back porch, deck, or balcony seem a little more friendly. (Two lanterns make it a party!)
- Likeminded folx will see your fairy lantern and feel an immediate kinship with you.
- A confident crafter can make a Mason jar fairy lantern in about an hour, give or take.
- If you are not a seasoned crafter, you'll learn some useful techniques in the process that will help you become one, if that's a goal.
- Mason jar fairy lanterns make outstanding nightlights - for you, or for one of your favorite small humans.
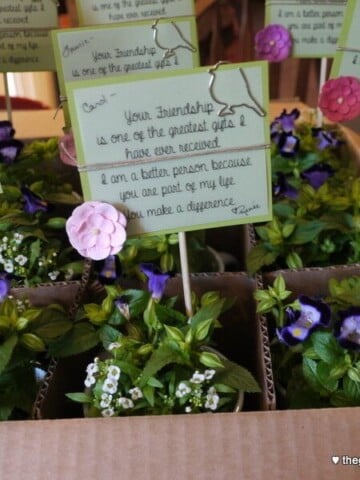
- If you make a fairy lantern for a friend, they will love you forever. 🏹
Disclaimer: This should go without saying, but here it is: We are not responsible in any way for any cuts, burns, or other harm incurred while using this tutorial (or anything else on our website). This includes, but is not limited to, the use of X-Acto knives (which are SHARP) and hot glue (which is HOT). Use common sense, and take utmost care when crafting in all cases.
Materials & Supplies
Most of the materials for these Mason jar fairy lanterns are inexpensive and readily available. If you do a lot of crafting, you may already have almost everything you need on hand.
Before you start, read all of the directions all the way through. Many steps in this tutorial can be adapted or completed using alternate materials, and a few are completely are optional. Make this lantern your own.
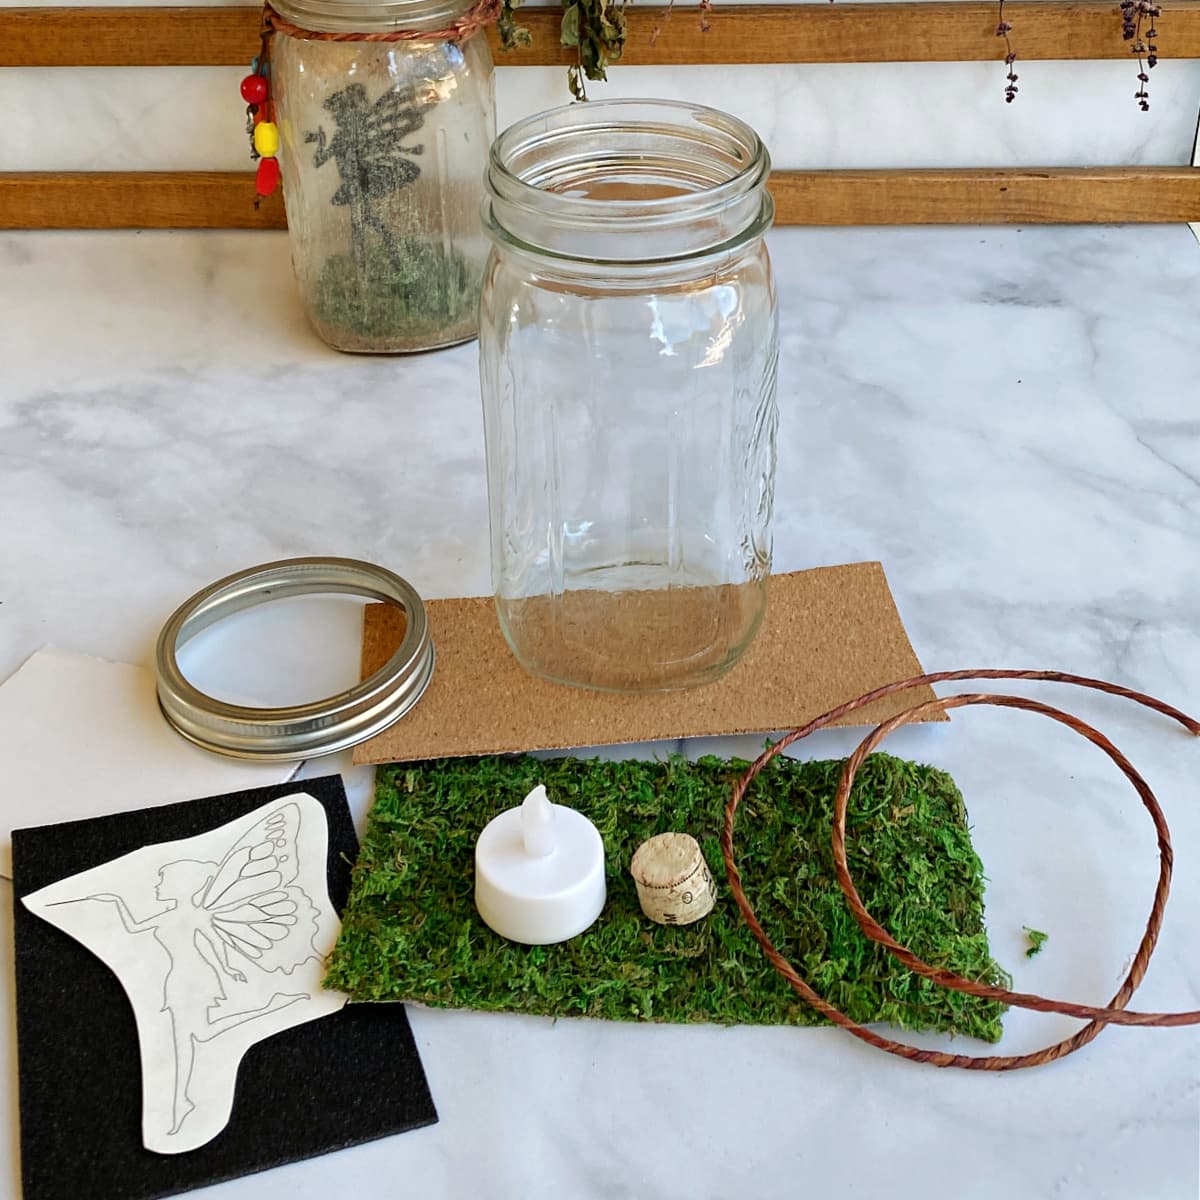
Basic Lantern Supplies
- 1 wide-mouth quart-size Mason jar (I'm using "Mason" generically. Any wide-mouth canning jar will do.)
- 1 wooden skewer
- 1 plastic grocery bag or strip of plastic wrap
- Masking tape (about 2-3 inches)
- Ultra-fine glitter (I use Crystal Diamond Ultra-Fine Glitter)
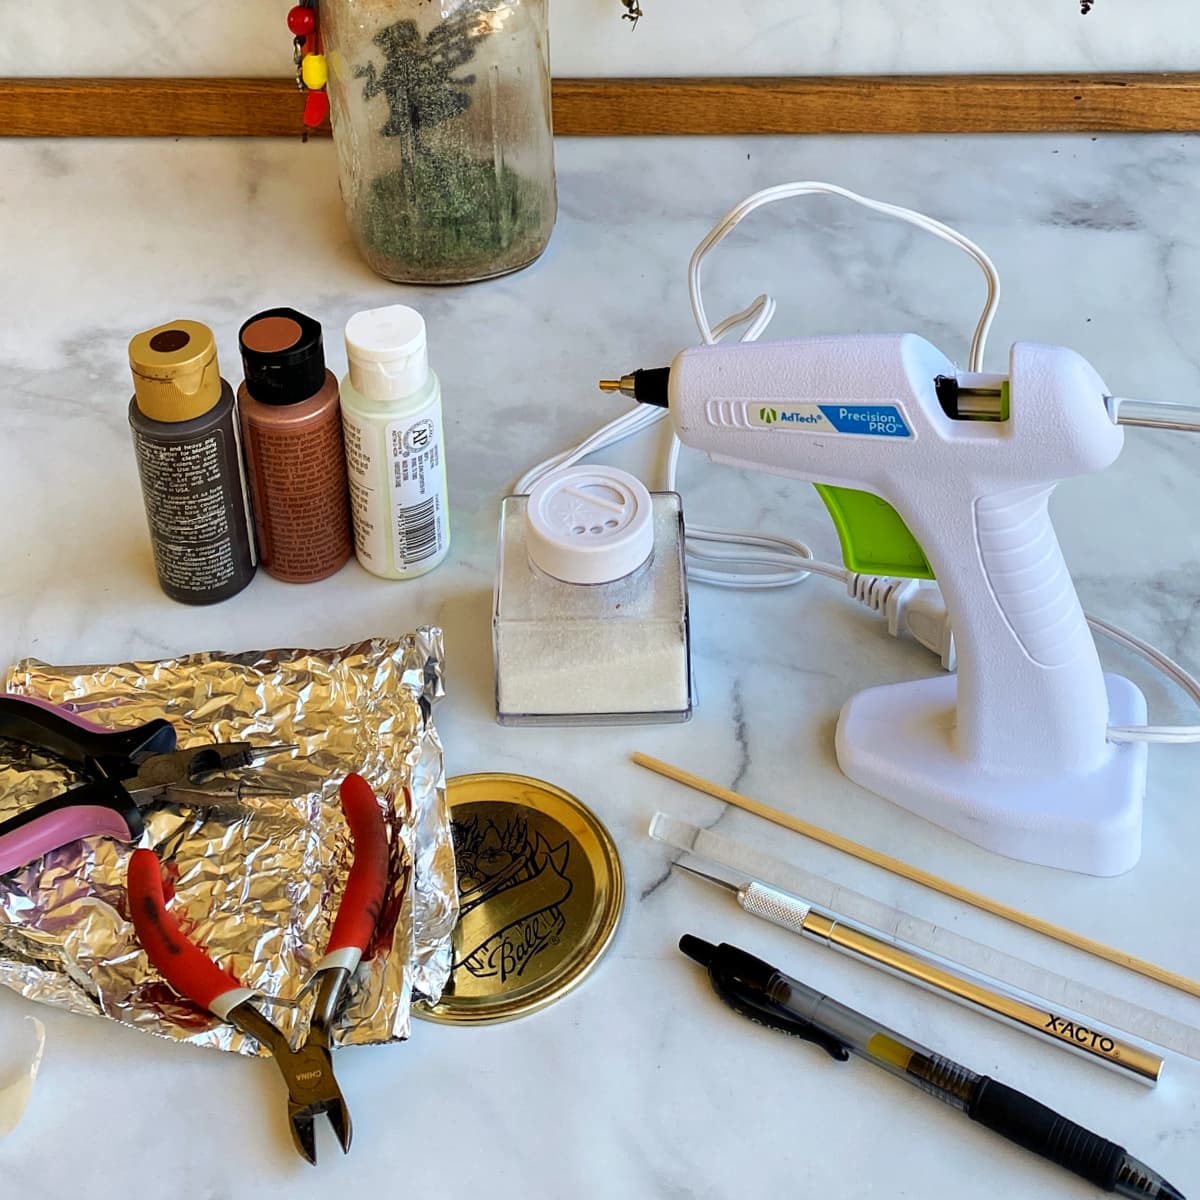
- Acrylic glow-in-the-dark paint (I use Folk Art; Neutral)
- Acrylic copper or rose gold paint (I use Folk Art Metallic Rose Gold)
- Acrylic dark brown or umber paint
- Paper towel
- 1 fairy silhouette printed onto self-adhesive paper (Free fairy silhouette printable here)
- 1 small piece of black craft foam large enough for your fairy cut-out, plus one inch all around. (I use glitter-backed foam because it is a little more rigid.)
- 1 wide-mouth jar ring
- ½-inch piece of cork (About a third of a wine cork.)
- 1 4-inch by 8-inch piece of crafting moss mat (or green felt)
- Glue sticks
- 1 4-inch by 8-inch piece of adhesive cork (Or anything else that is strong enough to hold up to cutting and hot-gluing. See Step 5.)
- 1 4-inch piece of cardboard
- 1 small battery-operated tea light
- 26-28 inches of heavy wire (I use 1.3mm Wired Jute Twine. You can find this is the floral area of most big-name craft stores.)
Tools Needed
You will need these tools:
- Hot glue gun
- X-Acto knife (A standard #11 blade works well.)
- Cutting mat
- Small, sharp pair of scissors
- Wide mouth jar lid
- Pen
- Small pliers
- Wire cutters
- Something to hold a small amount of paint: aluminum foil, plate, etc.
Extra Supplies (Optional)
- Polymer clay (to stabilize the fairy base inside the jar)
- Beads, charms, or other goodies to adorn and personalize your finished lantern
1. Prep & Paint Jar Interior
For this step, you will need:
- 1 wide-mouth quart-size Mason jar
- 1 wooden skewer
- 1 plastic grocery bag or strip of plastic wrap
- Masking tape
- Ultra-fine glitter (I use Crystal Diamond Ultra-Fine Glitter)
- Acrylic glow-in-the-dark paint (I use Folk Art; Neutral)
- Acrylic copper or rose gold paint (I use Folk Art Metallic Rose Gold)
- Acrylic dark brown or umber paint
- Something to hold a small amount of paint: aluminum foil, plate, etc.
- Paper towel
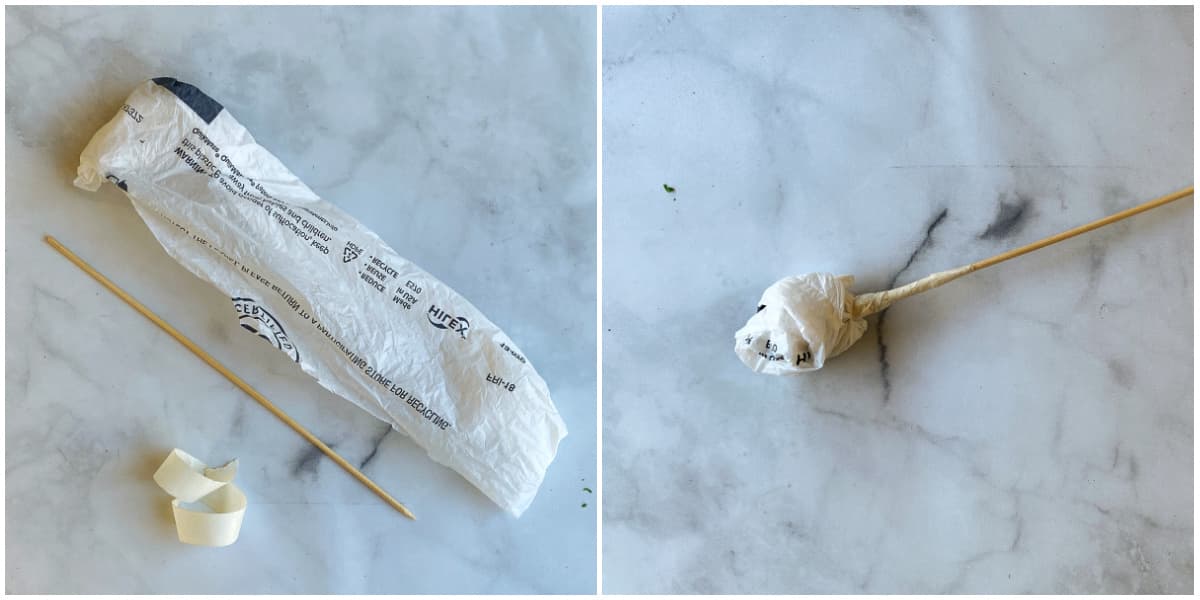
Make a Plastic Bag Paint Brush
You will use this brush to paint the inside of the jar. A plastic bag paintbrush is about as cheap a tool as they come, and will give the inside of your jar a rustic, unrefined look. (If you have another brush tool that you'd rather use, go for it.)
To make a plastic bag brush:
- Cut a 2-inch strip from a thin plastic grocery bag.
- Wrap the grocery bag strip unevenly around one end of the wooden skewer.
- Secure the bag to the skewer with masking tape.
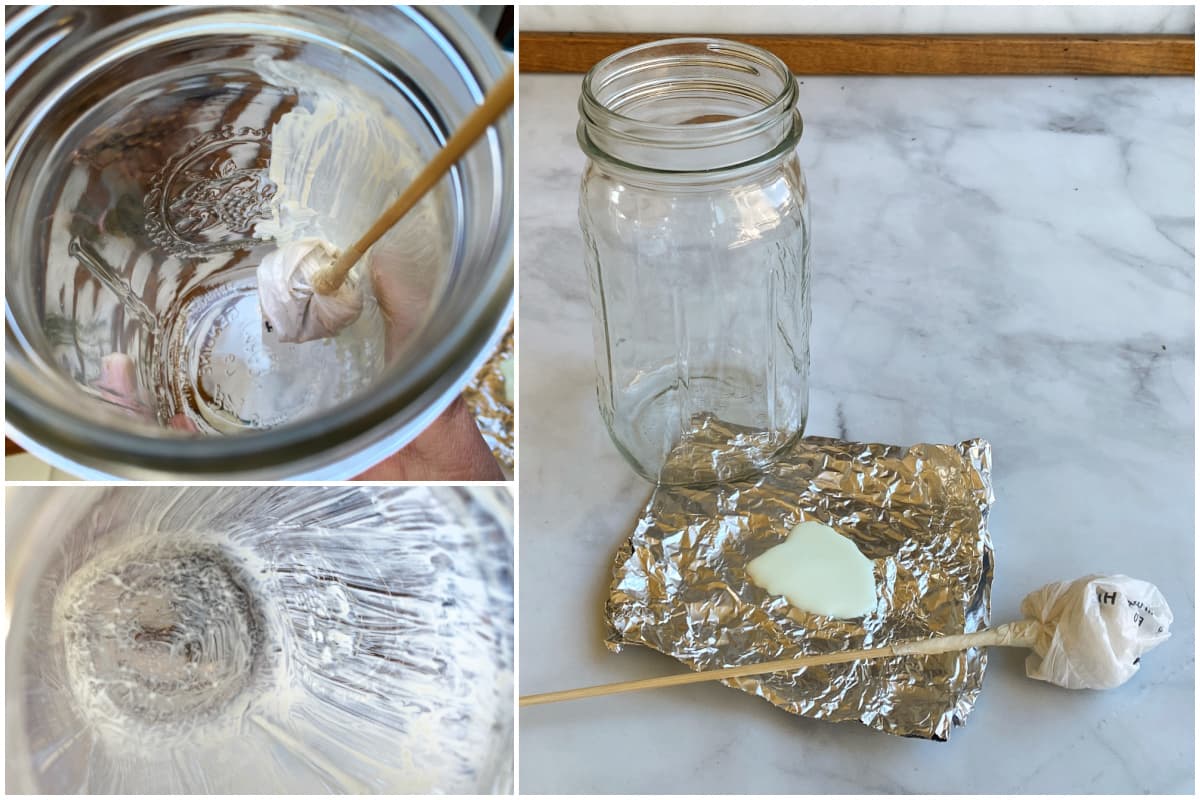
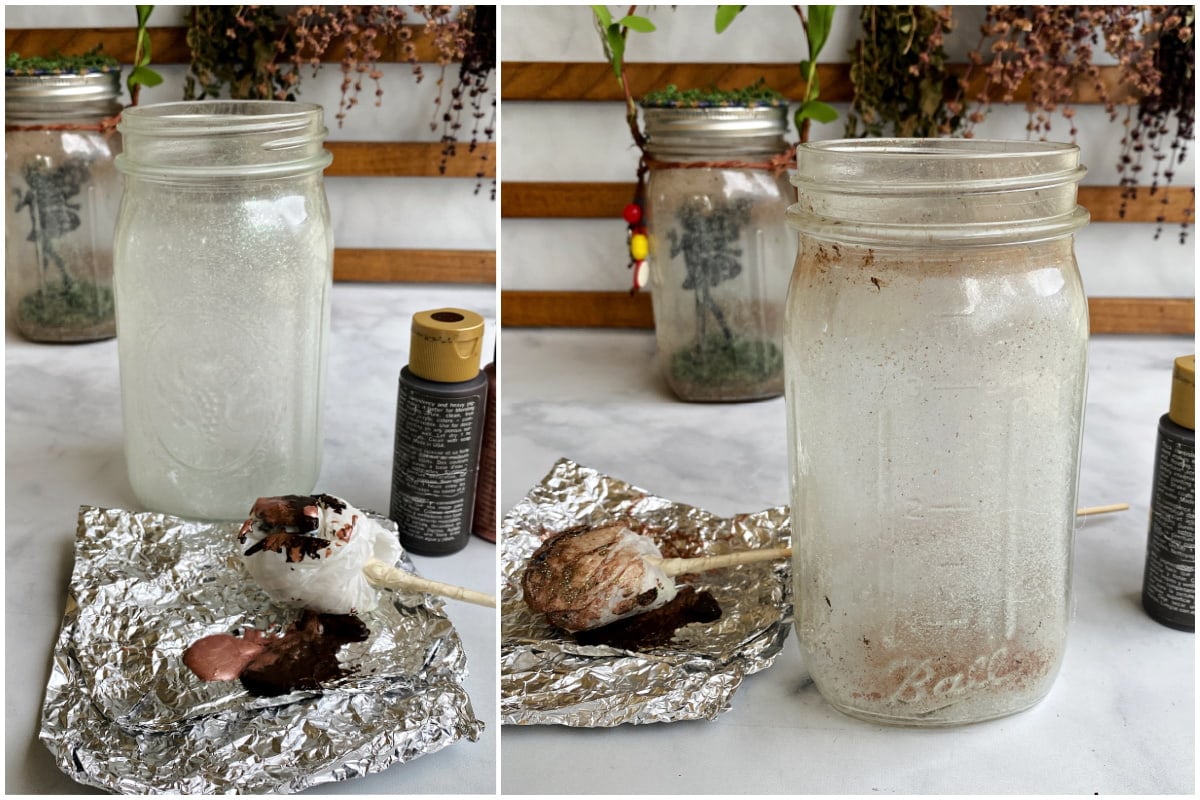
Paint Inside of the Jar
- Using the plastic bag brush, cover the entire inside of the jar with a thin coat of glow-in-the-dark paint.
- Wait at least an hour.
- Repeat to add a second coat.
For the first coat, it really doesn't matter how you paint it. I usually go up and down in the jar, because that is easiest. For the second coat, I try to pounce the brush all over the inside surface to create an even texture. Both coats of paint should be very thin.
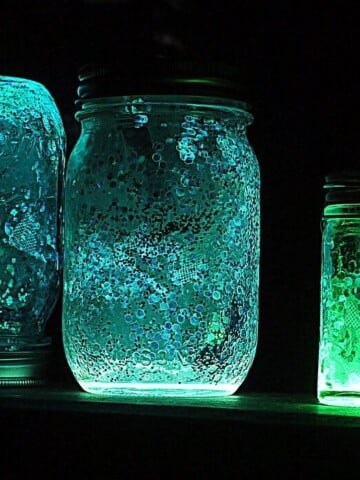
Add Glitter
Immediately after painting the second coat, sprinkle ultra-fine glitter inside the jar, put on the lid and ring, and shake the heck out of it to coat the entire inside with a very thin coat of glitter. Turn the jar upside down and shake out any extra glitter that does not adhere to the paint.
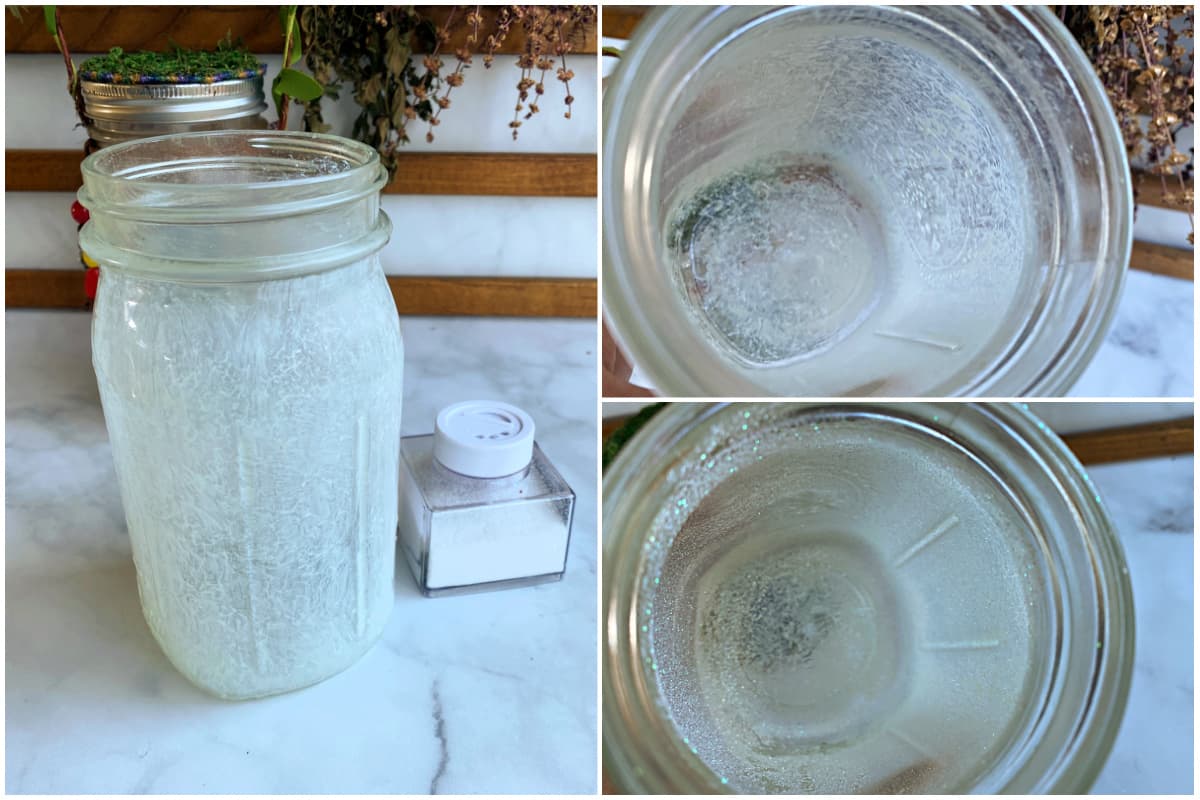
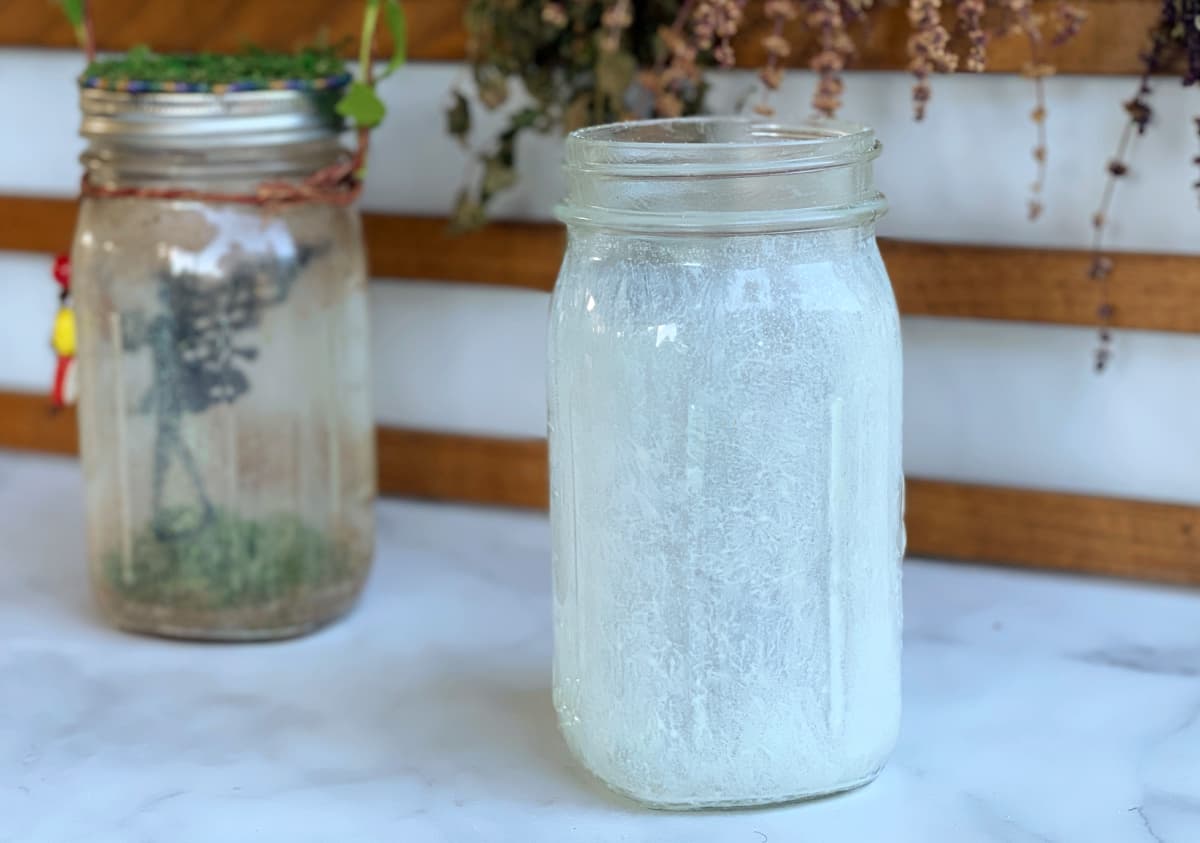
The jar will appear opaque after adding the second coat of paint and the glitter. Give the paint a day or two to completely cure and become clear(ish).
Antique Inside of Jar
When the inside of the jar has completely cured, drop a dime-size puddle each of dark umber paint and metallic paint (copper or rose gold) next to one another. Dip the plastic bag brush into the paints, and then pounce on a paper towel to remove most of the paint.
With a light hand, pounce the brush around the top and the base of the jar. Do this just enough to make it appear old and worn. (Don't overdo it.)
2. Cut Fairy Silhouette
For this step, you will need:
- 1 fairy silhouette printed onto self-adhesive paper (Free fairy silhouette printable here)
- 1 small piece of black craft foam (Big enough for your fairy cut-out, plus at least one inch all around it.)
- X-Acto knife (A standard #11 blade works well.)
- Small, sharp pair of scissors
- Cutting mat
If you don't have adhesive printer paper, you can print the fairy onto regular printer paper and either hold it firmly as you cut, or spray the back with spray-on adhesive.
Our cut-out options are just a few of the many fairy images available for use in Public Domain. You can find others by searching "fairy silhouette public domain". Make sure that whatever you choose will fit easily inside the jar, and has a large enough base (the part that touches the ground) to support the fairy.
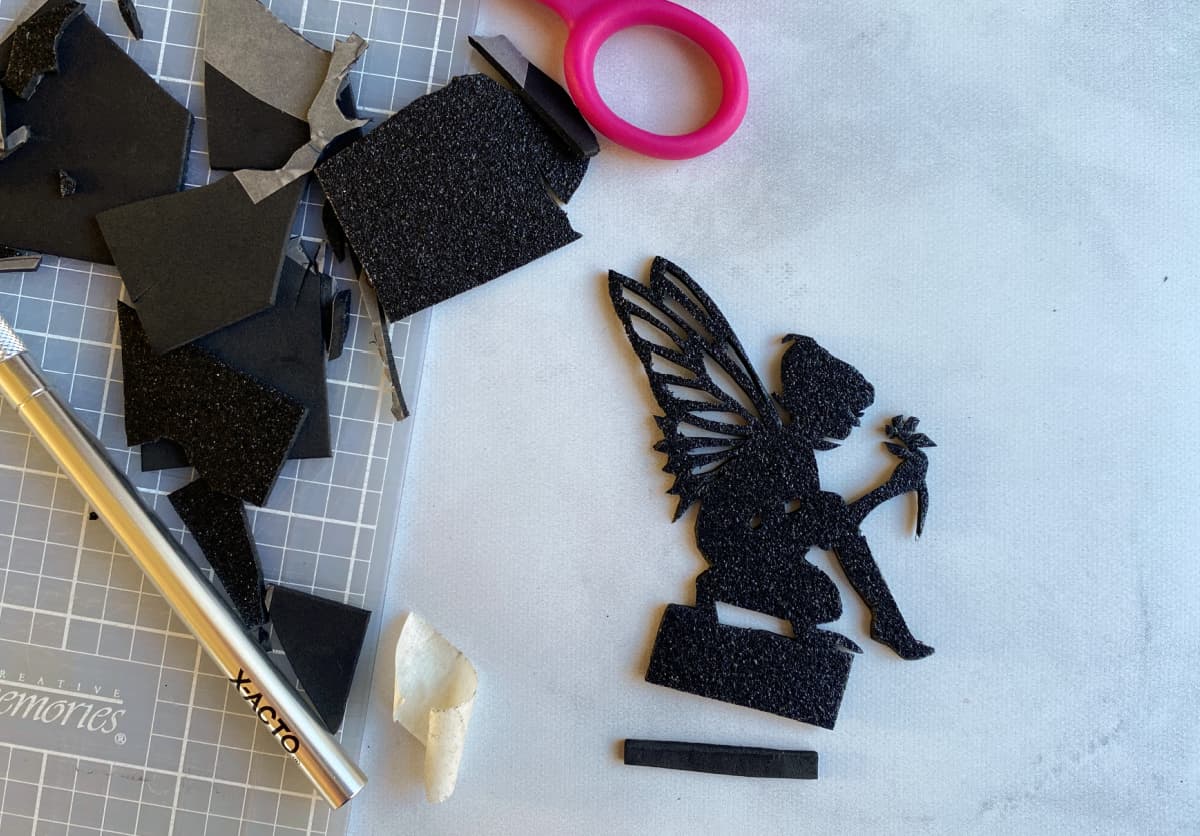
Cut Out Fairy
Place the fairy onto the black foam sheet. It is critical that you leave a 1-inch by half-inch strip (i.e., foundation strip) at the bottom of the fairy cut-out.
Place the foundation strip at the widest point on the design that you can; otherwise, your fairy will flop inside the lantern.
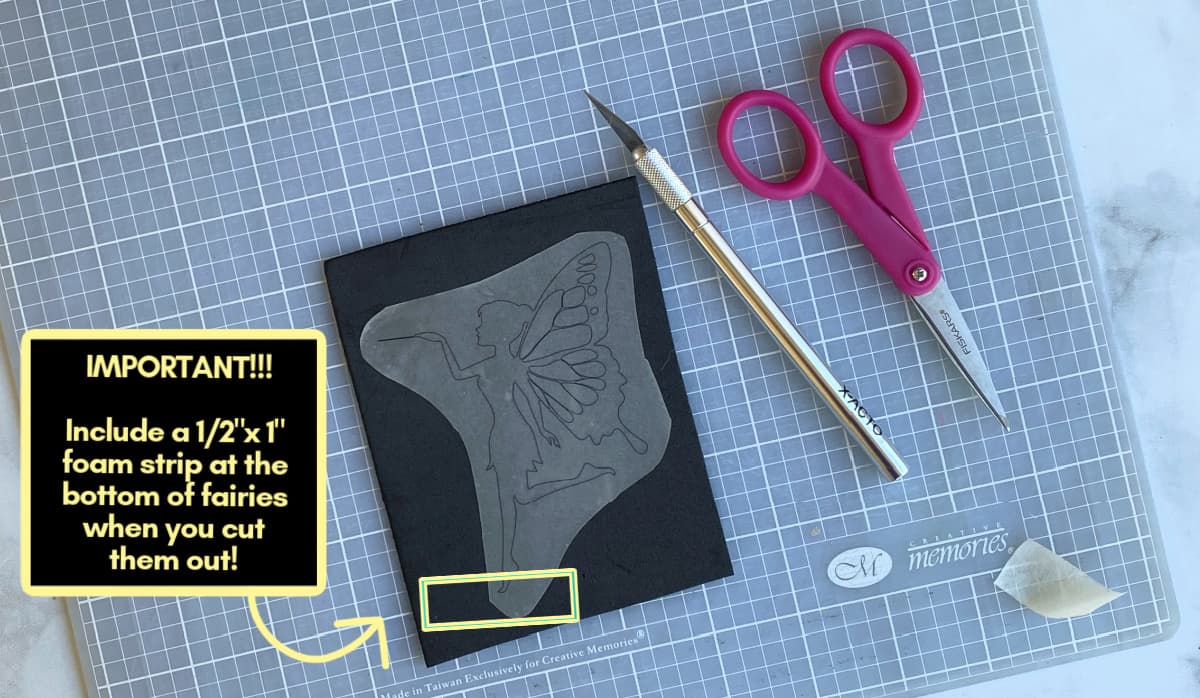
Cut the fairy out using the X-Acto knife and the scissors.
It is easier to cut the delicate interior piece out first, as the large piece offers some stability while you do so. Cut the outside outline out last.
If the lacy interior is beyond you cutting skills, skip it and just use the scissors to cut out the outline of the fairy.
Be sure to leave that little 1 x ½-inch foundation strip on the bottom!
3. Make Fairy Base
For this step, you will need:
- Cut-out fairy [Step 2]
- Wide mouth jar lid
- Pen
- Hot glue gun
- Glue sticks
- 1 4-inch by 8-inch piece of crafting moss mat (or green felt)
- 1 4-inch piece of cardboard
- ½-inch piece of cork (About a third of a wine cork.)
- Polymer clay (optional)
Using the jar lid (not the ring) as a guide, trace and cut two circles of moss matting and one of cardboard. (You will use one moss circle for this step, and the second in Step 5.)
Cut a moss or felt strip as tall as the cork piece, and long enough to wrap all the way around it.
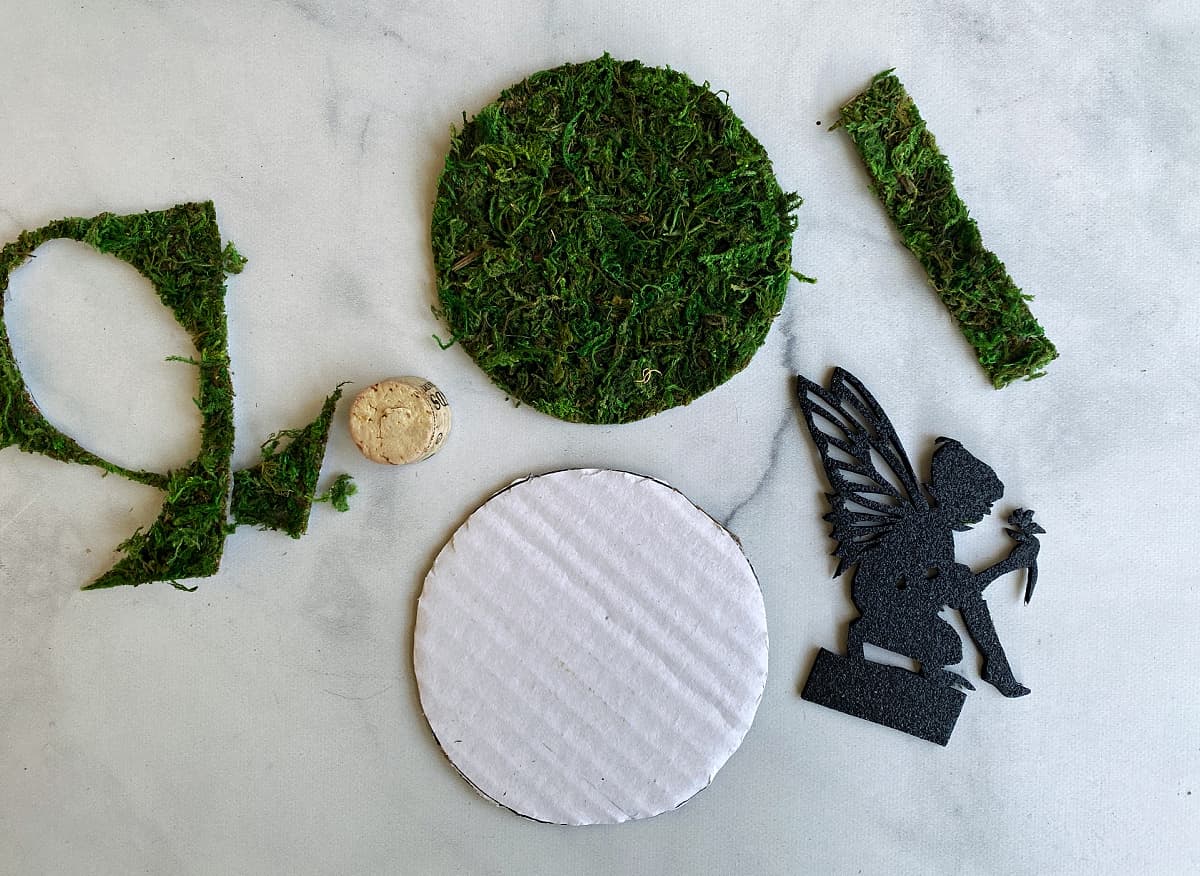
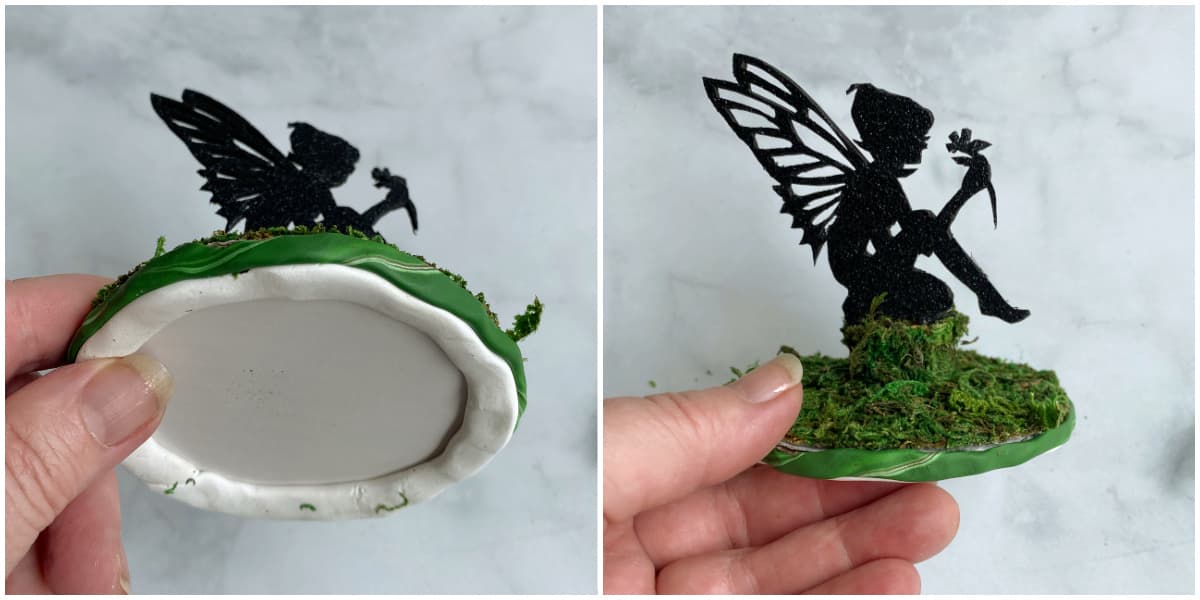
Hot glue the fairy to the cork.
Hot glue the moss strip around the base of the cork, covering the foundation strip.
Hot glue the one moss circle to the cardboard circle.
Hot glue the cork to the center of the moss covered-base. Be sure that the fairy wings do not extend beyond the edges of the base, or it will not sit in the jar properly.

OPTIONAL: It is helpful to add a little polymer clay around the base; both to give it some weight, and to help stabilize it on the rounded surface at the bottom of the jar.
4. Form Wire Handle
For this step, you will need:
- 26-28 inches of heavy wire (I use 1.3mm Wired Jute Twine. You can find this is the floral area of most big-name craft stores.)
- Small pliers
- Wire cutters
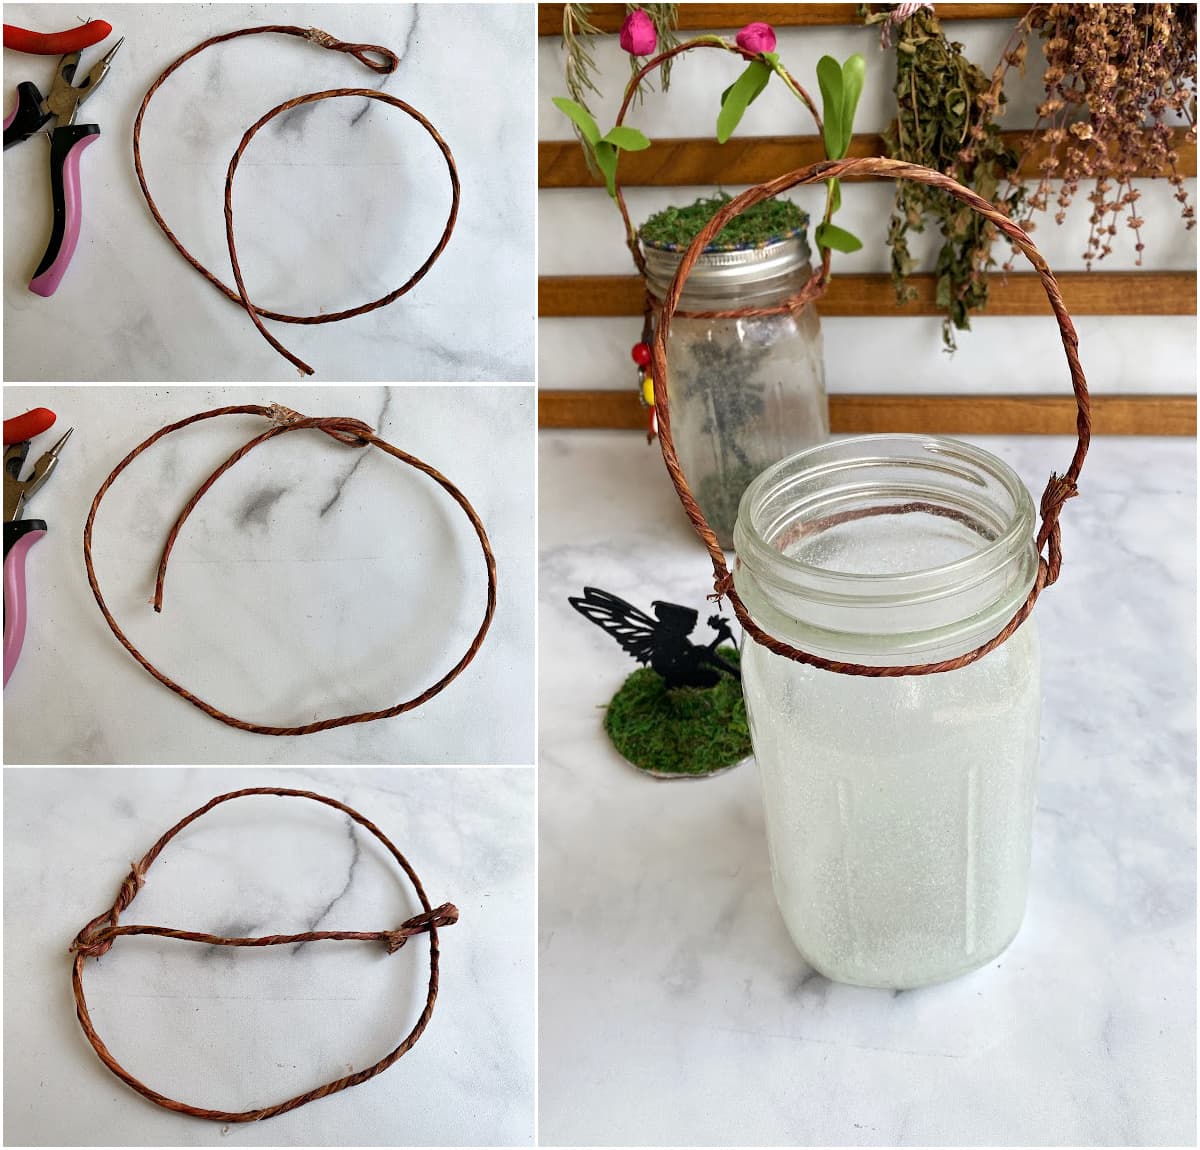
- Using the pliers, make a small loop on one end of the wire.
- Thread the other end of the wire through the loop.
- Loop the threaded end around the wire opposite the first loop.
- Pull the wire between the loops to form a bale. Adjust size as needed on the jar by pulling the handle tight.
Remove the bale and set aside. (It's easier to do the next step with the bale removed.)
5. Attach Tea Light to Lid
For this step, you will need:
- Moss or felt circle (from Step 3)
- 1 4-inch by 8-inch piece of adhesive cork sheeting
- Wide mouth jar lid
- Pen
- Hot glue gun
- Glue sticks
- 1 small battery-operated tea light
I use cork for the lantern lids because (a) I have a lot of it in my craft closet, (b) it holds up to the hot gluing, and (c) it is easy to cut. If you don't want to buy an adhesive cork sheet, you can use whatever you have on hand. The lid material does not show in the final product, so it doesn't matter what it it; as long as it is easy to cut and heat resistant.
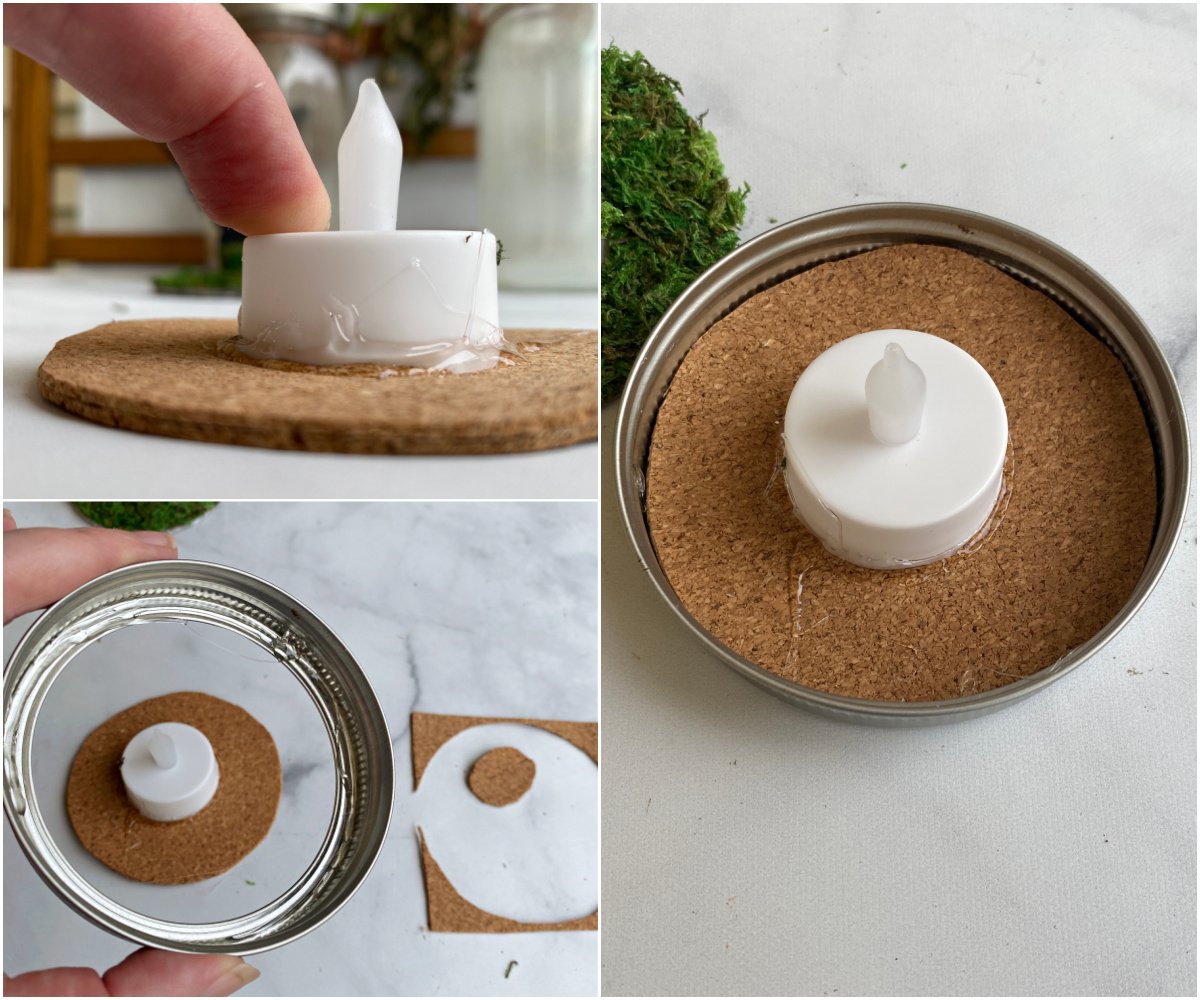
Cut the Outlet Hole
The whole point of all this fancy lid work is so that the electric tea light attached to the top can be easily turned on and off.
Using the jar lid as a guide (once again; not the ring), trace and cut a circle from the cork sheeting.
Trace a circle around the tea light base onto the cork sheeting.
Draw a smaller oval inside the circle. (It should look like University of Oregon's "O" logo.)
Cut out the oval.
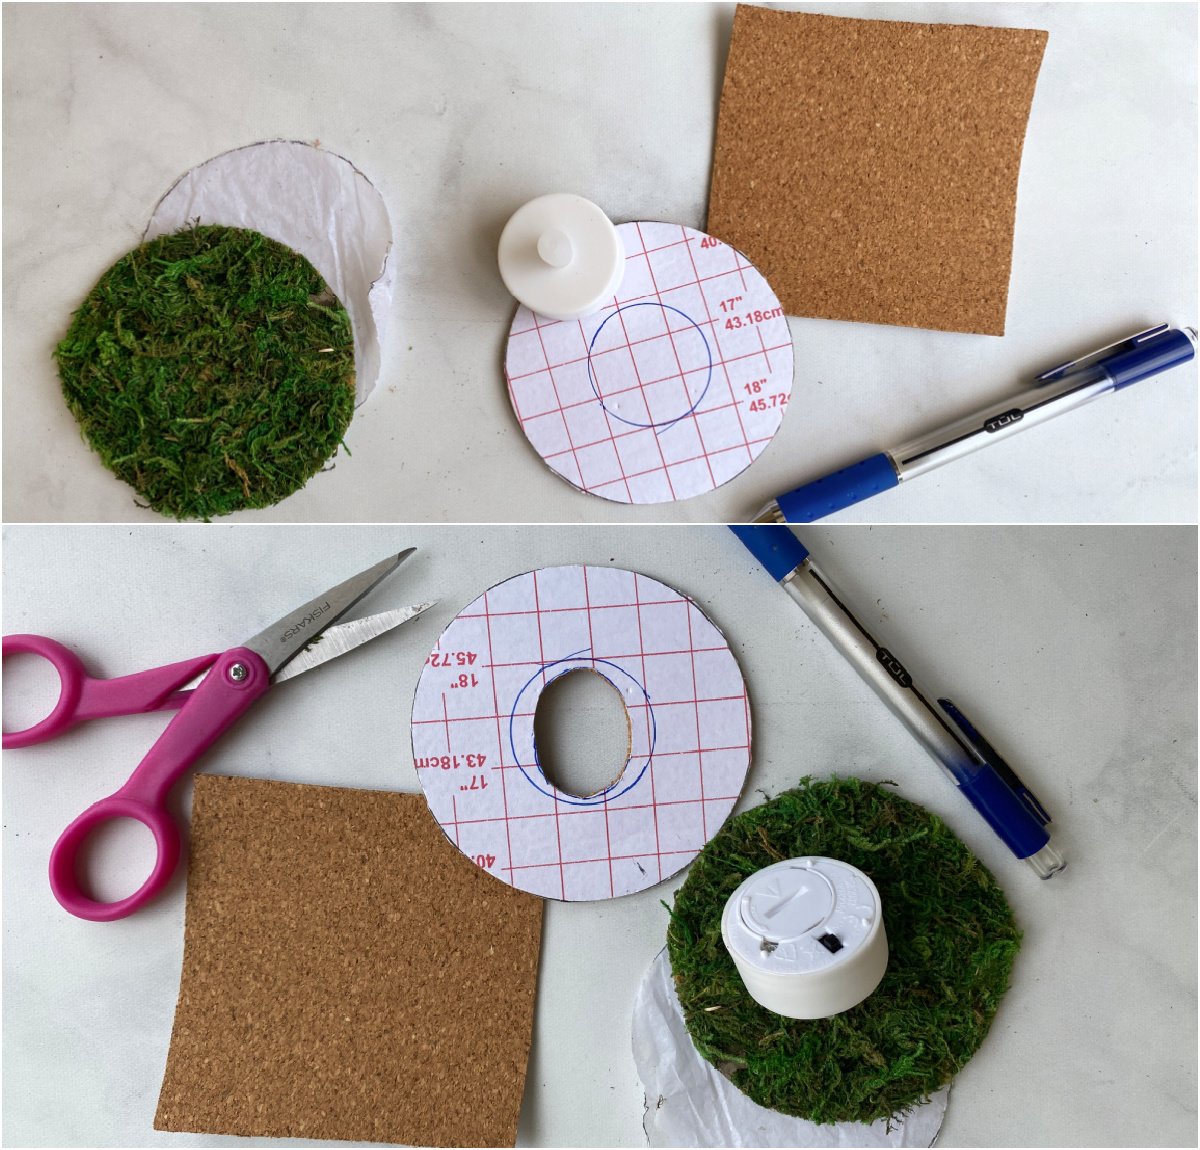
Temporarily place the oval over the base of the tea light, and insure that both the battery chamber and the on/off switch are accessible. Trim as necessary.
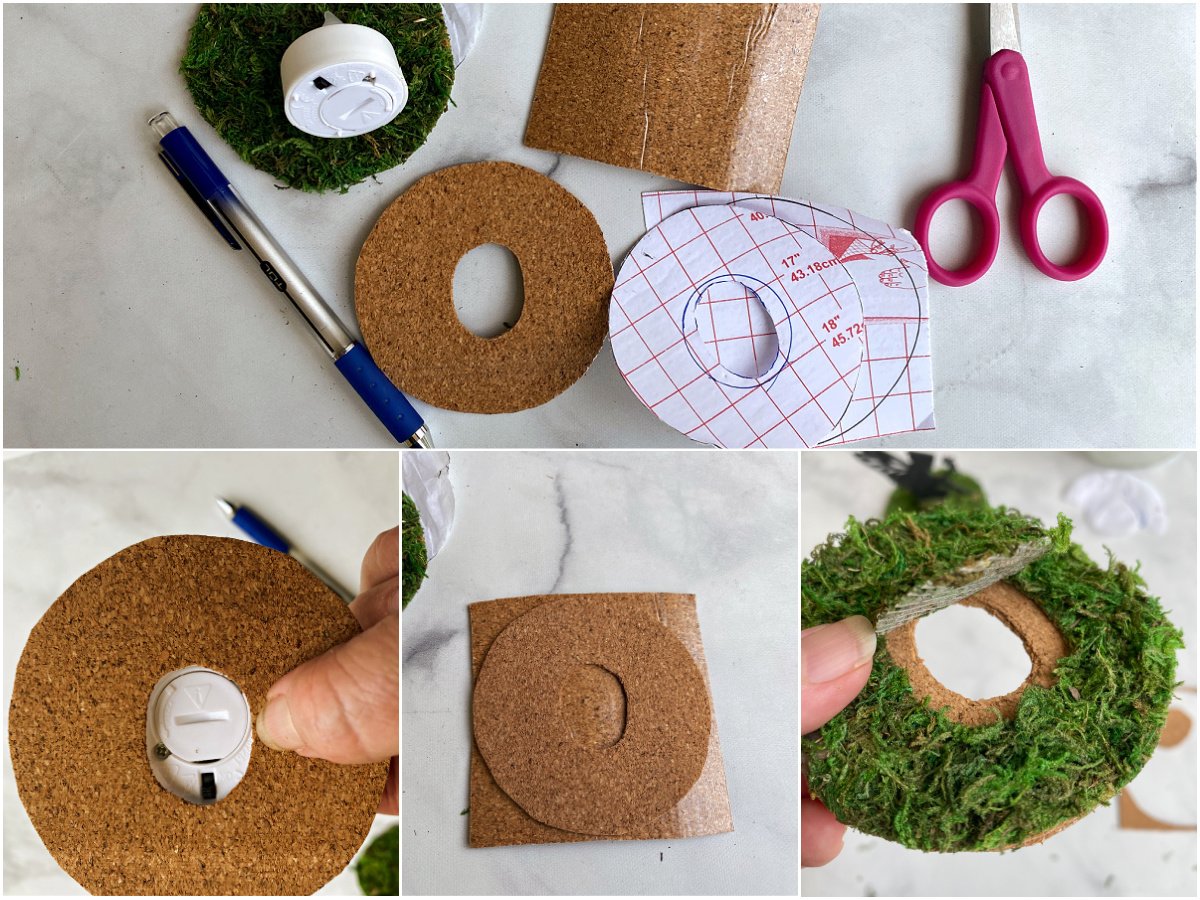
Remove the adhesive backing from both the cork circle and the remaining cork sheet, and them together.
Cut around the second cork sheet, so that there is a double layer of cork, with an oval cut-out in the middle.
If you choose something other than cork sheeting for the lid, and the material you choose strong enough, you do not need to make two layers.
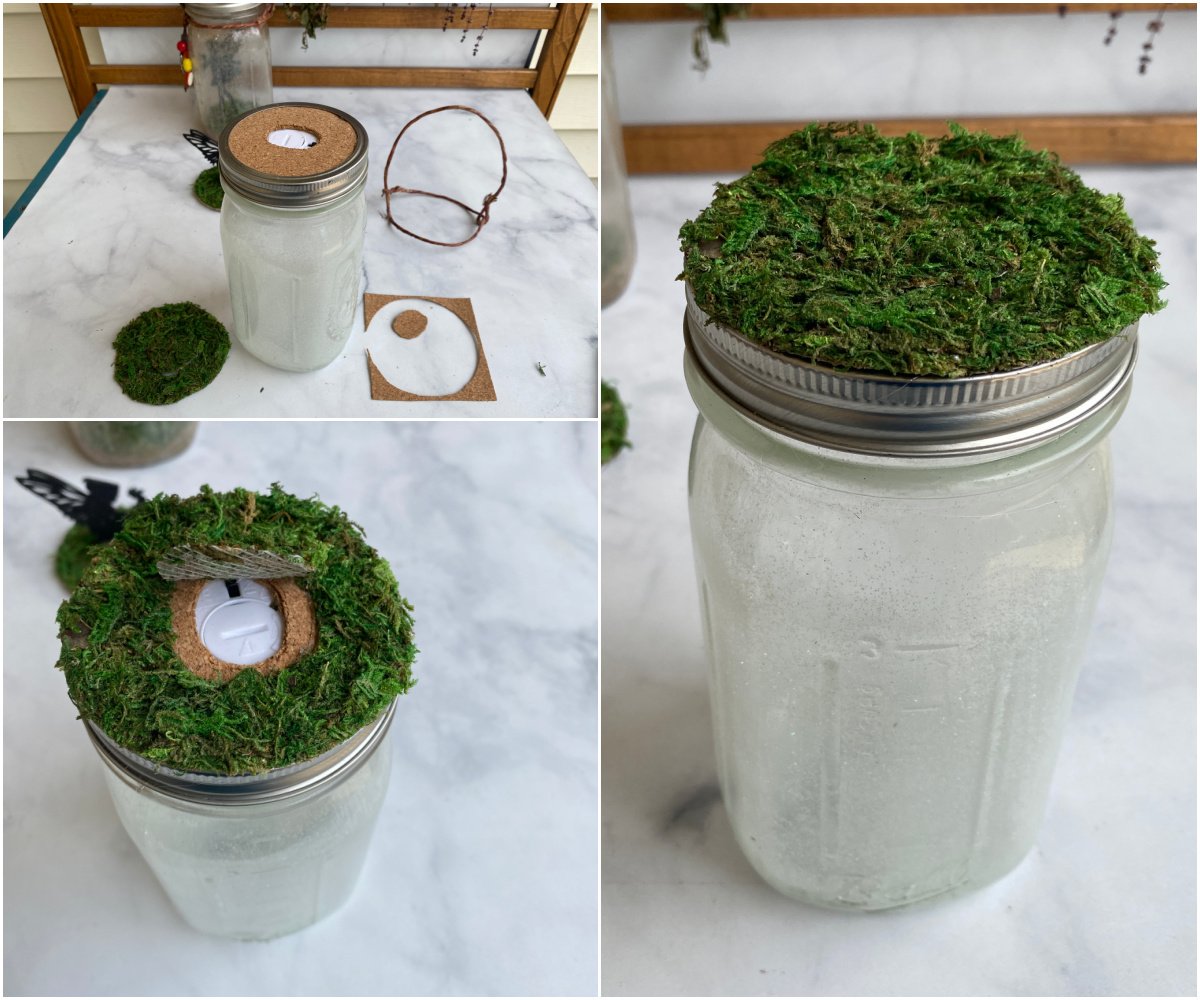
Place the moss circle on top of the cork, and cut a little flap that is larger than the hole in the middle of the cork. (It should look like a toilet seat.) Do not glue the moss on at this time; just set it aside.
Glue Tea Light to Lid
Hot glue the tea light to the cork lid, making sure to leave the battery chamber and switch accessible.
Run a bead of hot glue along the inside top rim of the jar ring, and attach the cork lid.
Immediately after hot gluing the lid to the jar ring, screw the lid on temporarily to seat it and form it to the jar.
Hot glue the moss circle to the lid, with the flap over the outlet hole.
Remove the lid from the jar and set it aside.
6. Put Lantern Parts Together
For this step, you will need:
- Prepared Mason Jar [Step 1]
- Fairy on Base [Steps 2 & 3]
- Handle / Bale [Step 4]
- Lighted lid [Step 5]
To insert the fairy into the jar, gently curve the cardboard slightly to allow it to pass through the mouth of the jar.
You can hot glue it in place, but I have found that gravity works just as well.
Screw on the jar lid, and then attach and tighten the handle.
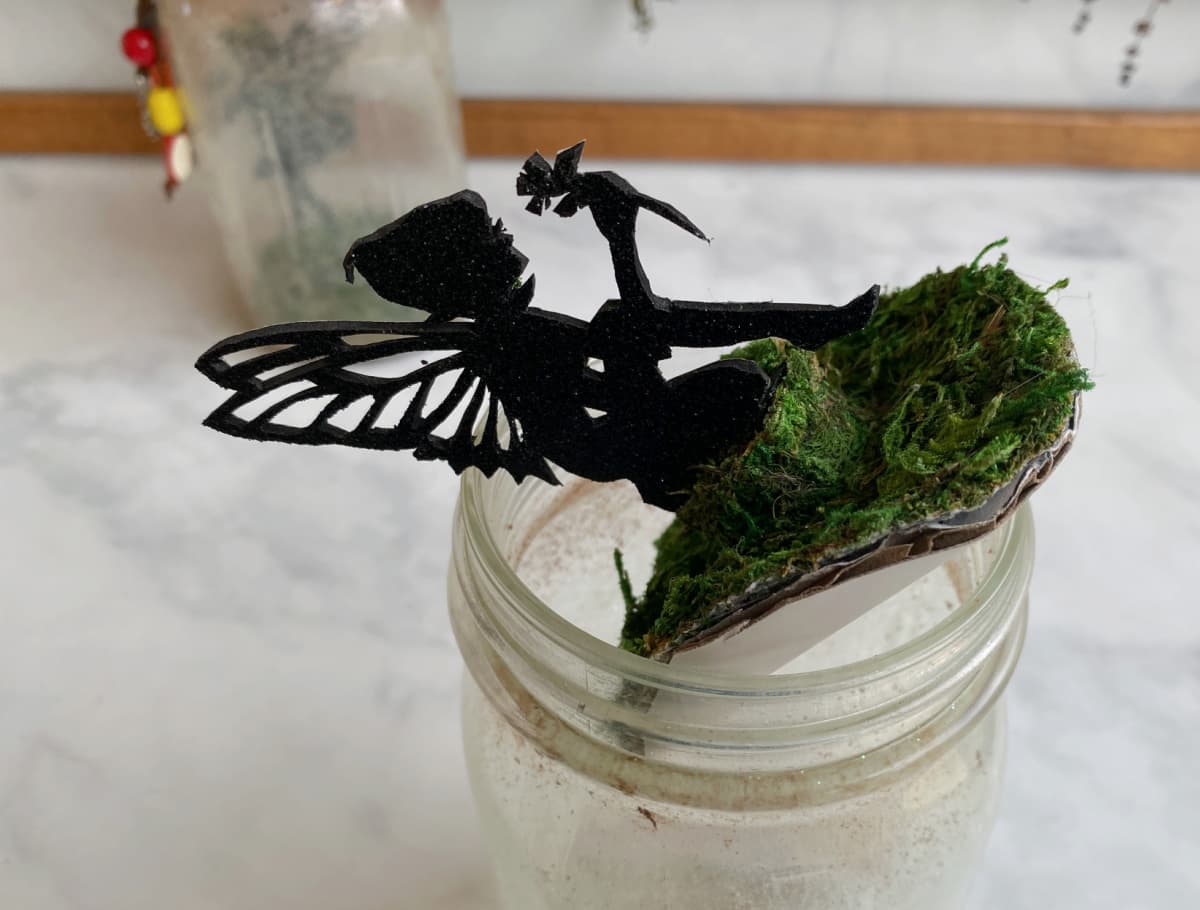
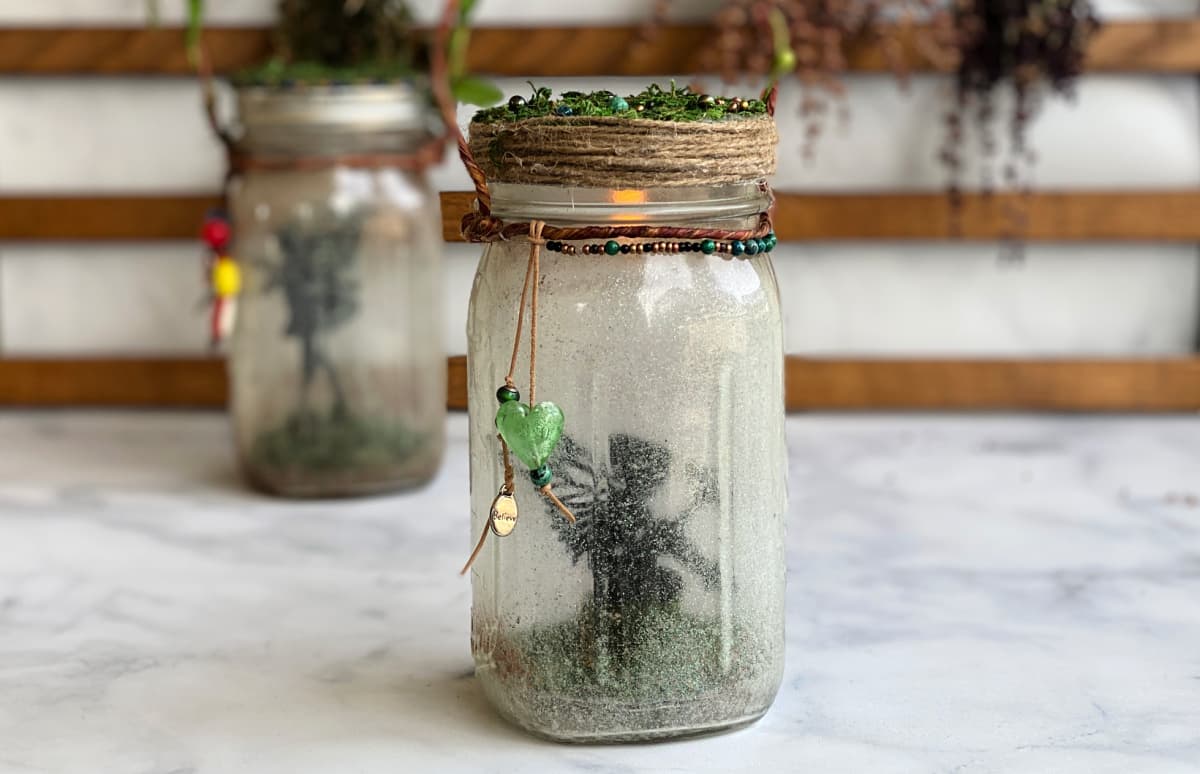
With the fairy in place, and the lid and handle attached, the basic fairy lantern is complete.
You can embellish your lantern with anything you want.
7. Embellish Lantern

Wrap something around the exposed part of the jar lid; fabric, jute, ribbon, etc.
Add flowers, feathers, pine cones, seeds, a morse-code message in beadwork, or whatever you think your fairy would like.
Fairy purists will also insist on adding a small air hole in the lid, so their fairy can breathe. 😉
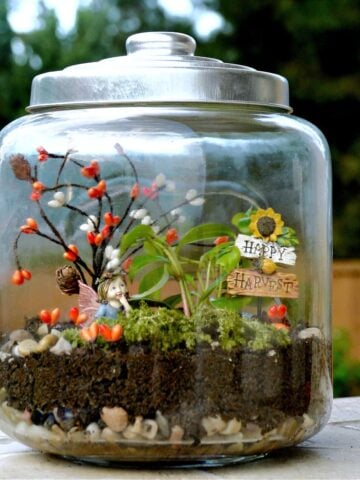
More Whimsical DIYs

Want More Free Recipes?
Subscribe to our newsletter to get family-friendly recipes and cozy living ideas in your inbox each week!
Find us on Instagram, Pinterest, and Facebook, too.
Thank you for visiting the Good Hearted Woman. Remember to bookmark this site, and come back soon!


Leave a Reply