
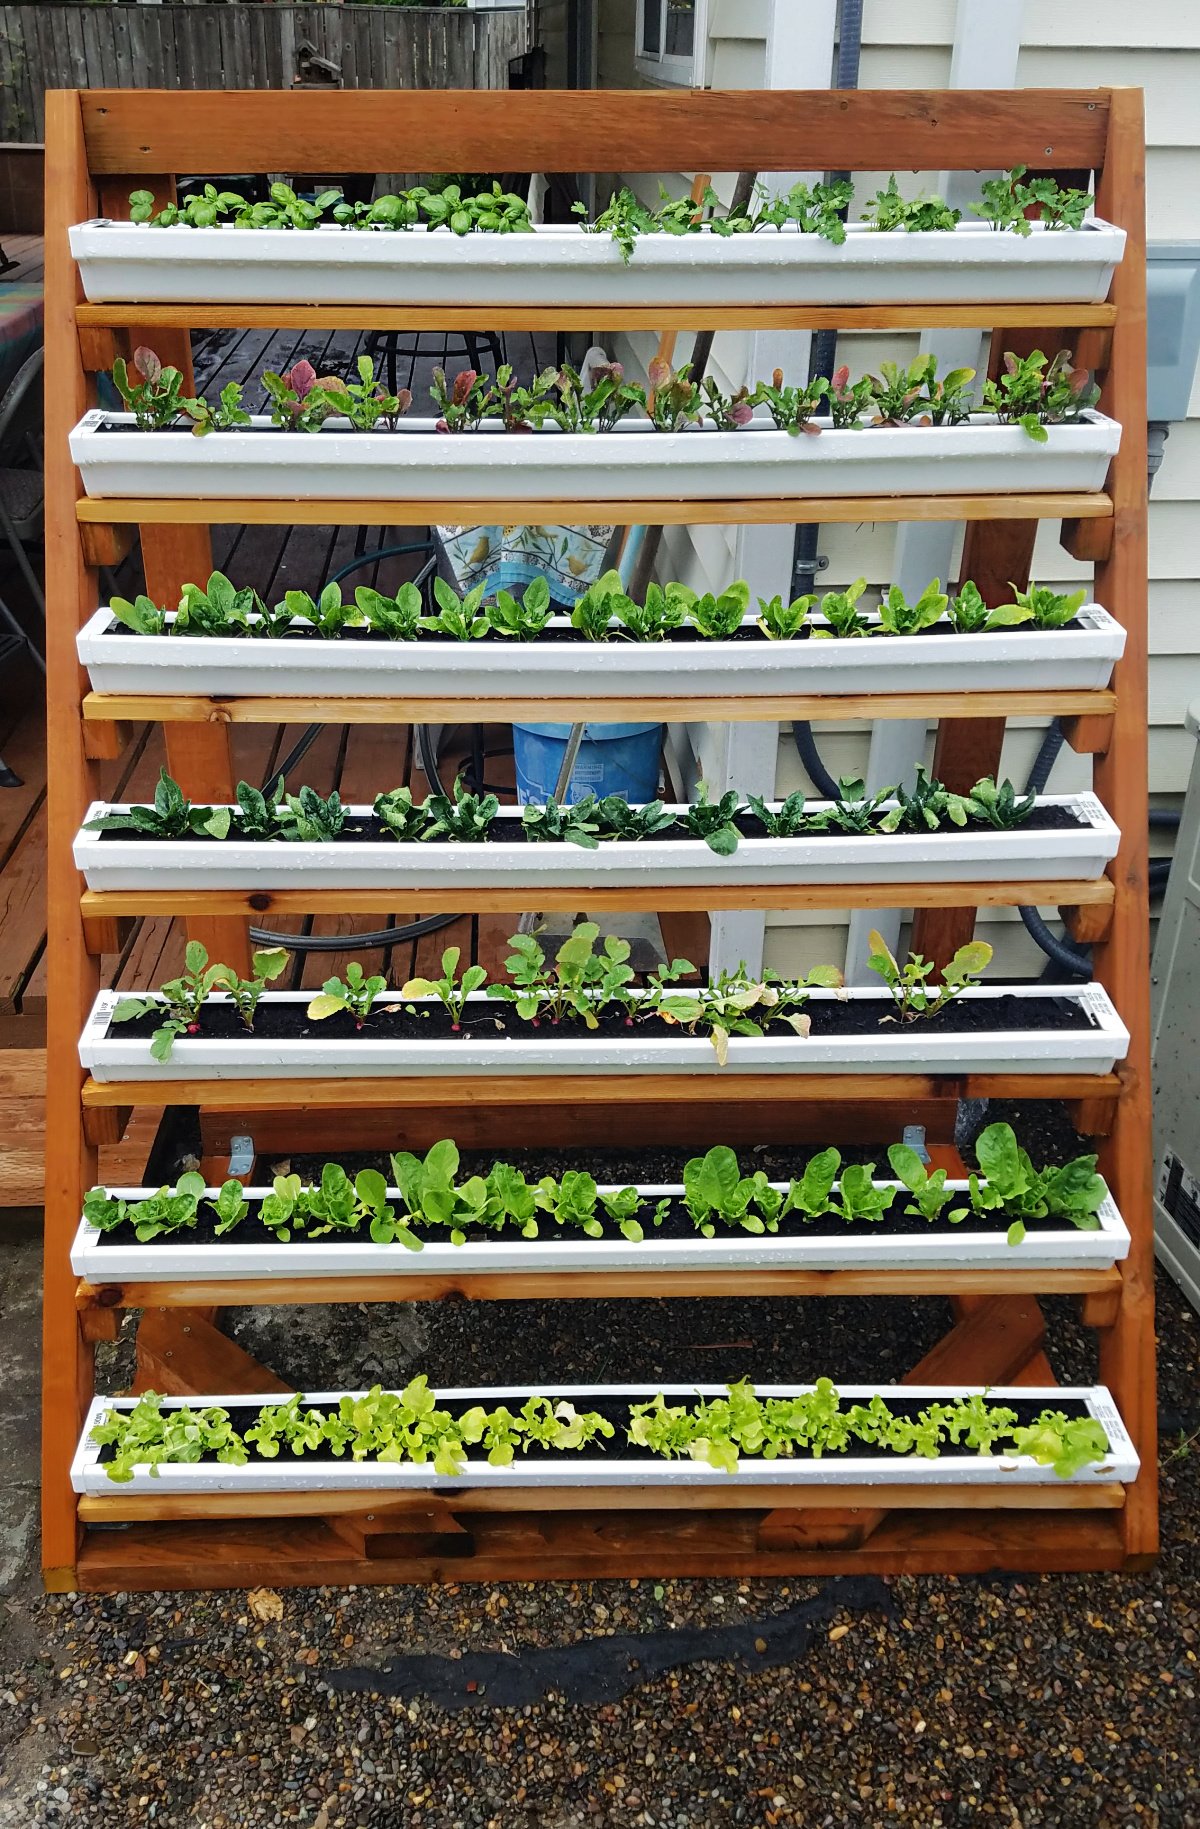
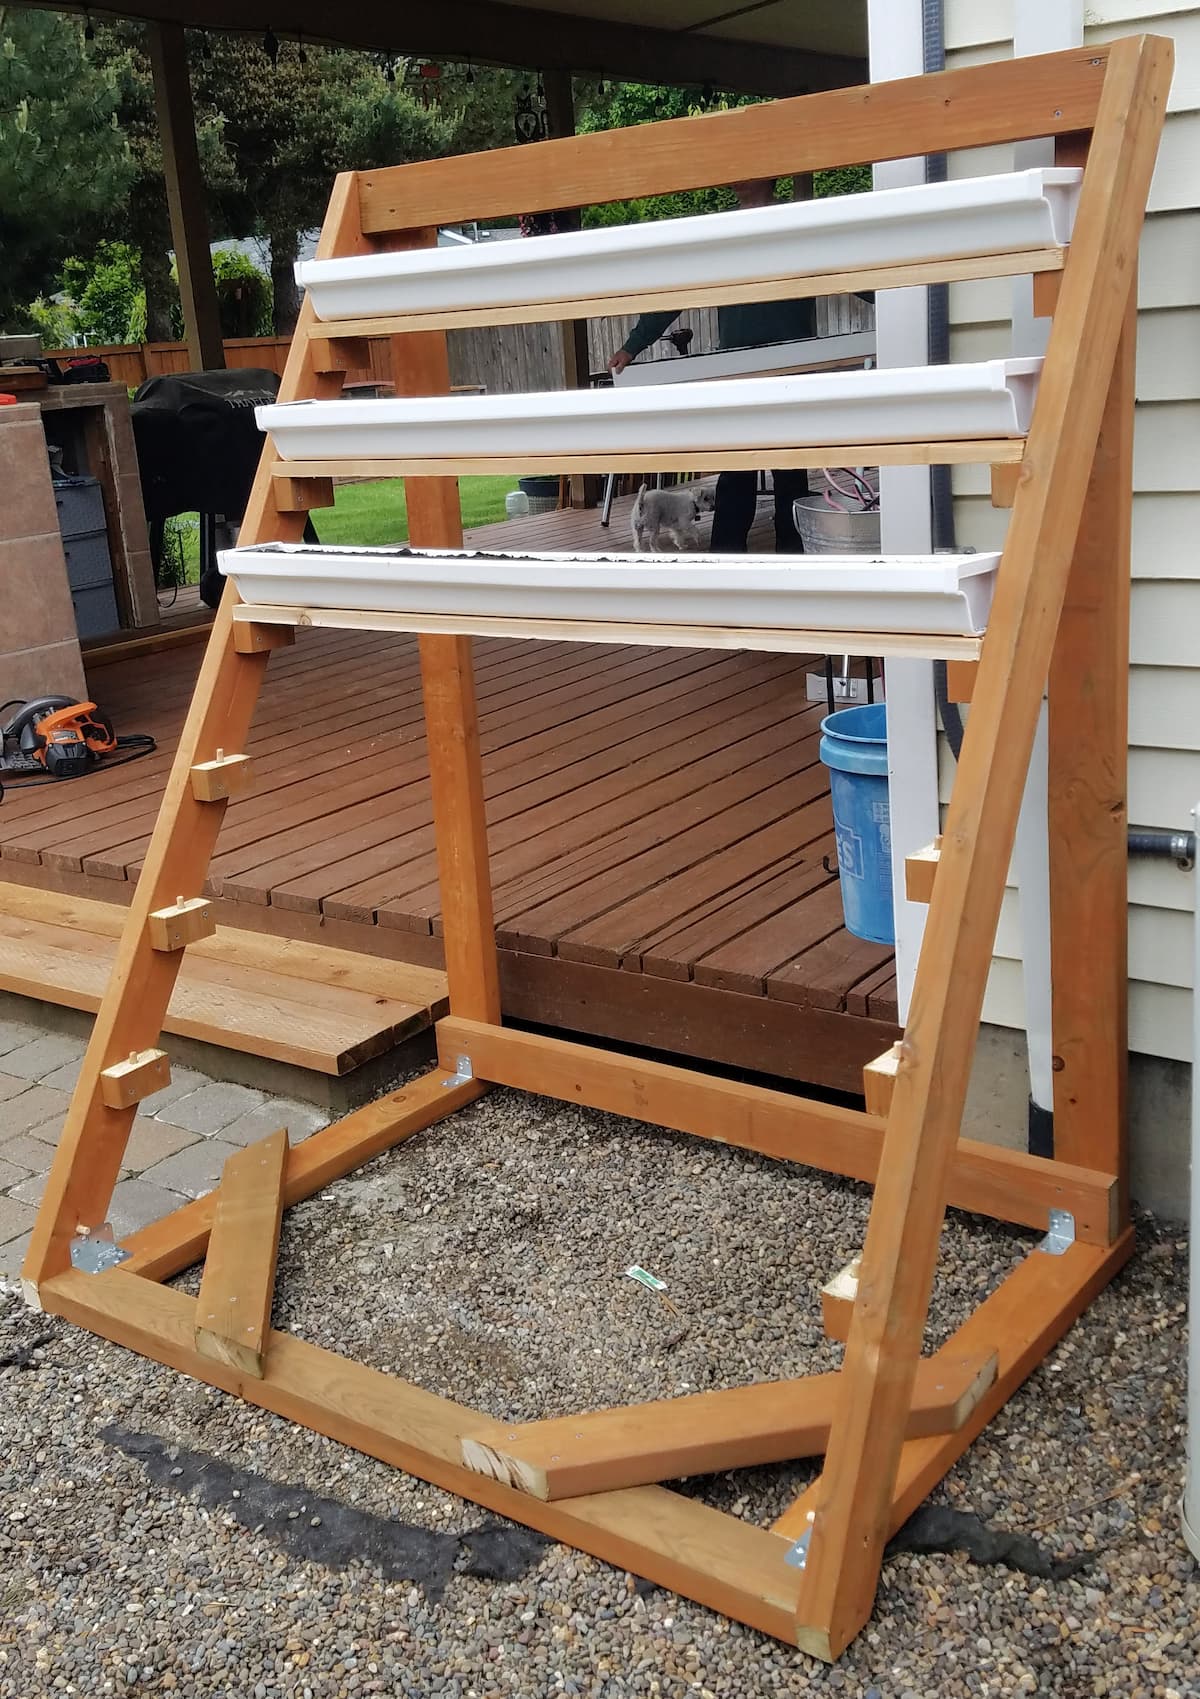
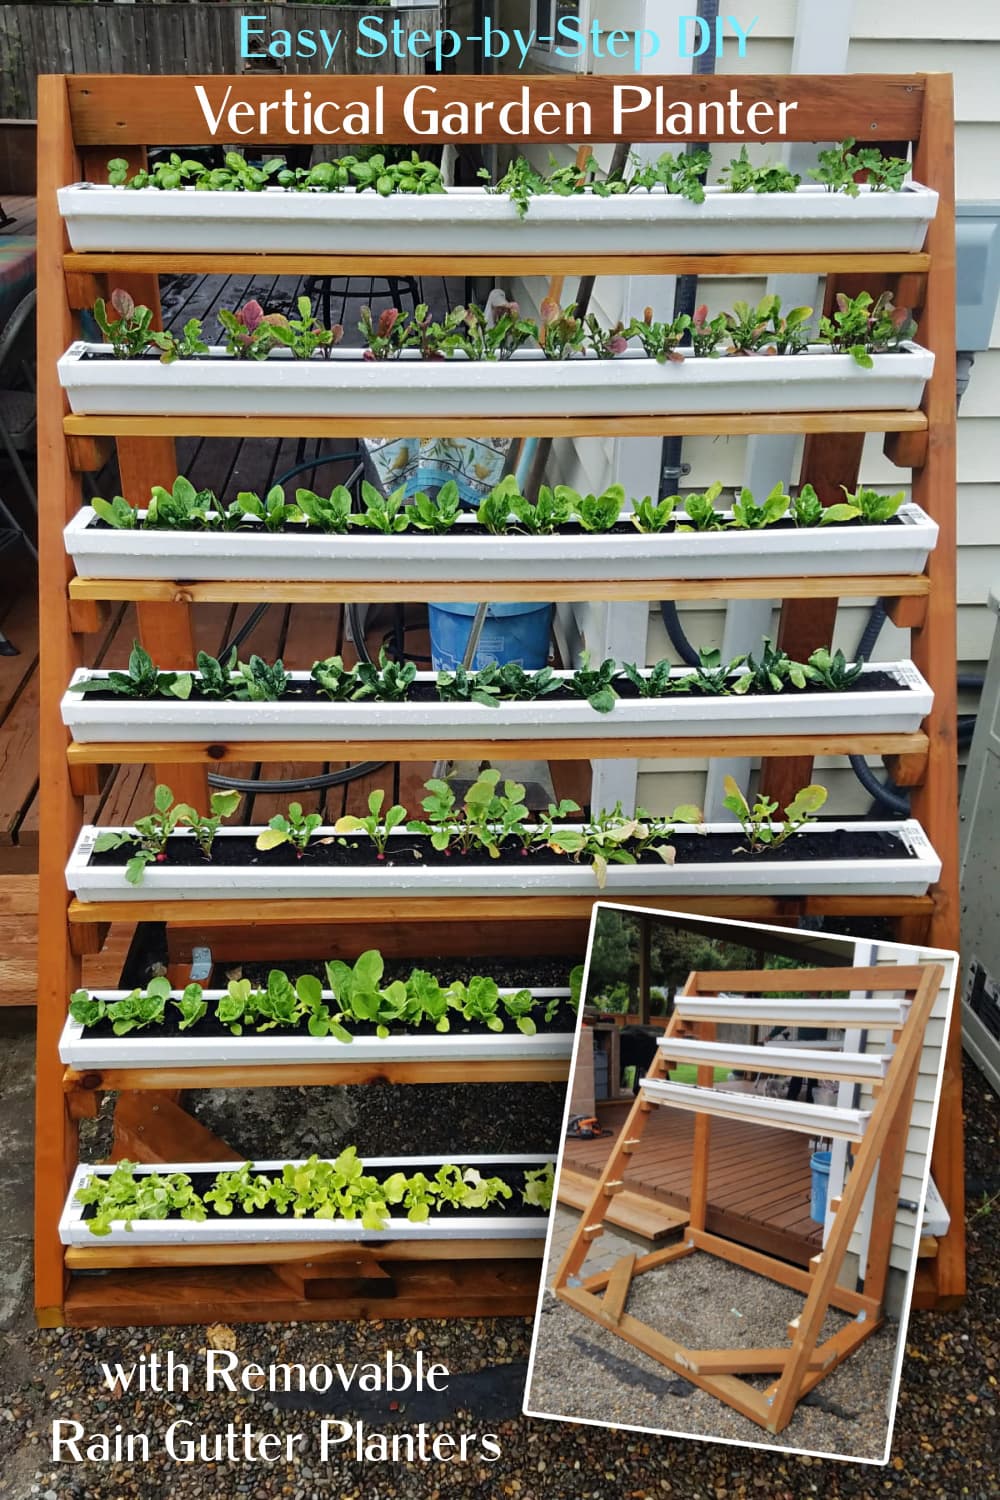
This simple Vertical Garden with Removable Rain Gutter Planters makes a great weekend project! Made out of 2x4's and vinyl rain gutters, our step-by-step directions make this project easy enough for even the most novice DIYer. (If we can build it, so can you!
Jump to:
If We Can Build It, So Can You!
This vertical garden planter is attractive, convenient, and (bonus!) it can provide a lovely backdrop for a backyard refuge. (I'm planning to build a couple more and string them with twinkle lights in the winter!)
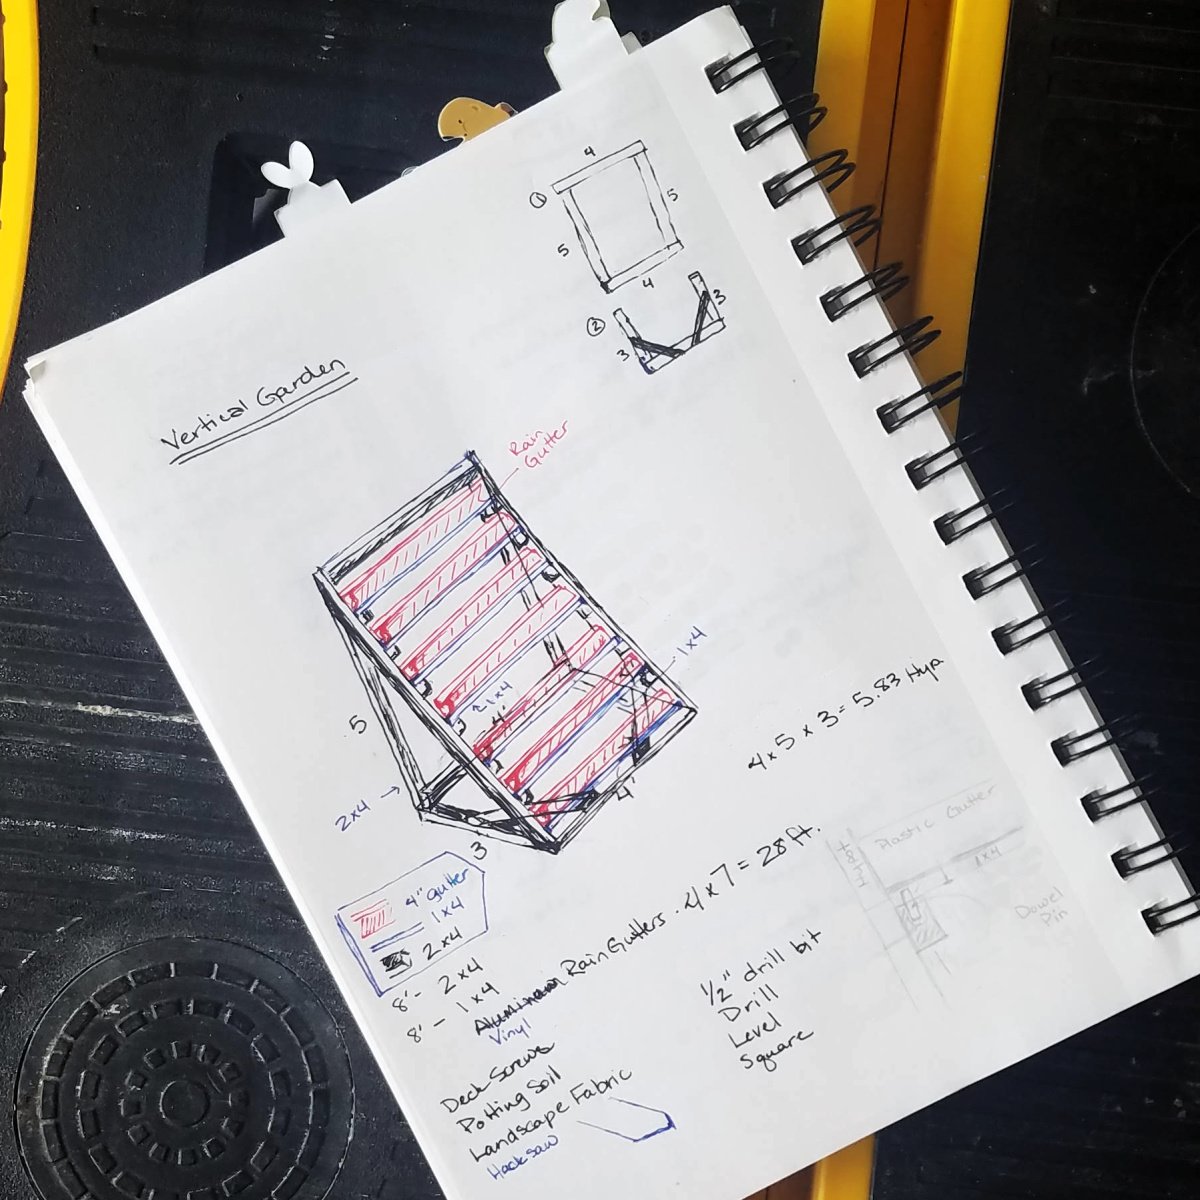
This project kicked off when we saw a vertical garden online that used rain gutters to create the planters. However, the direction offered were far too minimal for novice DIYers like us; plus, we wanted our planters to be removable. So instead of giving up, I called upon the construction skills imparted to me by Mr Eide (my impossibly stereotypical late-1970's middle school shop teacher) and took up the challenge.
The first thing you need to know is, Mr B and I are not remotely skilled DIYers. I have some basic carpentry skills and love drafting for fun (because I am nerdy that way). I once even designed and made a beautiful black walnut cradle with the help of my best builder-buddy. Mr B has made countless small household repairs, and can replumb almost anything. However, our real-world DIY build-stuff experience is limited.
What I'm saying is, if we can build this thing, you can too!
What You Need for this DIY Vertical Planter
SAFETY DISCLAIMER: Be careful with tools. If you don't know how to use them safely, don't. Just don't. You assume all responsibility and risk, and reliance on any advice, information, or content on this website is solely at your own risk, without limitation. We disclaim any liability for any injuries, accidents, befuddlements, temper-tantrums, owies, or other chaos that may result from constructing this project.
Materials
- 2-inch x 4-inch x 8-foot Premium Pressure Treated Lumber [6]*
- 1-inch x 4-inch x 8-foot Premium Pressure Treated Lumber [4]*
- Vinyl Gutters (10-foot lengths) [4]*
- Gutter Caps (be sure they match your gutter profile) [14]
- 2½-inch Exterior Screws
- ¾-inch Exterior Screws
- ⅜-inch x 2-inch Wood Dowel Pins [14]
- L-shaped Steel Corner Braces [4]
- Wood Glue
- Landscape Fabric [4-5 yards]
- Raised Bed Garden Soil
Lumber: We used pressure-treated lumber for this project, and we chose to leave it unpainted. If you use untreated wood, you will need to treat it or paint it before using so that it will stand up to the weather.
Gutters: Vinyl gutters are usually sold in 10-foot lengths. In this case, you will need 4 gutter lengths, in order to cut seven solid 4-foot lengths. If the gutter-runs you buy are longer or shorter, you may need to adjust the number you buy accordingly.
Tools
- Electric or Cordless Drill
- Standard Drill Bit Set (including ½-inch & ⅜-inch drill bits)
- Saw (We used a circular saw.)
- Screwdriver (Phillips)
- Tape Measure
- Hacksaw
- Level
- Square
- Rubber Mallet
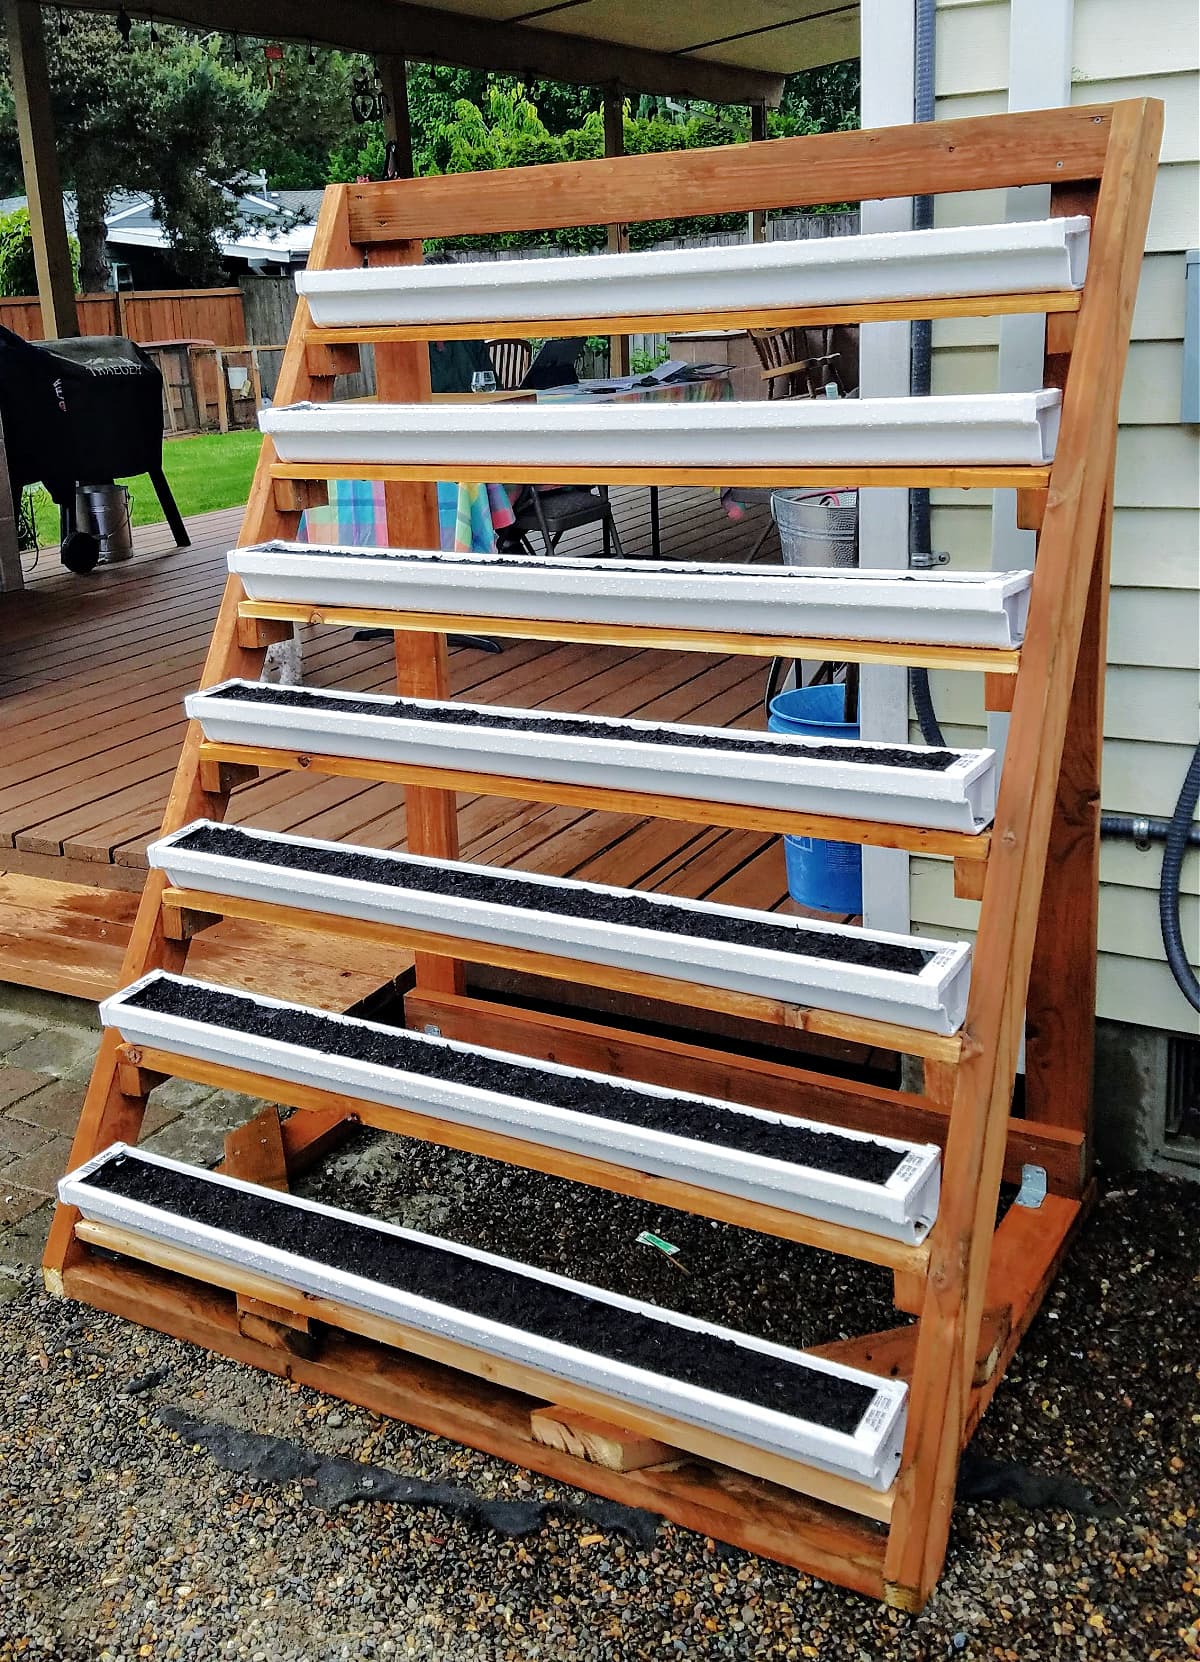
How to Build a Vertical Garden • Step-by-Step
While we are extremely happy with our end-product (and we hope you will be, too!), we are certain that there are better/easier ways to do some of these steps. If you have an idea or knowledge that can improve on these plans, please share it below in the comments. We will continue to update the process as it evolves. Thank you.
Step 1: Cut the 2x4s
Cut [6] 2x4x8's into the following lengths:
- 5 feet | 3 feet
- 5 feet | 3 feet
- 4 feet | 4 feet
- 4 feet | 2-inch (x12)
- 6 feet | 2 feet
- 6 feet | 2 feet
When you are done, you will have the following lengths.
- 6-foot lengths = 2 (2"x4"x6')
- 5-foot lengths = 2 (2"x4"x5')
- 4-foot lengths = 3 (2"x4"x4')
- 3-foot lengths = 2 (2"x4"x3')
- 2-foot lengths = 2 (2"x4"x2')
- 2-inch lengths = 12 (2"x4"x2")
If your measurements are a little under or over, don't worry. It is only important that the equal lengths are the same length. (i.e. If your 5-foot lengths are only 4'10", that's just fine: they just need to both be the same length.)
Step 2: Frame the Back
You will need:
- 2 - 5-foot lengths (2"x4"x5')
- 2 - 4-foot lengths (2"x4"x4')
- 2½-inch Exterior Screws
The back frame of this vertical garden planter is a 5'x4' rectangle, constructed with 2"x4"s.
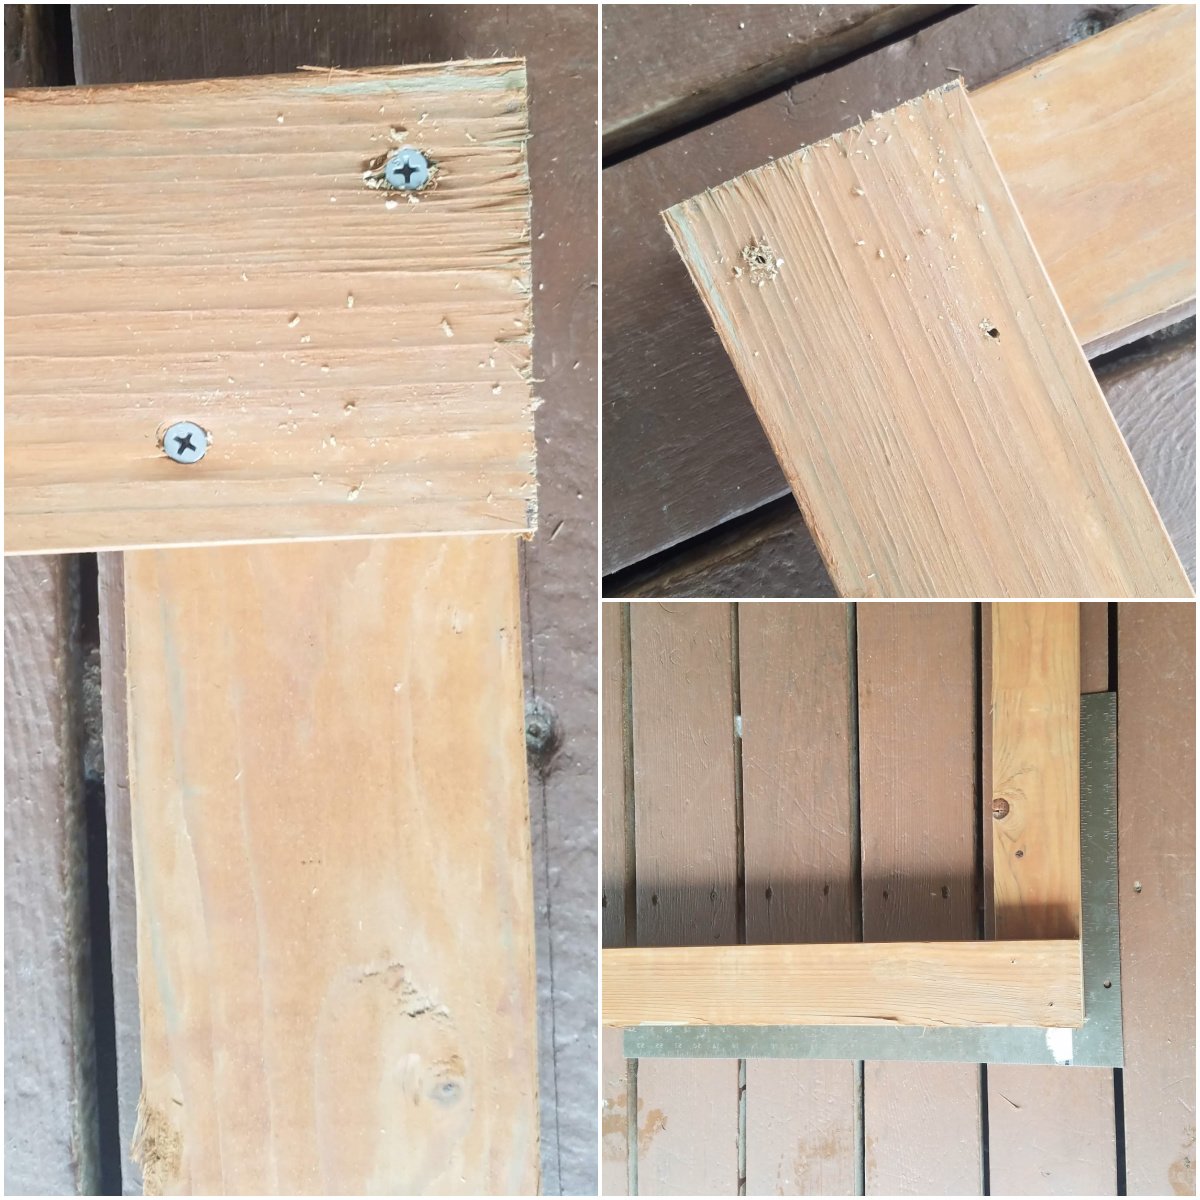
Drill pilot holes for screws on each end of both the 4-foot lengths. Check to make sure corners are square, and then secure the frame with 2½-inch exterior screws, drilling down through the 4-foot lengths into the 5-foot lengths. (We used 2 screws in each corner.)
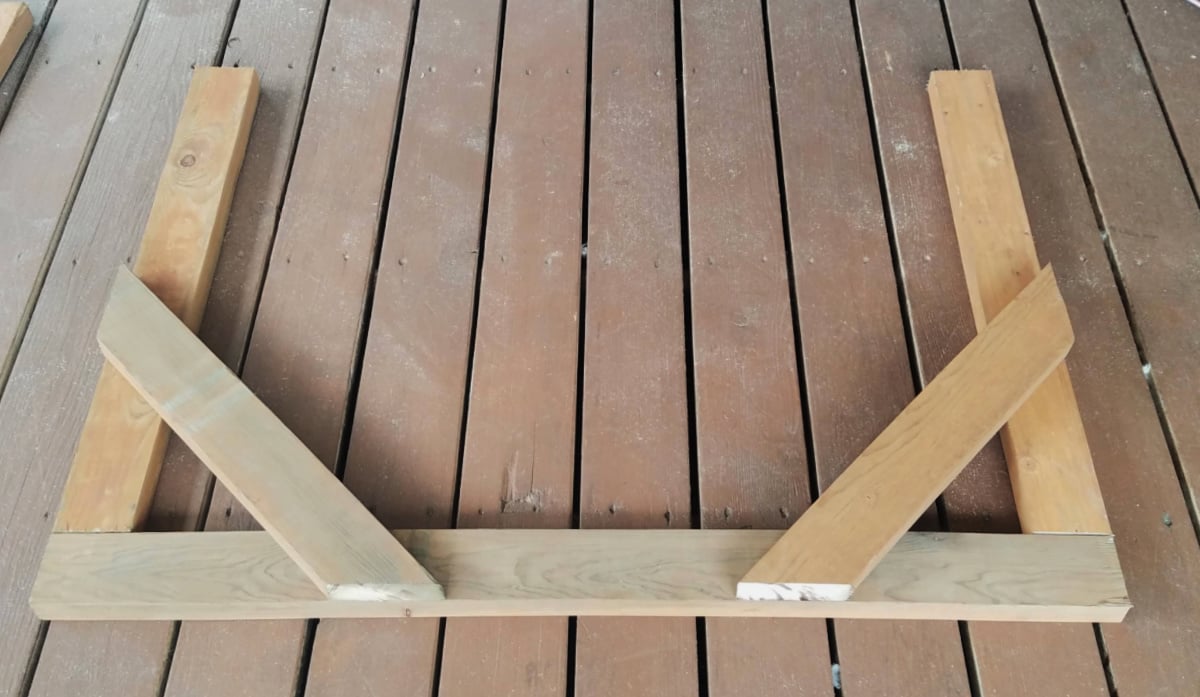
Step 3: Frame the Base
You will need:
- 1 - 4-foot lengths (2"x4"x4')
- 2 - 3-foot lengths (2"x4"x3')
- 2 - 2-foot lengths (2"x4"x2')
- 1¼-inch Exterior Screws
- 2½-inch Exterior Screws
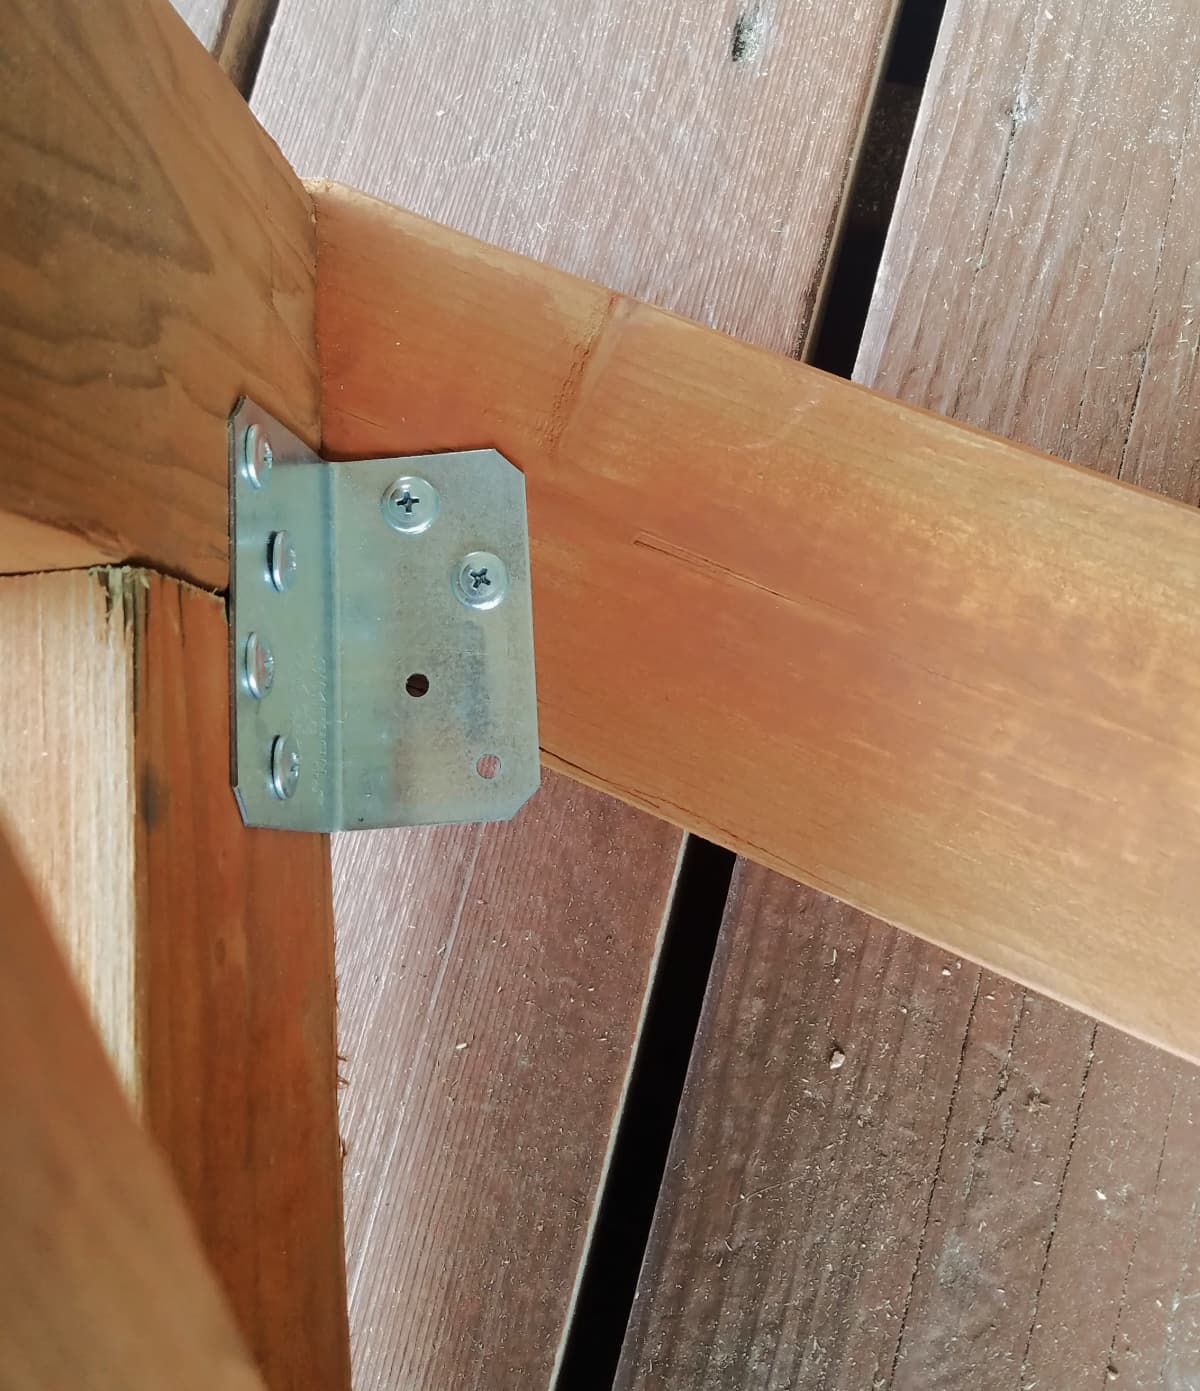
- L-shaped Corner Braces [2]
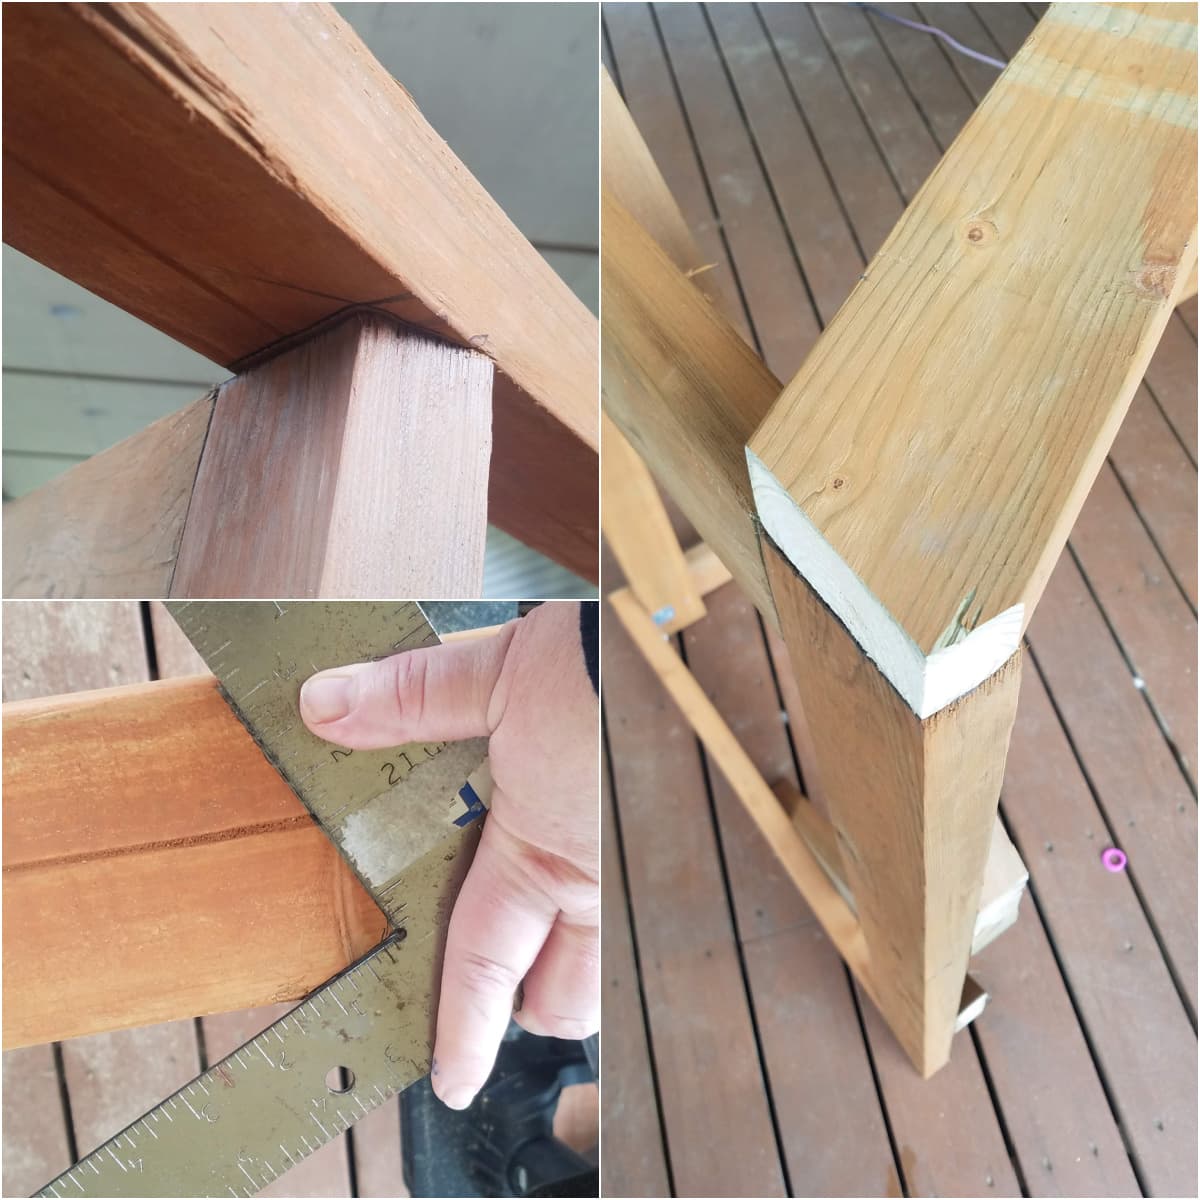
The base of this vertical garden is a 3-foot by 4-foot, 3-sided rectangle built with 2"x4"s. It is secured with 2x4 angled support braces and reinforced with short steel L-braces.
First, use a saw to cut the ends of the 2-foot 2x4s to 45° angles as shown in the images below.
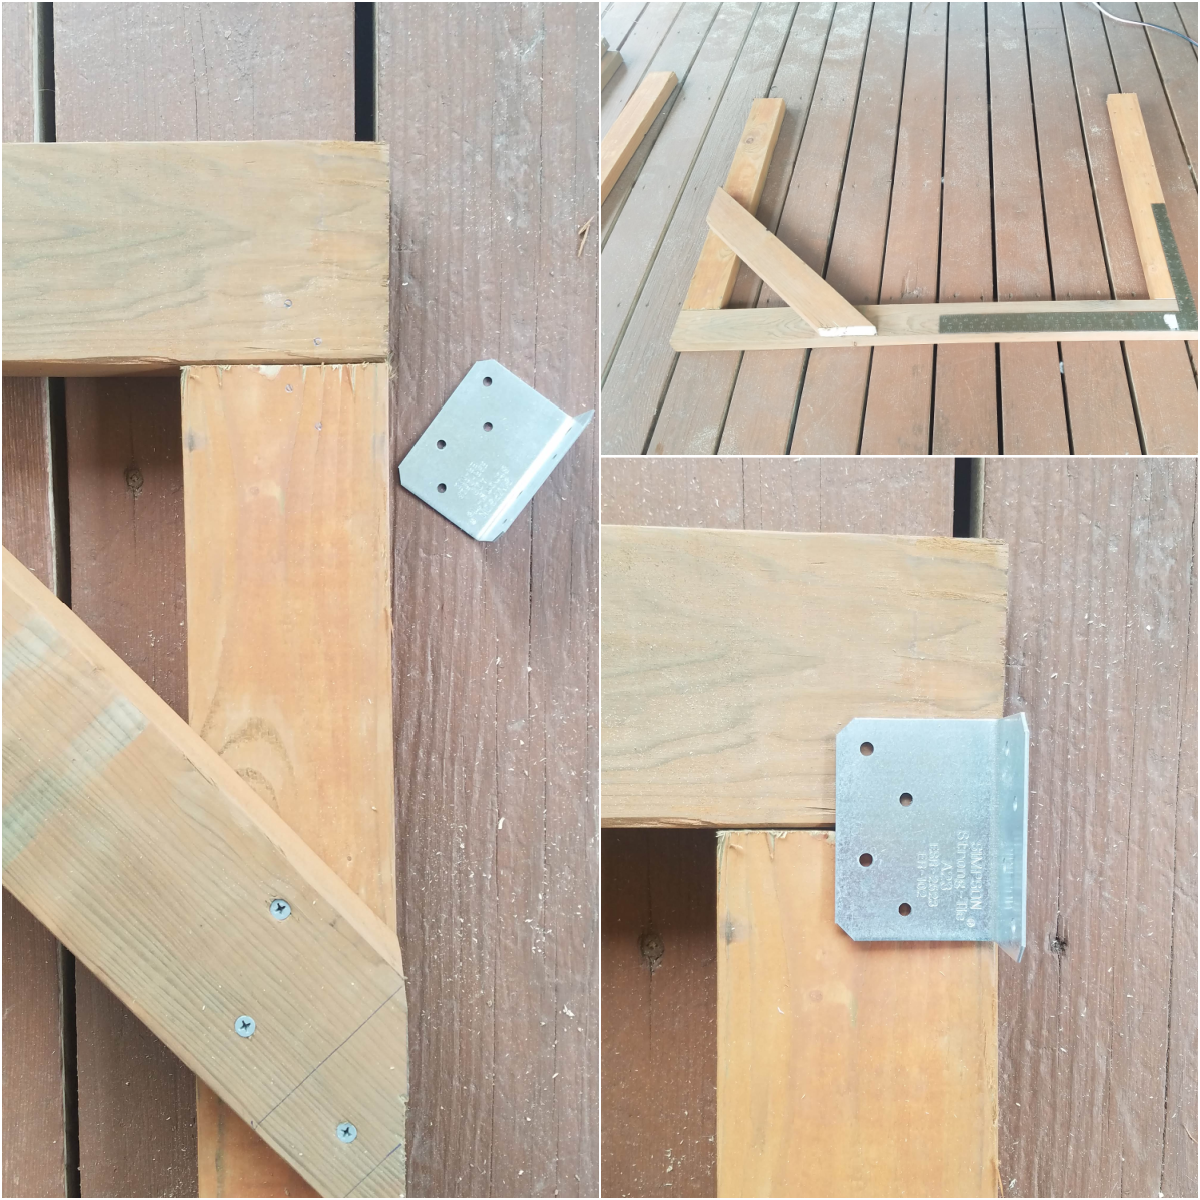
Drill pilot holes for the screws in the boards you just cut the 45° angles on. Check to make sure corners are square, and then secure them to the base frame with 2½-inch exterior screws.
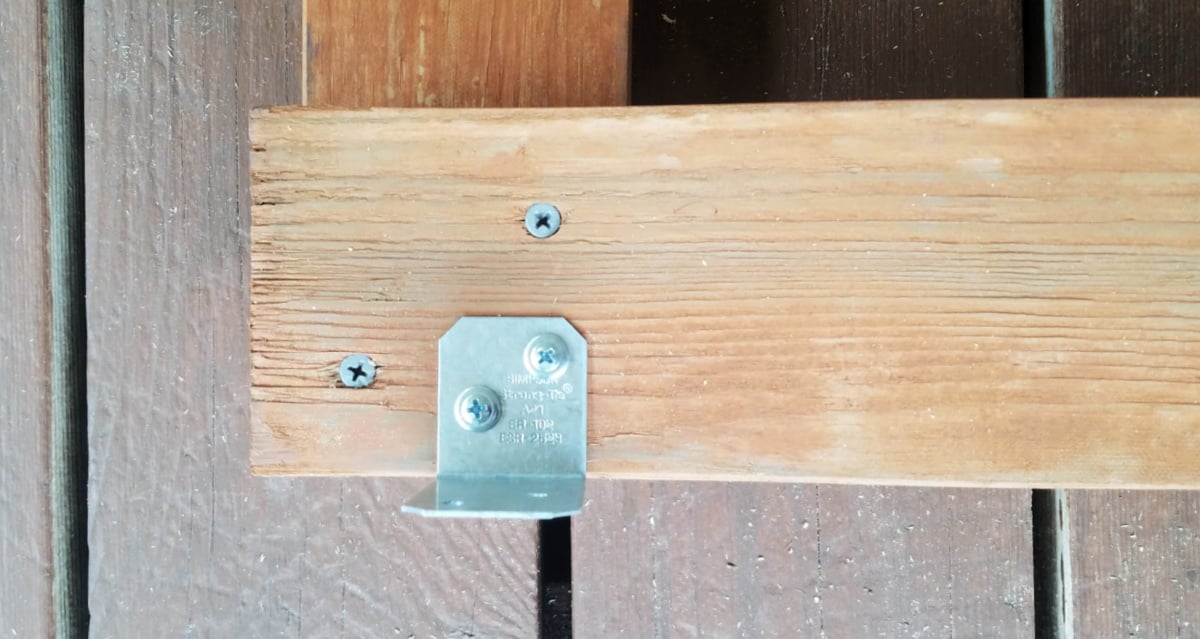
Reinforce the butt-joint with a corner-brace placed on the outside edge of the joint, as shown. Use 1¼-inch Exterior Screws to secure the braces to the frame.
(I am certain that there is a better bracket/brace to use in this situation; however, we had a bunch of L-brackets when we made this, and they seem to work fine.)
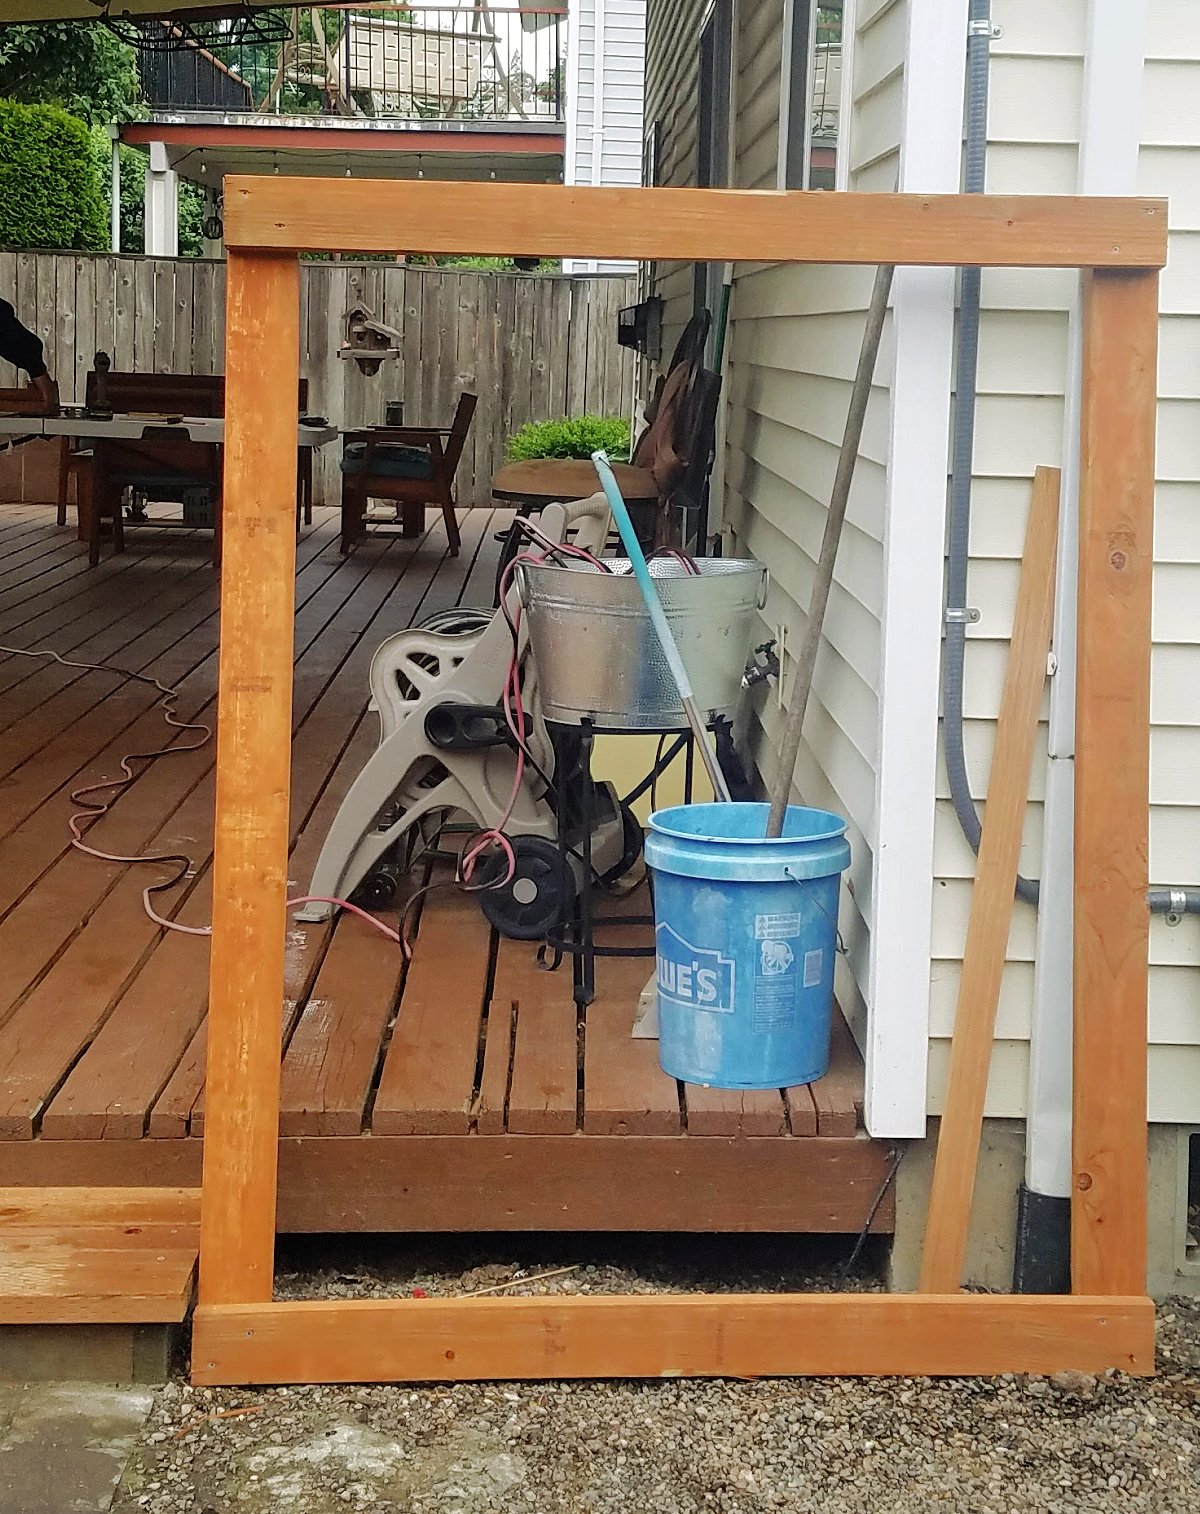
Step 4: Attach Back Frame to Base Frame
The frame will be very wobbly at this point. Don't worry. Carefully turn it on its side for the next step.
You will need:
- Back Frame
- Base Frame
- 2½-inch Exterior Screws
- 1¼-inch Exterior Screws
- L-shaped Corner Braces [2]
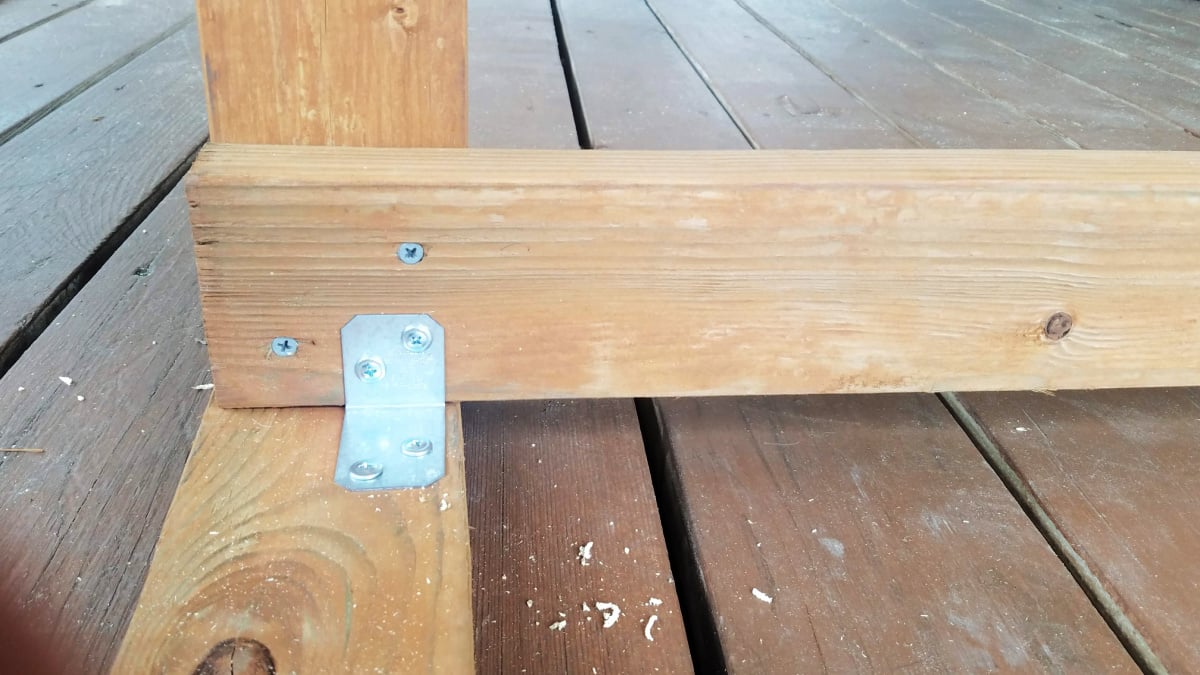
Using 1¼-inch Exterior Screws, attached corner braces to the bottom of the back frame as shown below.
You may notice we used round-headed screws. Flat-heads are a better choice, but that's just what we had at the time.
Attach the back frame to the base by setting the whole back on top of the rear of the base. Secure the corner-braces to the base with 1¼-inch Exterior Screws.
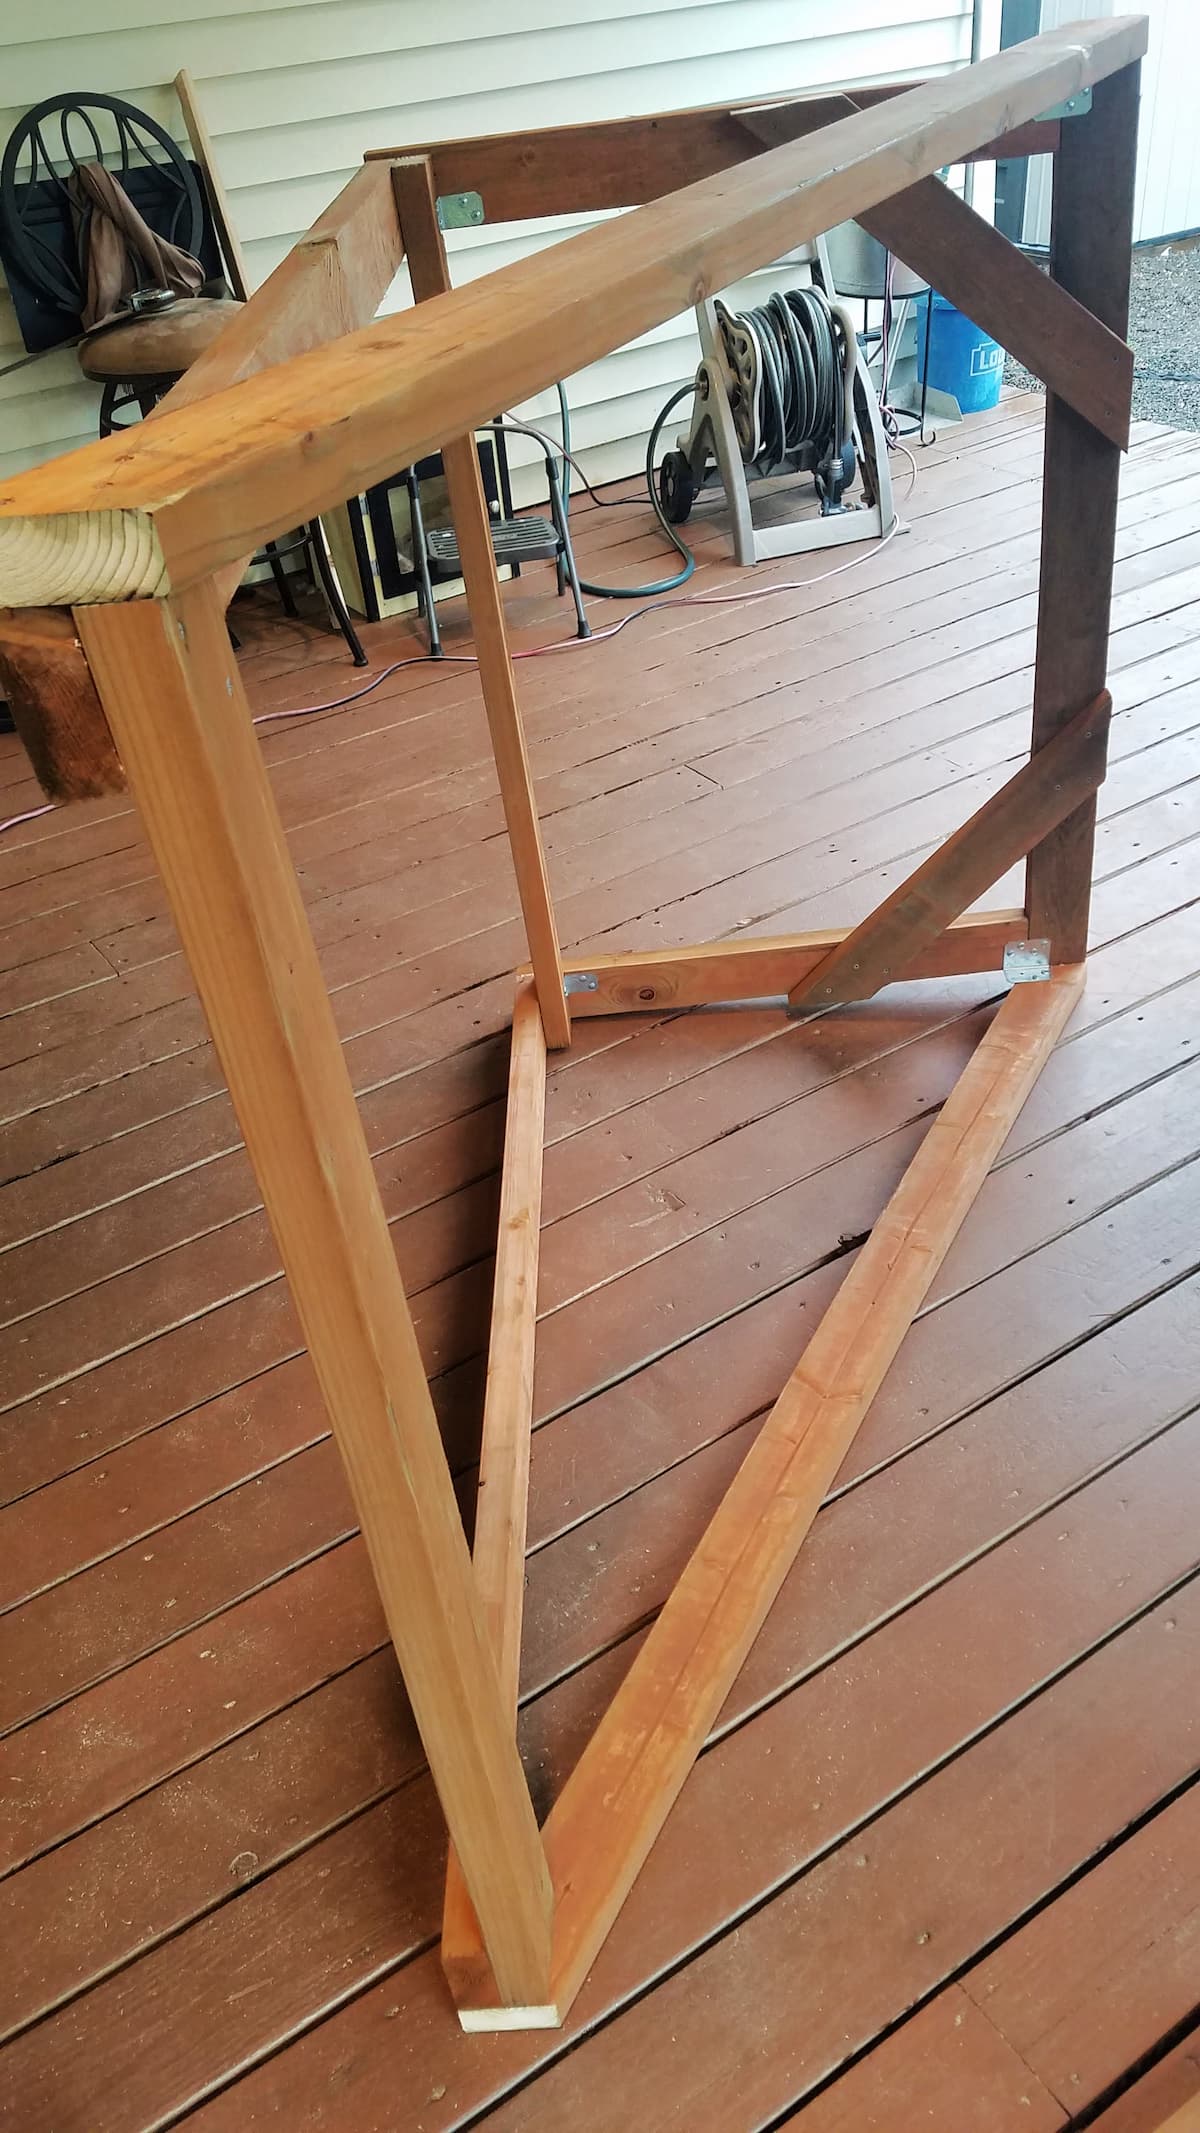
Step 5: Attach the Hypotenuse
You remember what a hypotenuse is, right? It's the longest side of a right triangle, opposite the right angle. It's also what makes this structure sound and solid.
You will need:
- Frame (Back & Base attached)
- 2 - 6-foot lengths (2"x4"x6')
- 2½-inch Exterior Screws
- 1¼-inch Exterior Screws
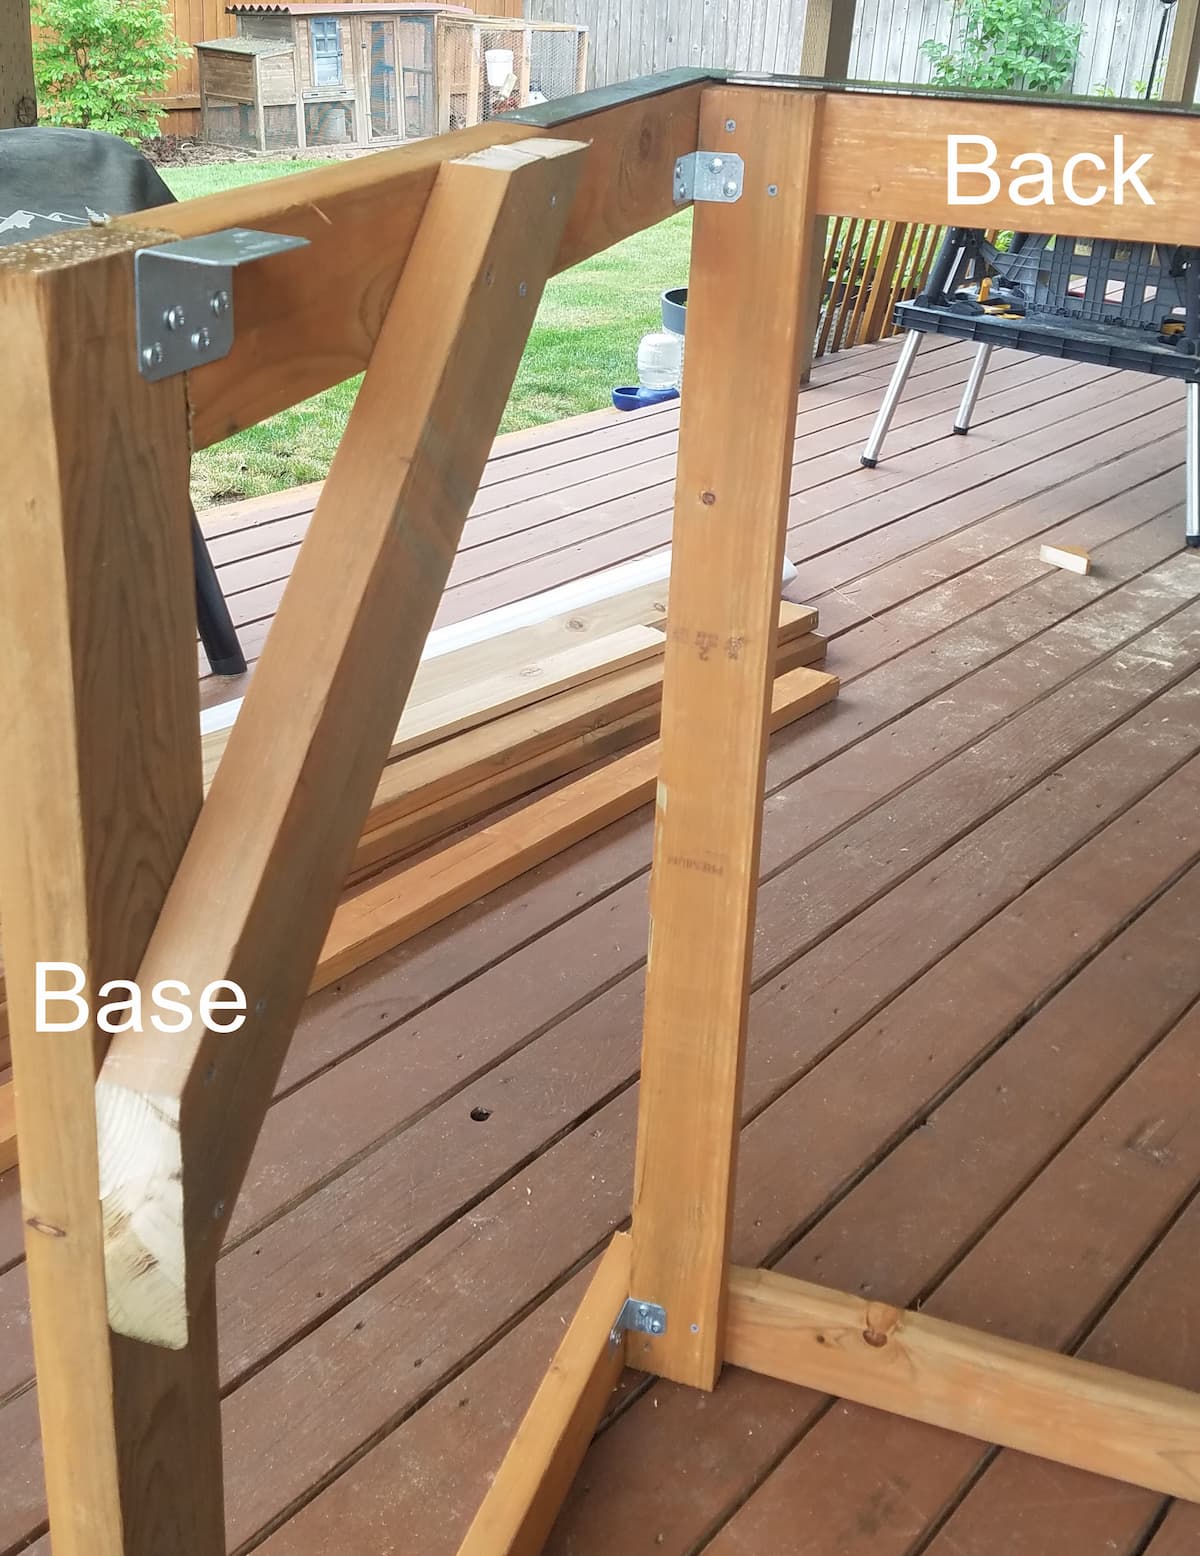
Use a carpenter's square to ensure that the base corner is square. (Do not just eyeball it!) Once you are certain the corner is square, rest one 6-foot length along the side, across the top and bottom corners. (Remember - your vertical garden is on its side right now.)
From underneath, trace the bottom corner onto the 6-foot 2x4. Use a square to clean up the lines, and then use a saw to cut the edges to fit.
Repeat the process for marking and cutting the other end of the hypotenuse.
Drill pilot holes, and then secure each end of the hypotenuse with three 2½-inch Exterior Screws.
Remember those first little floating corner braces that you added to the Base Frame in Step 3? Attach them to the inside of the hypotenuse using 1¼-inch Exterior Screws.
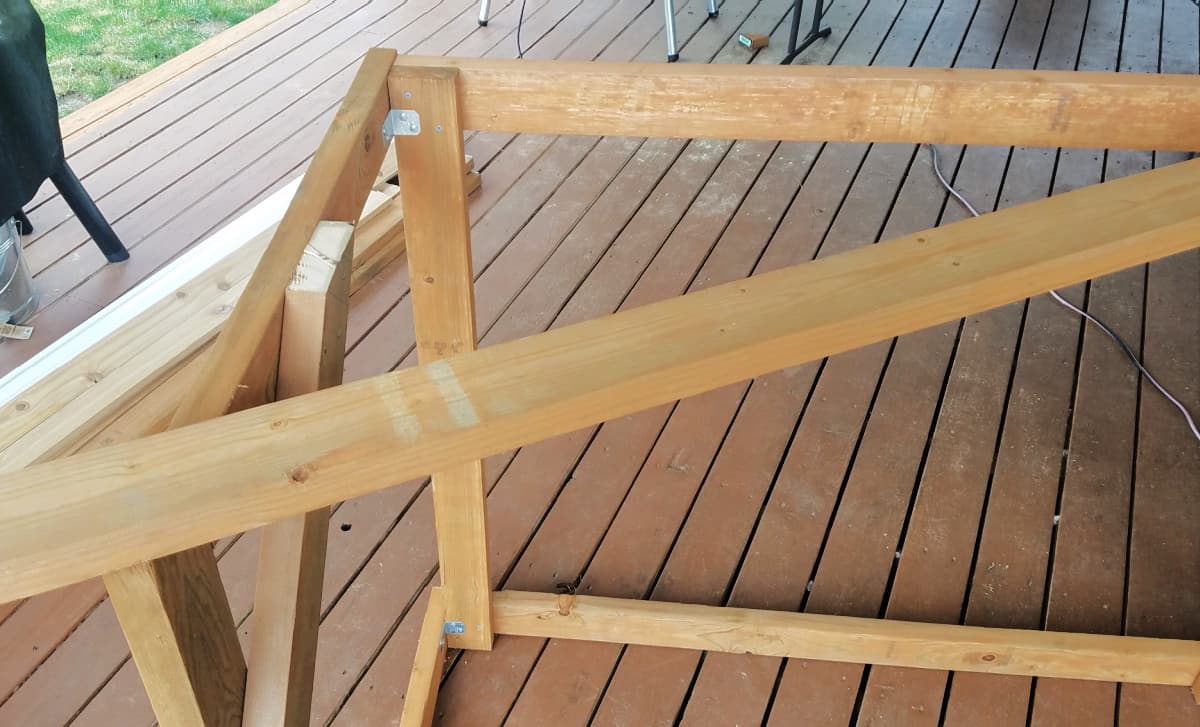
Turn the frame over and repeat, adding hypotenuse to the other side.
Step 6: Prepare the Cleats
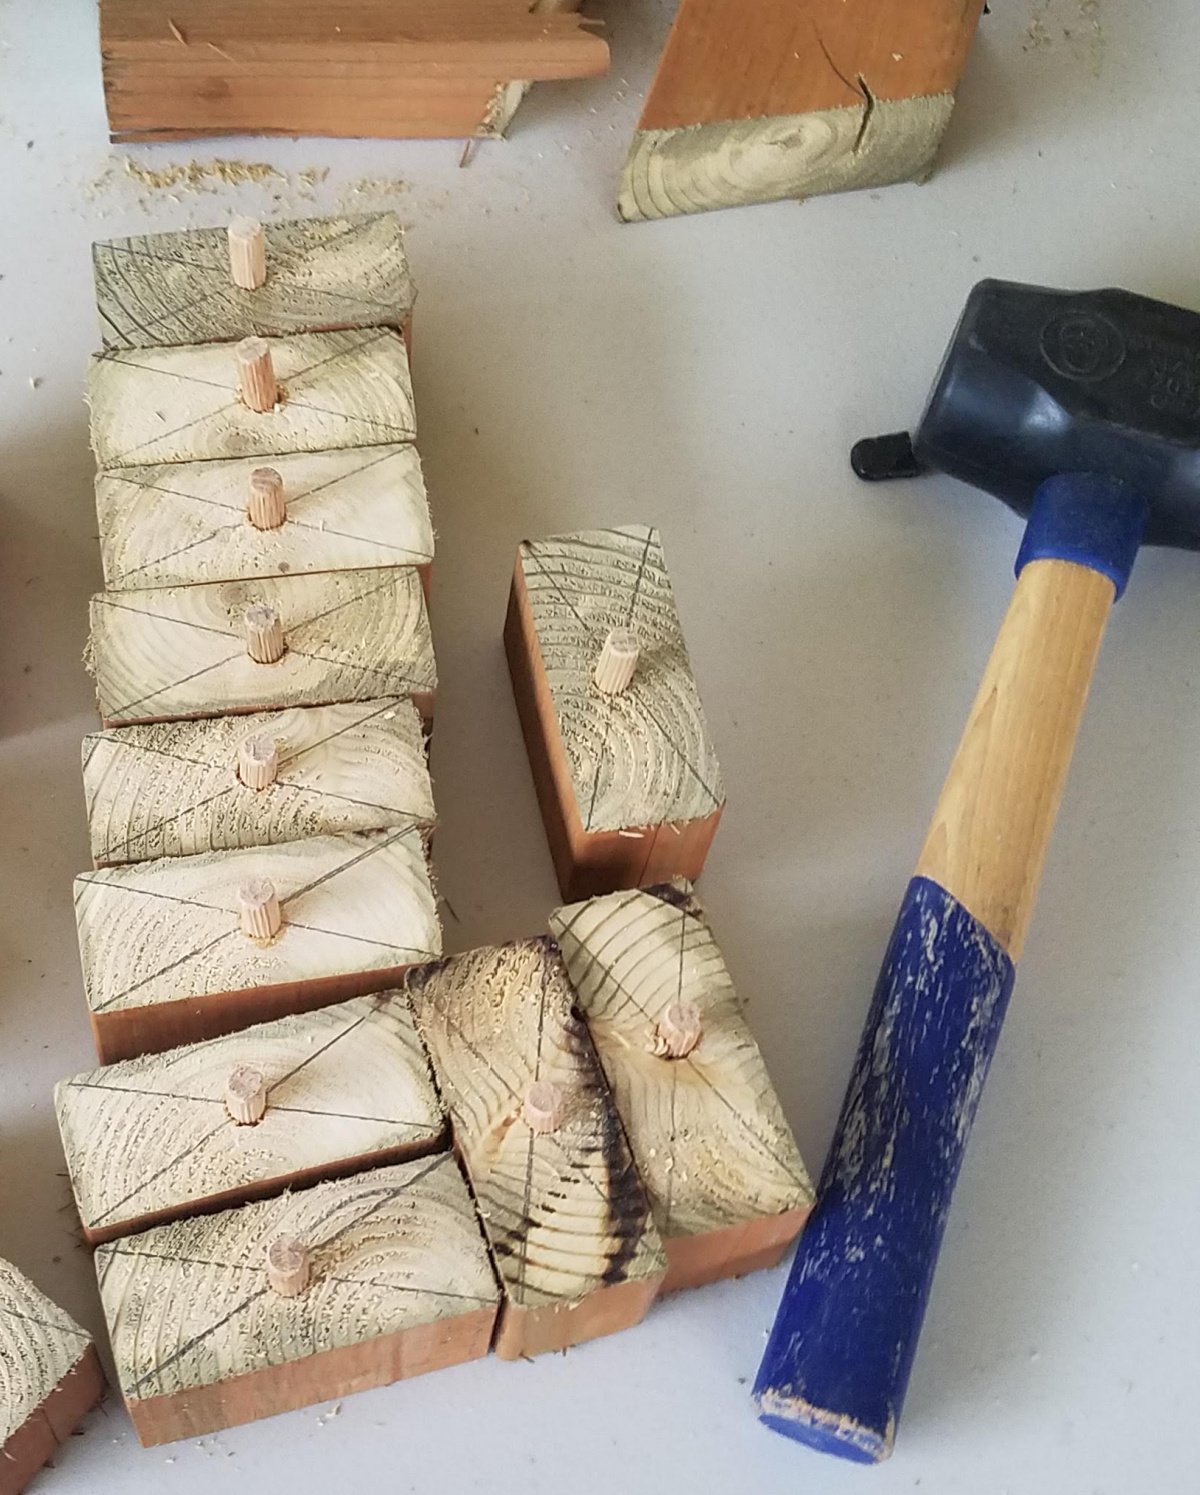
For the purposes of this project, cleats are the little 2x2x4 blocks that hold up the planter boxes. They have a wooden dowel inserted in the center.
Later, in Step 8, you will create a cut-out on each end of the bottom of the planter boxes. This cut-out will slip over the dowel pegs in the cleats to secure and steady the planters on the Vertical Garden frame.
You will need:
- 12 - 2-inch lengths (2"x4"x2")
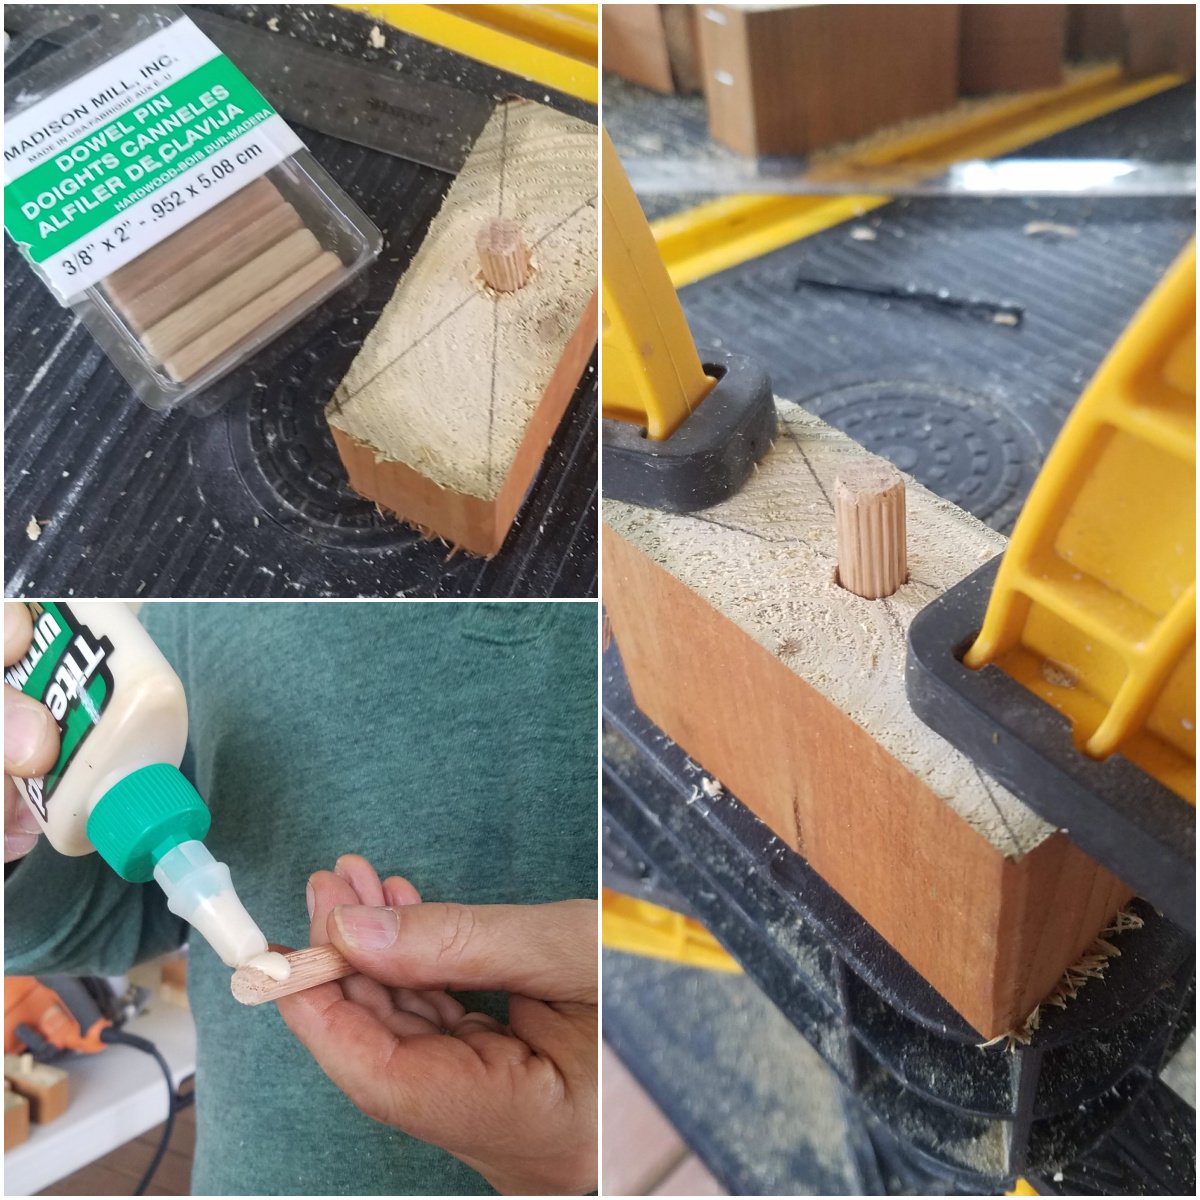
- ⅜-inch x 2-inch Wood Dowel Pins
- Wood Glue
Note: The top six planter boxes rest on cleats; however, the bottom planter does not have cleats. It rests on the angled corner cross-pieces on the base frame.
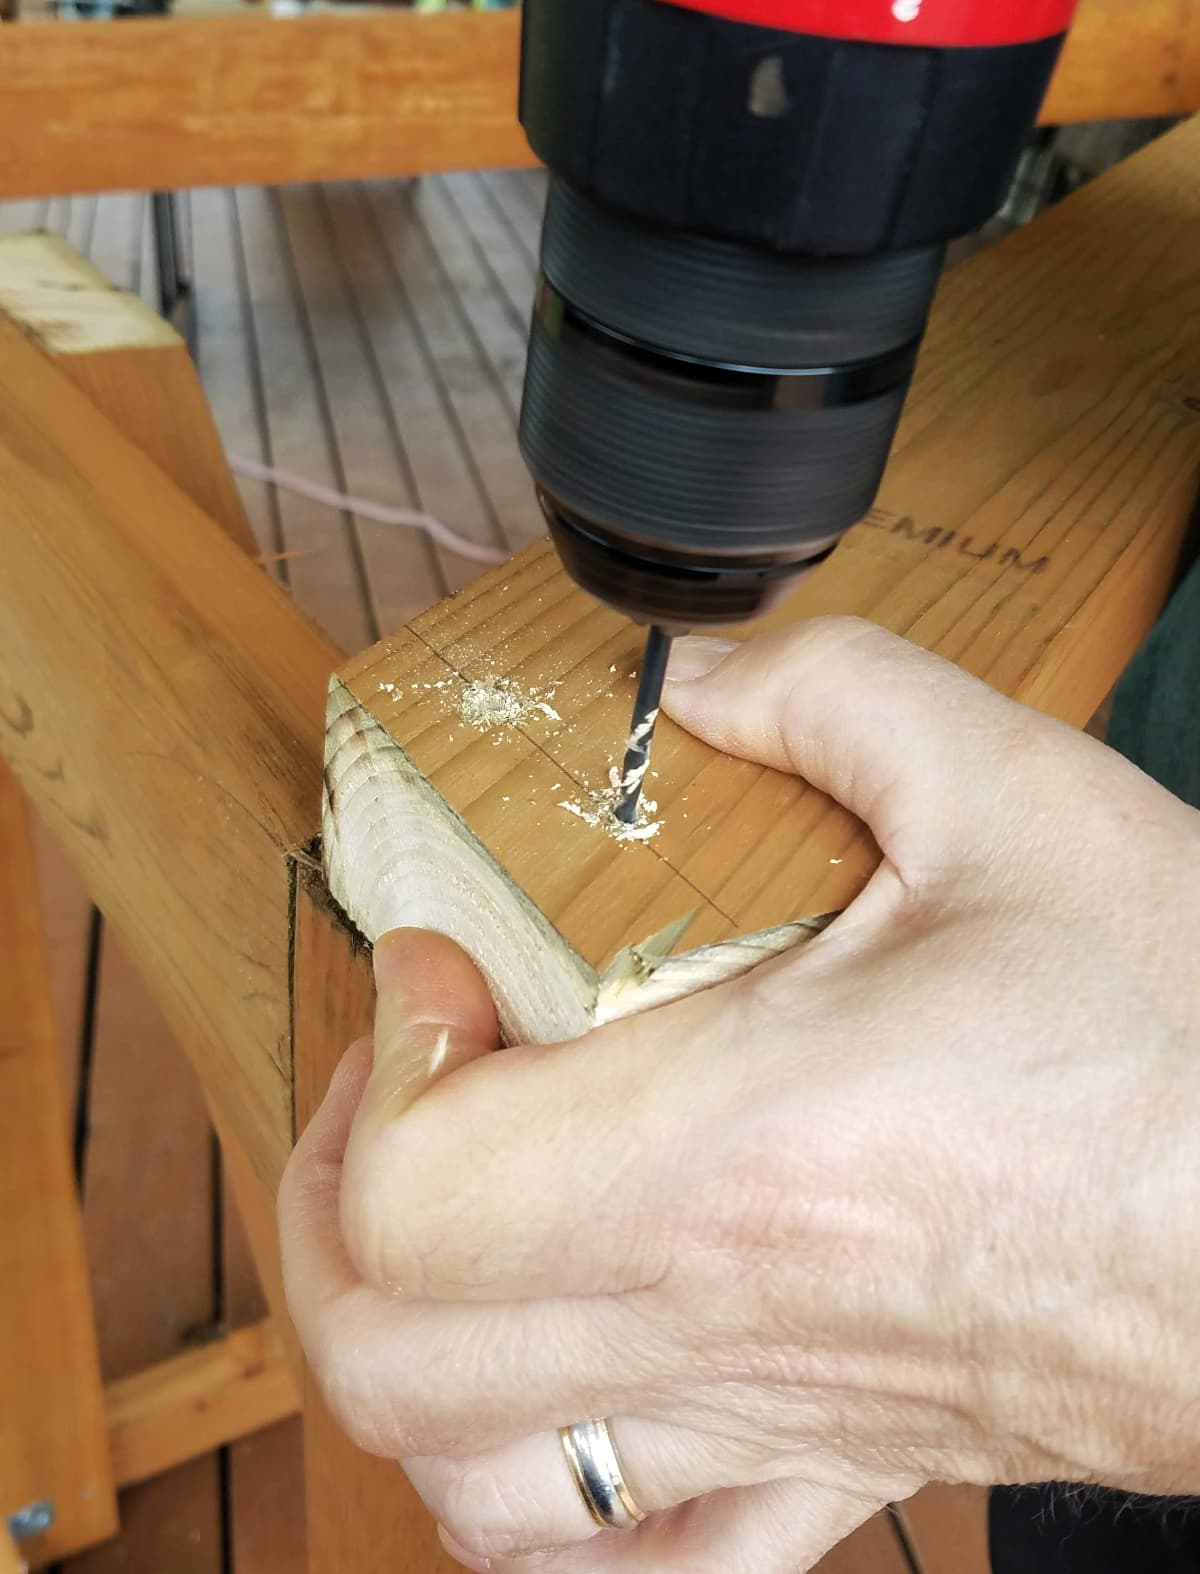
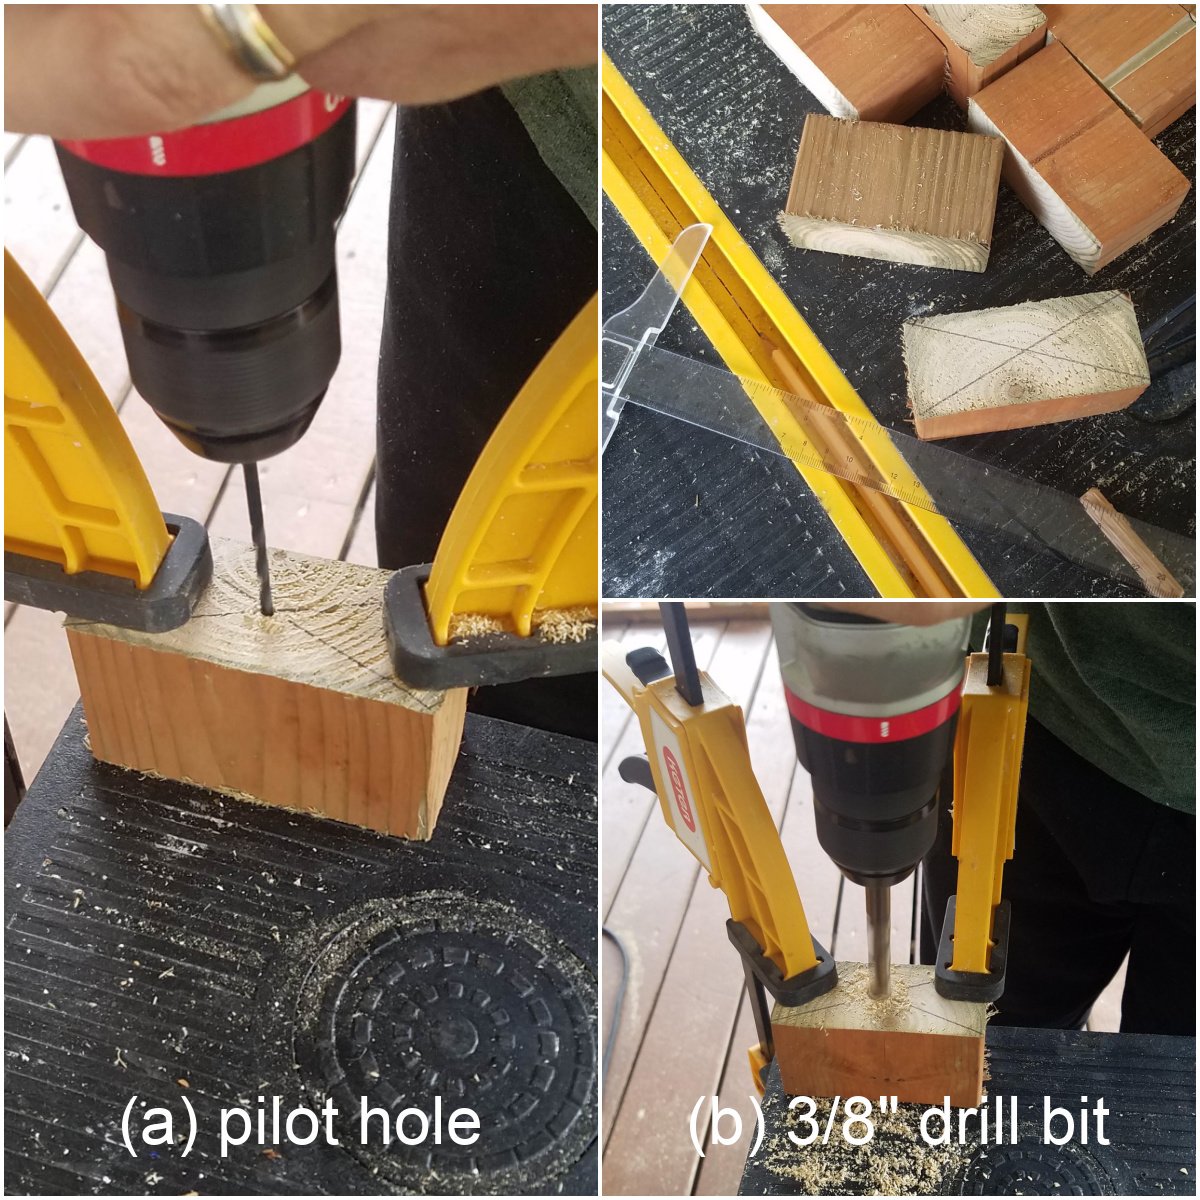
Draw an X on one cut end of each cleat block.
Drill a small pilot hole, and then use the ⅜-inch drill bit to drill down about 1-inch. Do not drill down too far - the dowel must extend out of the block by at least ½-inch.
Put a little wood glue on one end of the dowel and put the dowel into the hole. It will be very tight. Use a rubber mallet to pound the dowel in until it extends ½ to ⅝-inch above the face of the block. Allow the glue to dry.
If you simply cannot get the dowel to go into the ⅜ drilled hole, try a 7/16 bit, or ½ inch (as a last resort).
Step 7: Mark Measurements for Cleat Placement
This is probably the trickiest part of the project. Not the hardest (you've already done the hard stuff!!), but the trickiest.
Below you'll find the measurements we used for the garden shown here, but be sure to check the placement before you secure the cleats to be sure the distances work for your gutter choice. If you've changed the size of any frame dimensions, you may need to recalculate the distances between cleats/planters.
Remember, the lowest planter does not rest on cleats. The first cleat you place (from the ground) will hold the second-from-the-ground planter.
You will need:
- Prepared Frame
Set the Vertical Garden Frame upright (as it will set when in use) on a solid, level surface.
You will place twelve cleats; six down the side of each hypotenuse. It is vitally important that they are placed at the same height on both sides, so measure carefully.
You will mark one entire hypotenuse first, and then mirror those measurements on the opposite side. Start on either side of the frame.
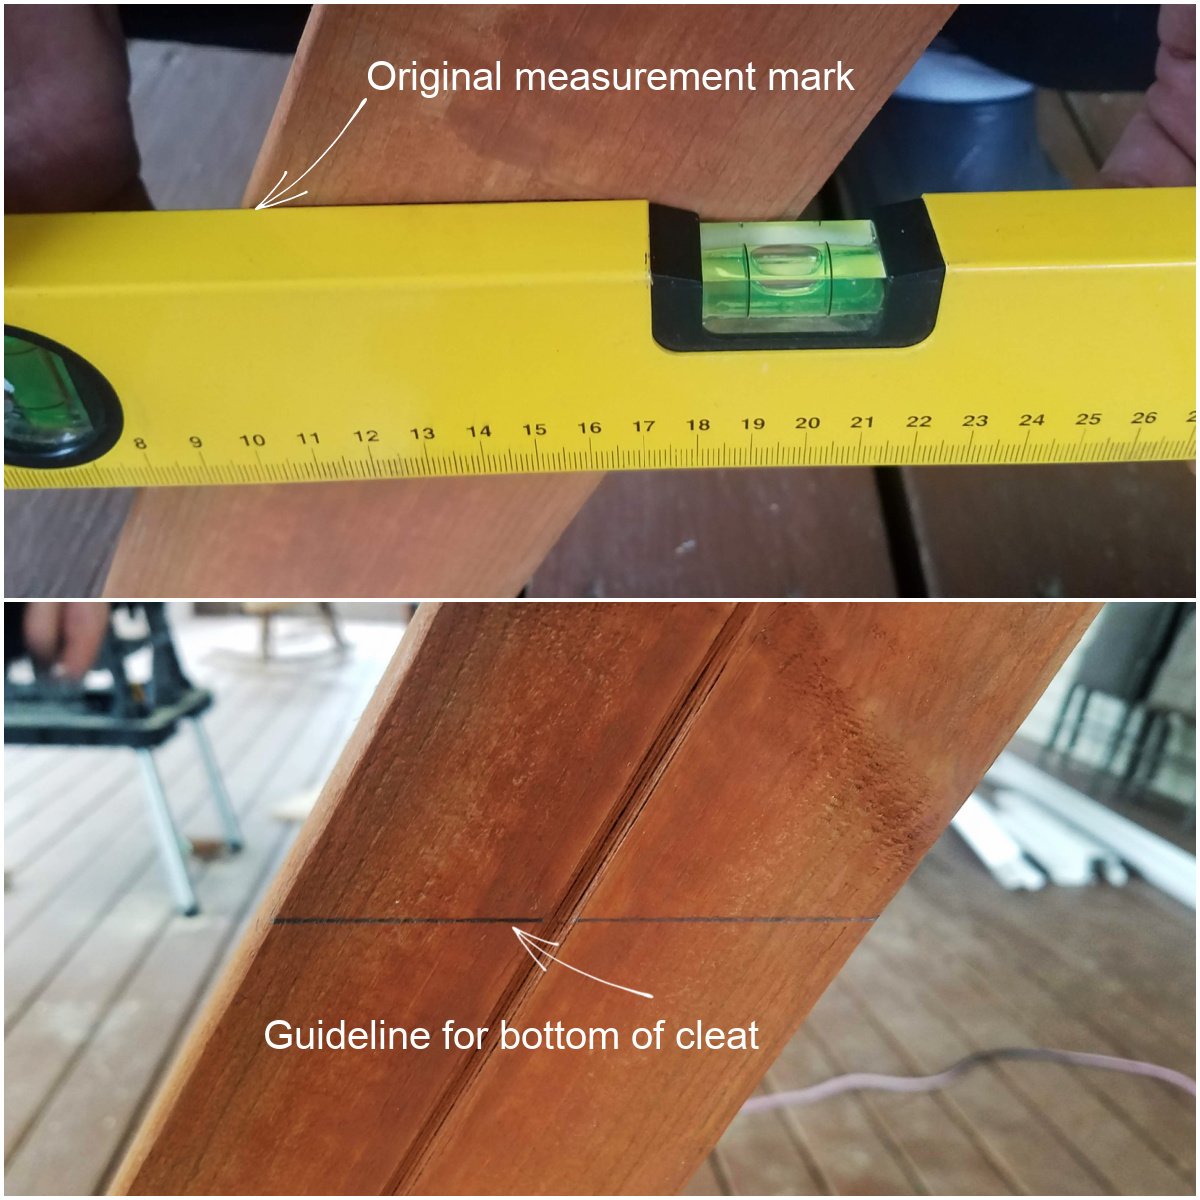
Measuring from the bottom inside corner edge of one hypotenuse, mark the bottom of the first cleat at 11-inches. Hold the tape measure against the hypotenuse: DO NOT measure vertically from the ground.
Make the first mark on the INSIDE FRONT of the beam at 11-inches. From the 11-inch mark, measure up another 9-inches and mark at the 20". Continue until you have made six measurements; all 9-inches apart. So, using a tape measure from the bottom of the frame, you will mark at 11" - 20" - 29" - 38" - 47" - "56".
The last/top mark (at 56") will determine the height of the BOTTOM of the top cleat. The top of the top planter will set approximately 6½ to 7 inches above that mark, and then the plants you grow will extend up from there. If you are happy with this placement, continue. If not, adjust your measurements before before you move on.
Hold a level at the top mark, and use a pencil to draw a level line across the hypotenuse. Repeat this for each mark.
Repeat on the opposite side. Remember to measure from the bottom on both sides.
Step 8: Attach Cleats to Hypotenuse
You will need:
- Prepared Frame
- Prepared Cleats
- 2½-inch Exterior Screws
Turn the frame onto one side, with one measured and marked hypotenuse facing up.
Place the bottom of cleat even with one of the cleat guidelines. The dowel should be pointing toward the top of the frame. Drill pilot holes first, and then attach the cleats to the hypotenuse with 2½-inch Exterior Screws. Repeat for all the cleats on that side, then turn the frame over and mount the cleats to the other hypotenuse.
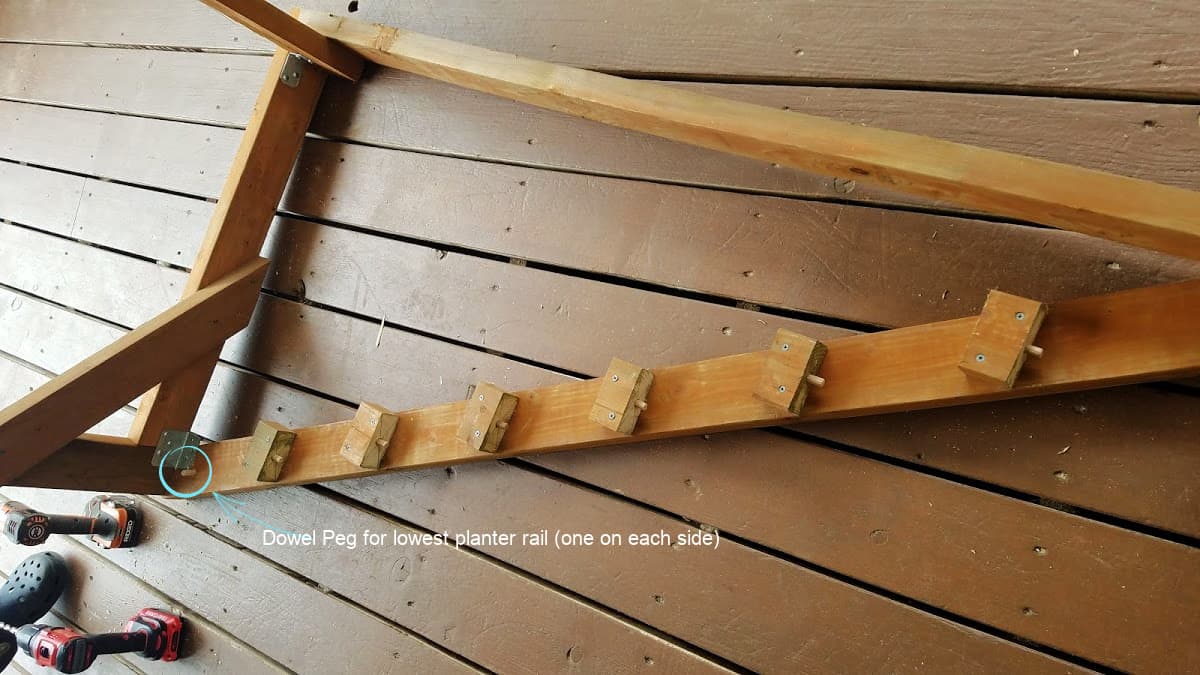
Bottom planter dowels:
You will need one more set of dowel pegs: these help secure the bottom planter rail.
For placement, center the dowel about 1½-inches above the base on the hypotenuse. (The image below should the structure on its side.)
You may want to wait to do this until you have attached the gutter planters to the rails (Step 11). Then you can rest a planter-rail on the bottom and check for dowel placement.
If you are not concerned about wind or cats dislodging the bottom planter, you can just skip the lowest dowels and just let the planter rest on the bottom cross-pieces.

Step 9: Cut & Prep 1x4 Rails
You will need:
- 4 - 1-inch x 4-inch x 8-foot Premium Pressure Treated Lumber (1"x4"x8')
Measure the space across the top, from where the top of one cleat meets the hypotenuse to the same place on the opposite side. Measure across a number of different pairs of cleats: the wood or frame may not be perfectly straight. (I mean, we hope it is, but things happen; and in this case, even a ¼-inch variation can make a difference.) Use the smallest of those measurements to determine how long to cut the 1x4s.
Cut the 1x4s
Cut 1"x4"s into seven lengths that are ½-inch shorter than the aforementioned shortest measurement.
This will allow the rain gutter planters to be easily removed, even when the wood expands. It will also allow you to move them from one level to another.
Drill the 1x4s
Using a ½-inch drill bit, drill a hole, centered 1½-inches the end of each 1"x4"x(your measurement).
Create cut-out on 1x4 ends
Use a hacksaw to cut into the drilled hole to create a U-shaped cut-out on each end of the 1x4.
This cut-out is what will slide over the dowel on the cleat and secure the rain gutter planter to the vertical garden structure.
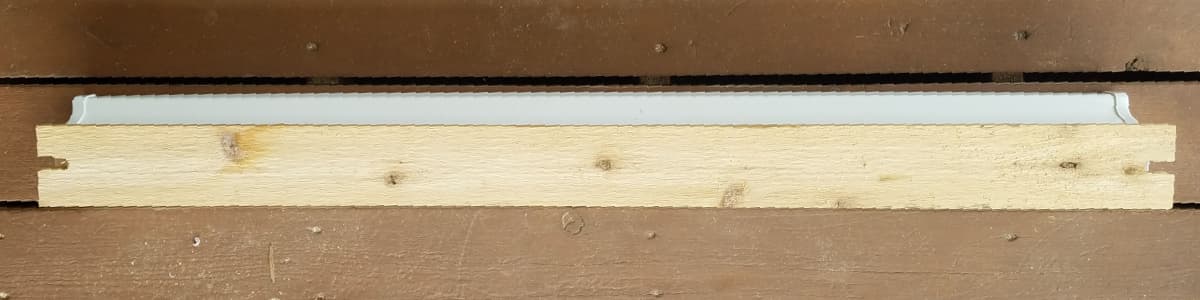
Before going any further, check to make sure that each cut rail slides easily over the cleats on the frame. If any are sticky or in any way difficult to mount, make any adjustments necessary.
Step 10: Cut & Prep Rain Gutters
You will need:
- Vinyl Gutters (10-foot lengths) [4]*
- Gutter Caps (be sure they match your gutter profile) [14]
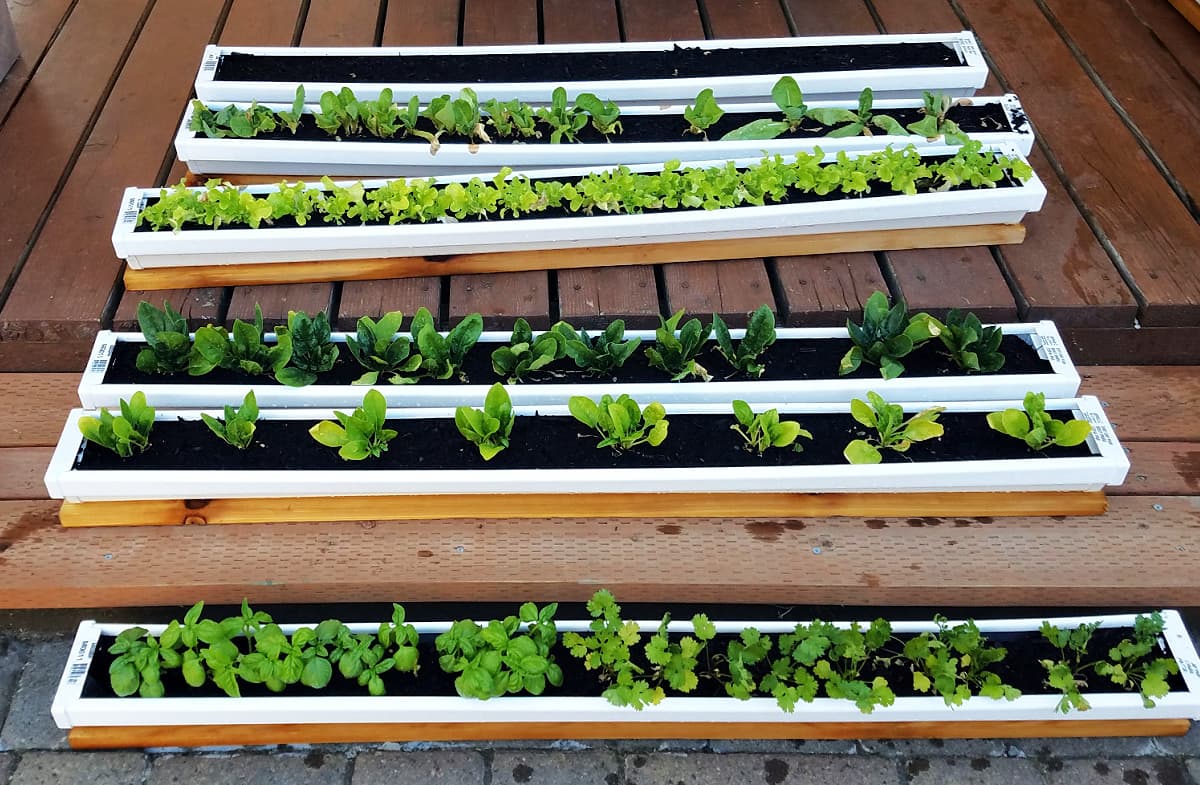
Note: We used a "K" style gutter for this vertical garden planter because I liked the profile; however, I think the half-round style has wider space for root growth, so we'll may use those instead next time.
Determine How Long to Cut Gutters. Each gutter length should be 1-inch shorter than the 1"x4" boards you cut in Step 8 (and 1½-inches shorter than the distance between the hypotenuse/cleats). This will leave room for the gutter caps.
Use a hacksaw to cut seven gutter lengths.
Place a gutter cap on the end on one gutter and use a rubber mallet to ensure that the cap is well-seated. (If necessary, use a file to clean the cut edges of the gutters to allow the cap to cleanly seat.) Repeat until all the gutter caps have been seated.
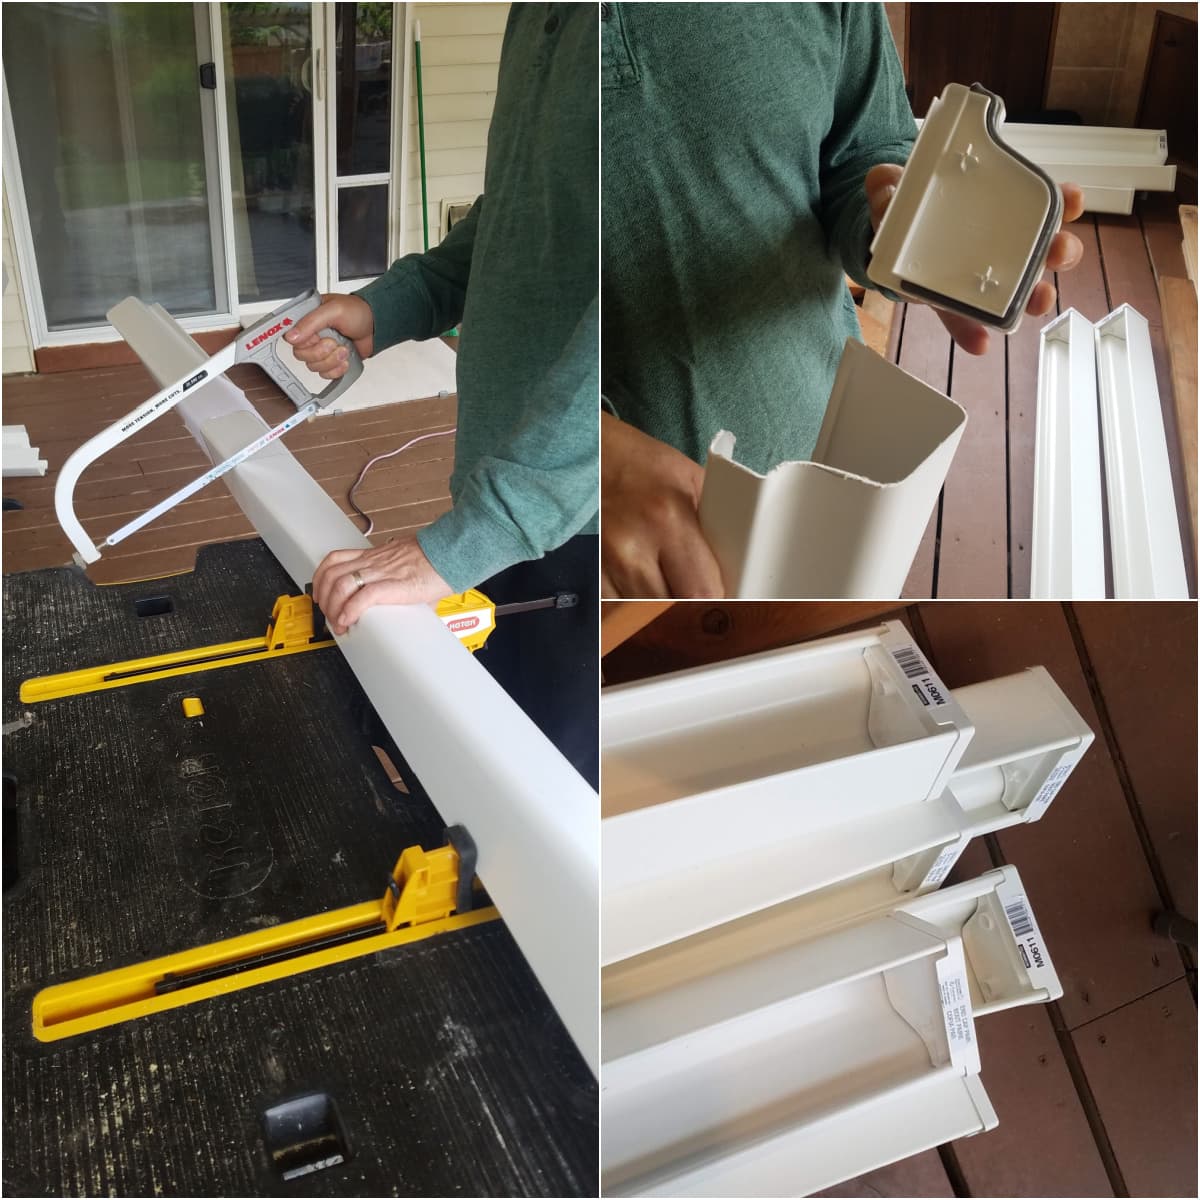
We chose to not permanently seal our gutter caps to the gutters, so that it's easier to clean them out between seasons. However, you may choose to seal them closed with a silicone sealer. It's up to you.
Step 11: Attach Rain Gutter Planters to 1x4 Rails
You will need:
- 7 - Precut 1x4 Rails (Step 9)
- 7 - Rain Gutter Planters
- ¾-inch Exterior Screws
Mark three or four drainage holes, spaced evenly along the inside center of the rain gutter. The drainage holes should be at least 9-inches from each end.
Use ¾-inch exterior screws to secure gutter planters to rails. (We used about 5 screws per board.)
Once the gutter planters are attached to the rails, use a ½-inch drill bit to drill the drainage holes, drilling through the gutter and board at the same time.
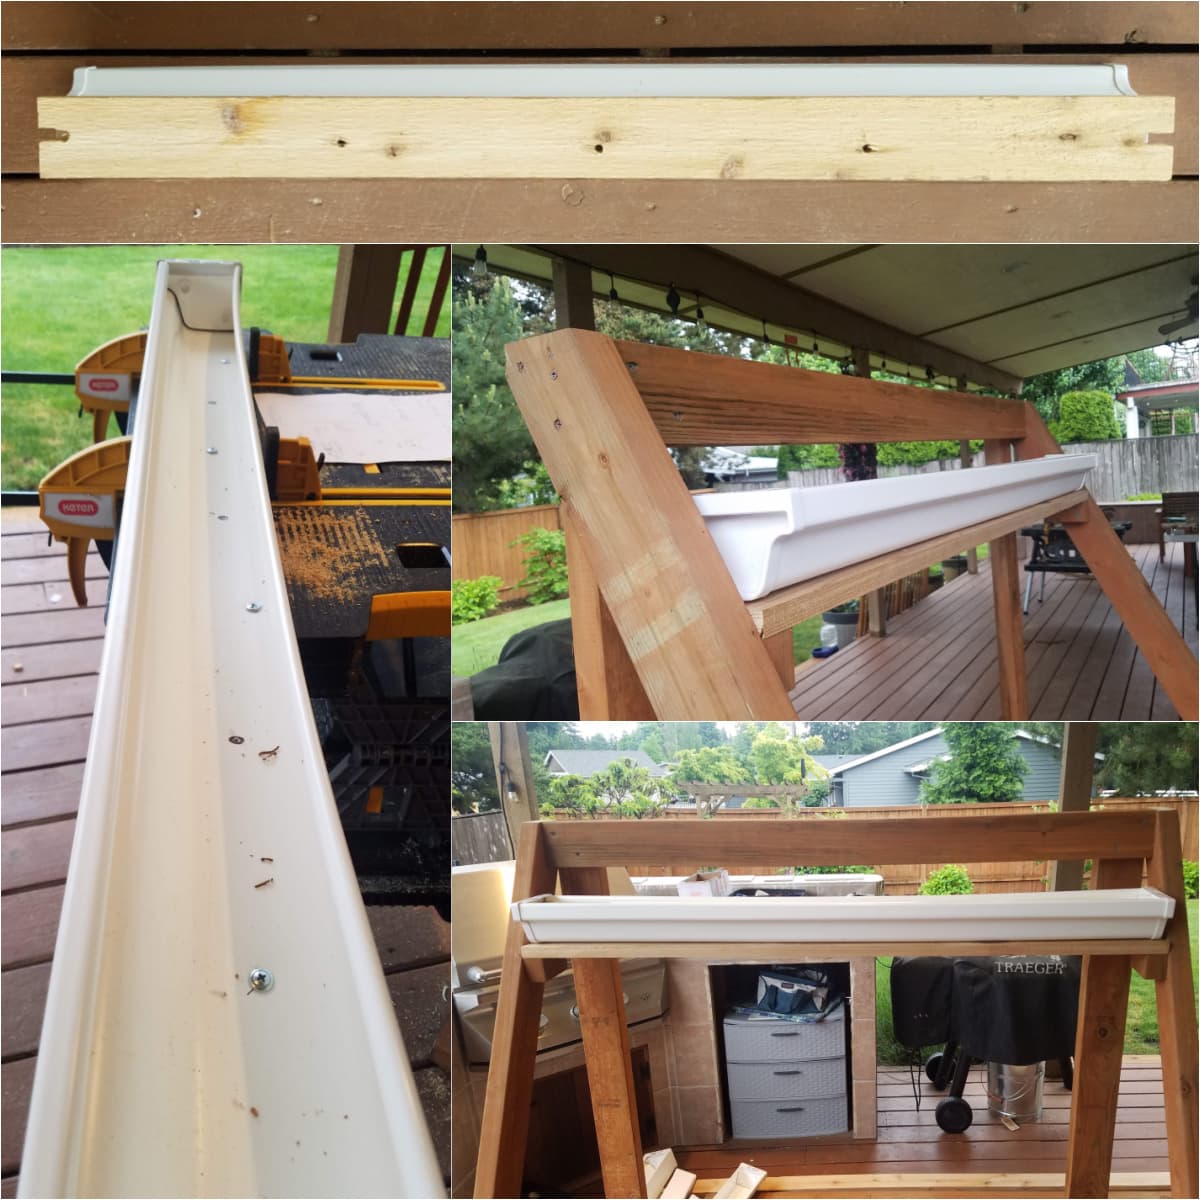
Check the mounted planters on the frame to ensure that they fit easily over the dowel posts. If they don't, make any adjustments necessary before progressing.
Step 12: Fill Planters with Potting Soil
You will need:
- Completed Planters
- Landscape Fabric
- Raised Garden Potting Soil
Before filling with soil, line the rain gutter planters with landscape fabric. Once the planters are filled, trim any extra fabric to clean up the edges. The landscape fabric will hold moisture and help prevent the soil from washing out.
Fill the planters to the top with soil. The soil will settle a lot after it is watered, so don't be afraid to fill it clear to the top.
Congratulations! You did it. Now the only thing left is to plant your vertical garden!
FAQs & Expert Tips
This rain-gutter vertical garden is designed to grown small, shallow-rooted plants.
I like to call this our Salad Bar. We were very successful growing spinach, lettuces, arugula, basil, and other microgreens in our garden. The lettuces didn't grow to full size, but we prefer to harvest our lettuce as we need it, and the fresh, baby greens were always available whenever we wanted them.
We also tried (for the sake of this post) to grow radishes, with some success. The gutters don't allow the roots to go far enough down to allow them to grow very large, but we did get some tasty little radishes out of it.
My favorite thing to grow in it is arugula sprouts, which grow quickly and well in the shallow growing environment.
Vertical Gardening Resources
- 11 of the Best Vegetables to Grow in Pots & Containers
- Raised Bed Gardening for Beginners: Everything You Need to Know to Start and Sustain a Thriving Garden
- All New Square Foot Gardening
- Vertical Gardening: Grow Up, Not Out, for More Vegetables and Flowers in Much Less Space
- Vegetable Gardening for Beginners: A Simple Guide to Growing Vegetables at Home
More DIY Projects for Your Garden


Want More Free Recipes?
Subscribe to our newsletter to get family-friendly recipes and cozy living ideas in your inbox each week!
Find us on Instagram, Pinterest, and Facebook, too.
Thank you for visiting the Good Hearted Woman. Remember to bookmark this site, and come back soon!


Rick says
We really enjoyed the whole process of building this raised garden.