

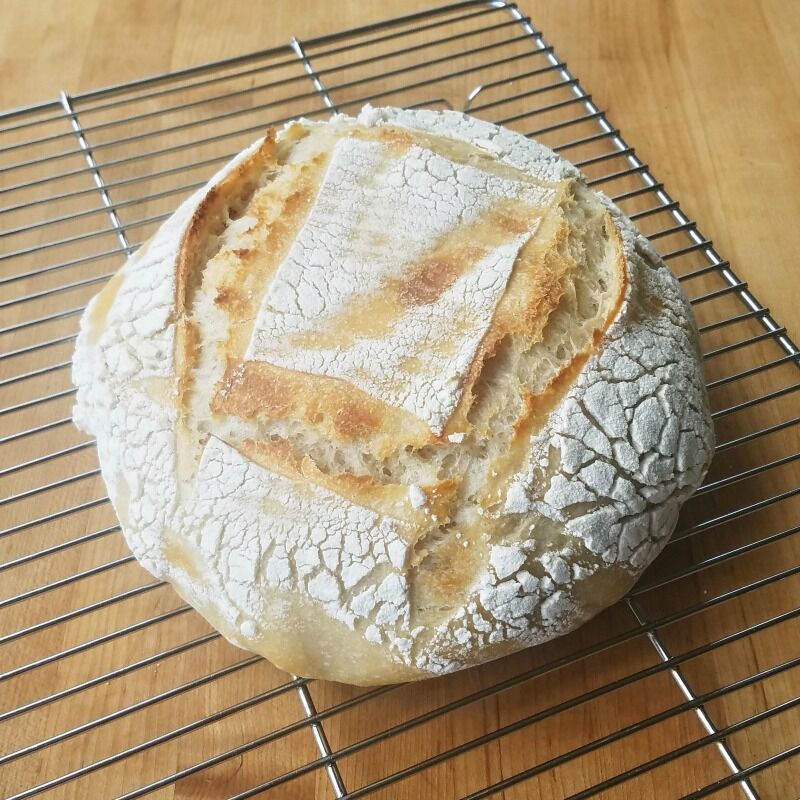
This Easy Sourdough Bread recipe is perfect for beginning bakers and old sourdoughs alike! Recipe makes a long-rise dough, and requires only sourdough starter: no added yeast.

This Basic Sourdough Bread recipe is easy and straightforward, and it consistently bears excellent results (even when I forget it for an extra hour or five). Moreover, the bite is amazing: chewy and tender, with a mild, pleasant sourdough tanginess. In a nutshell, it's one of the best all-round breads I've ever made.
Jump to:
What's the Story on this Sourdough Bread Recipe?
Some years ago, when I first embarked my own sourdough baking journey, I took a deep-dive into the science of sourdough. I studied as much as I could, and got a feel for the process by testing out all the best beginner bread recipes I could find.
From that experience, plus advice from experts and lots of trial and error, I created this easy sourdough bread recipe for beginners - one that can be easily repeated over and over again with consistent, delicious results. Compared with some artisan sourdough bakers, my skill level barely scratches the surface, which is probably why I keep going back to this recipe over and over again. It never fails me!
If you fall in love with sourdough baking, this may not always be your forever-sourdough recipe: you may find bigger, better, crustier loaves to bake. Artisan loaves. Breads with Attitude. But this recipe is a wonderful, forgiving beginner recipe with a high rate of success - Everything you want in your first loaf!
What is True Sourdough? ( And Why Do I Care?)
This bread is a true sourdough bread, which means that it does not rely on the addition of any extra yeast. It depends solely upon the natural yeast in the Starter for leavening.
True sourdough bread is significantly slower to rise than dough that relies on added traditional yeast to do the heavy lifting. For example, from the time you stir first the ingredients through the final post-baking rest time, this Easy Sourdough Bread takes a minimum of nine hours to make.
Don't stress about the time element, though. Sourdough is both easy to work with and very forgiving. Once you get the rhythm and flow of the sourdough baking process, you'll be able to throw a loaf of this bread together with only about 20 minutes of actual hands-on time. The rest of the time, you'll just be waiting around for it to do its thing.
Rising Times for this Recipe
When you stir up a batch of sourdough bread dough, your dough goes through a number of phases on its way to becoming bread; most notably, the bulk fermentation (first) and proofing (second) rise times.
BULK FERMENTATION: This bread recipe requires a minimum 6-hour bulk fermentation (1st rise); however, I personally recommend allowing it to rise at least 8 hours before moving on to proofing (2nd rise), when you form your loaf or boule. A longer rise will yield a chewier crust, and intensify the sourdough flavor in your bread.
PROOFING: Proofing (2nd rise) can take anywhere from 2-3 hours on the countertop to 12 hours overnight in the refrigerator.
I prefer to proof overnight in the fridge and bake my bread first thing in the morning. This gives me a house that smells like fresh bread all day, and I don't have to heat the kitchen up during the day.
What Goes into this Sourdough Bread Recipe
★ Sourdough Starter [100% Hydration: Feed your healthy starter 12-24 hours before beginning the bread making process.
★ Lukewarm Water: Water should be 105°-110°F (40°-44°C). The live culture in sourdough, like all yeast, is a living thing and is killed off at higher temperatures.
★ Flour: We recommend using bread flour or unbleached all-purpose flour for this recipe.
★ Maple syrup: Honey is a good substitute for maple syrup in this recipe.
★ Kosher salt: Use kosher salt. If using table salt, reduce the amount to 1¼ teaspoons.
How to Make Easy Sourdough Bread (Step-by-Step)
Feed your healthy starter 12-24 hours before beginning the bread making process.

Step 1: Autolyse (Mix the Dough)
In a large stand-mixer bowl, mix together water, flour, syrup or honey, starter, and salt thoroughly with wooden spoon. Allow to rest for at least 15 minutes, and up to an hour.
How to measure the Starter: The vigor of your Starter will affect its density. Stir Starter down before measuring, especially if use a measuring cup. (I highly recommend using a kitchen scale to get more consistent results.)
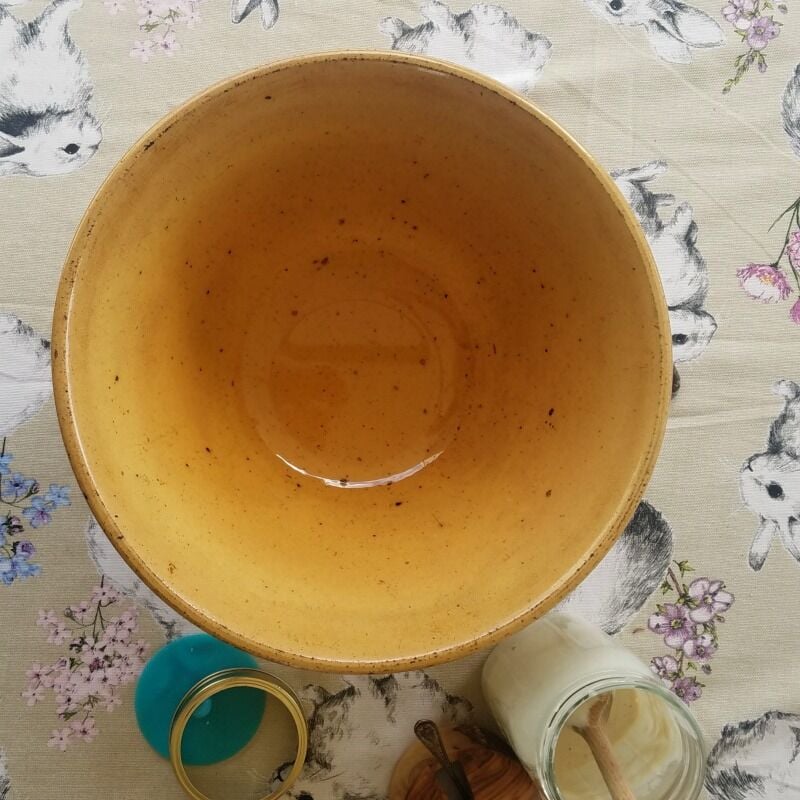
While dough is resting, lightly coat a medium-sized bowl with olive oil. The bowl needs to be a big enough to allow the dough to double in size.
I use about two tablespoons of oil to coat the bowl the first time.
Step 2: Knead Dough
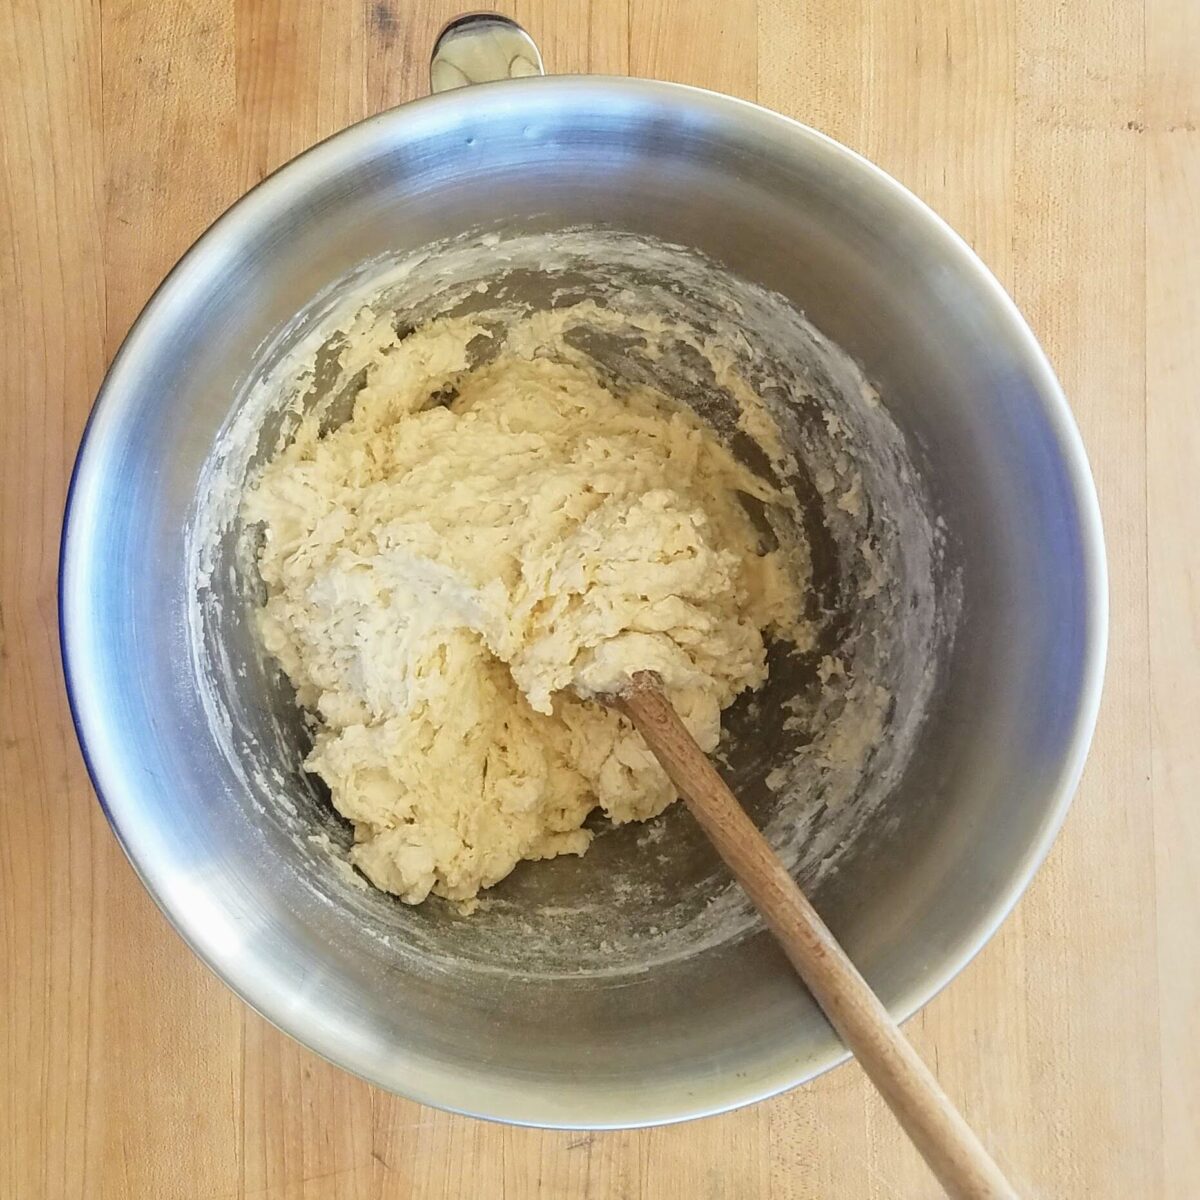
Put the mixer bowl on the stand-mixer. Knead dough with bread hook for 10 minutes.
This normally is a very sticky, soft dough. However, depending on the actual hydration of your starter, you may find that you need to add a little more flour to get things started.
I often end up adding an extra ½ cup during the kneading step. Try not to add more than ½ cup of flour, though. You can work in a little more flour during the folding process if you need to.
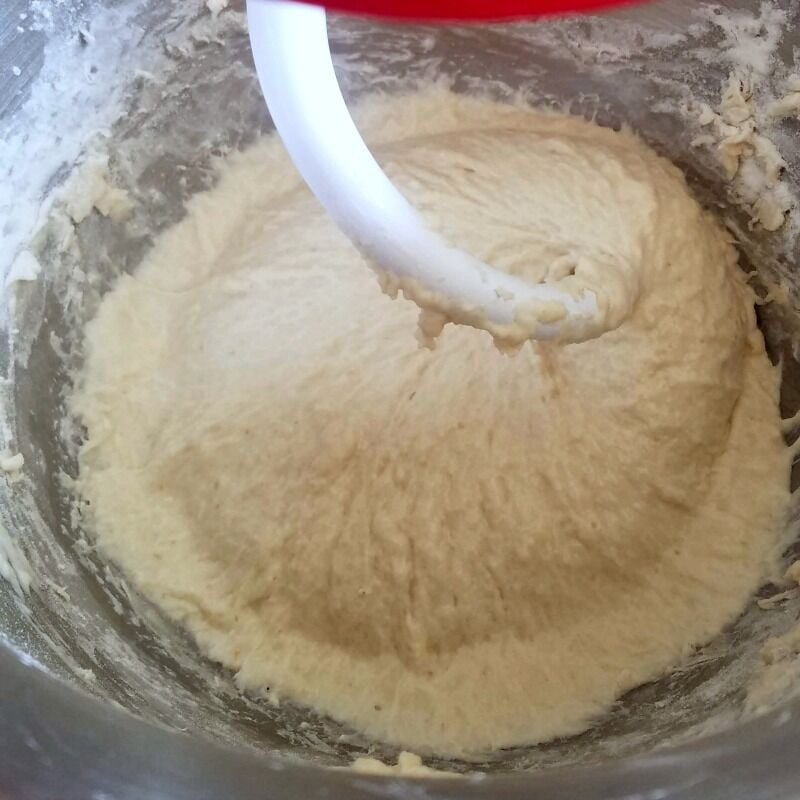
Step 3: Bulk Fermentation (1st Rise)
Remove dough from mixer, place on a well floured board, knead by hand a couple of times, and shape into ball.
After you form the ball, it should kind of slowly settle onto the board, like an old man into a lounge chair. It won't hold its shape for a long time, but it also shouldn't just melt into a puddle. You need to find a happy medium.
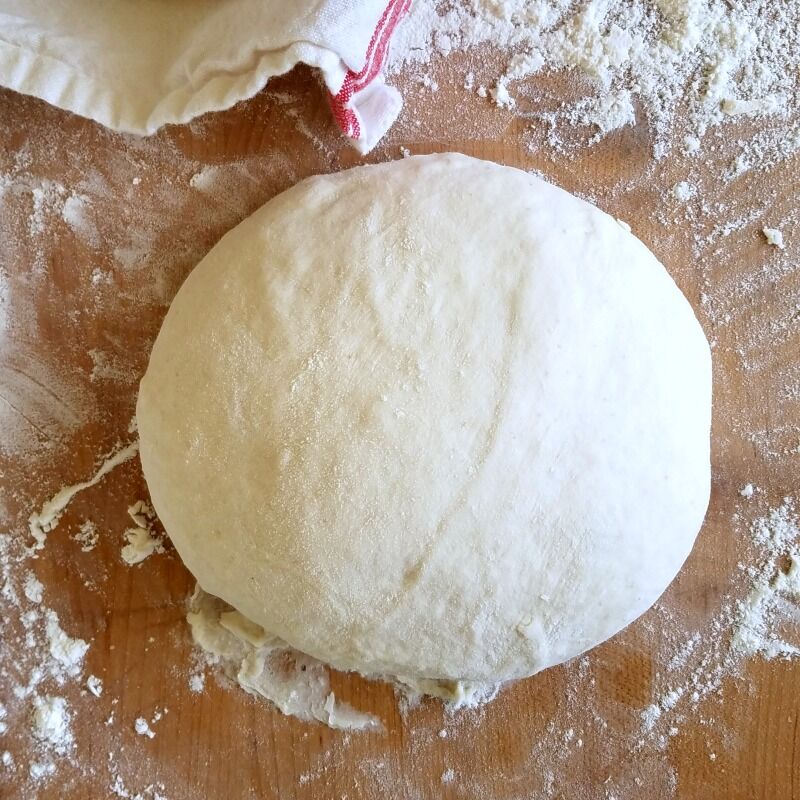
Put dough ball into the oiled bowl, smooth-side down first. Then flip it smooth-side up so that all sides of the dough are covered with oil.
Cover bowl with plastic wrap and set in a warm place.
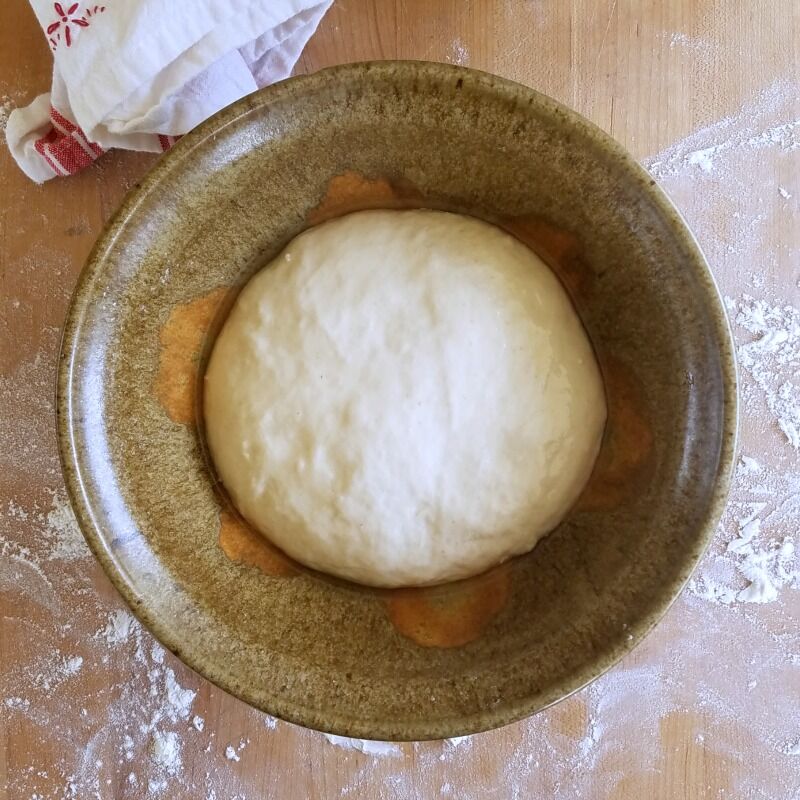
Allow dough rise at least 6 hours, folding every 30 minutes for the first 2 to 2½ hours.
To fold, turn dough out onto a floured surface and pat down to remove most of the air bubbles. Fold as illustrated and return to bowl, smooth side up.
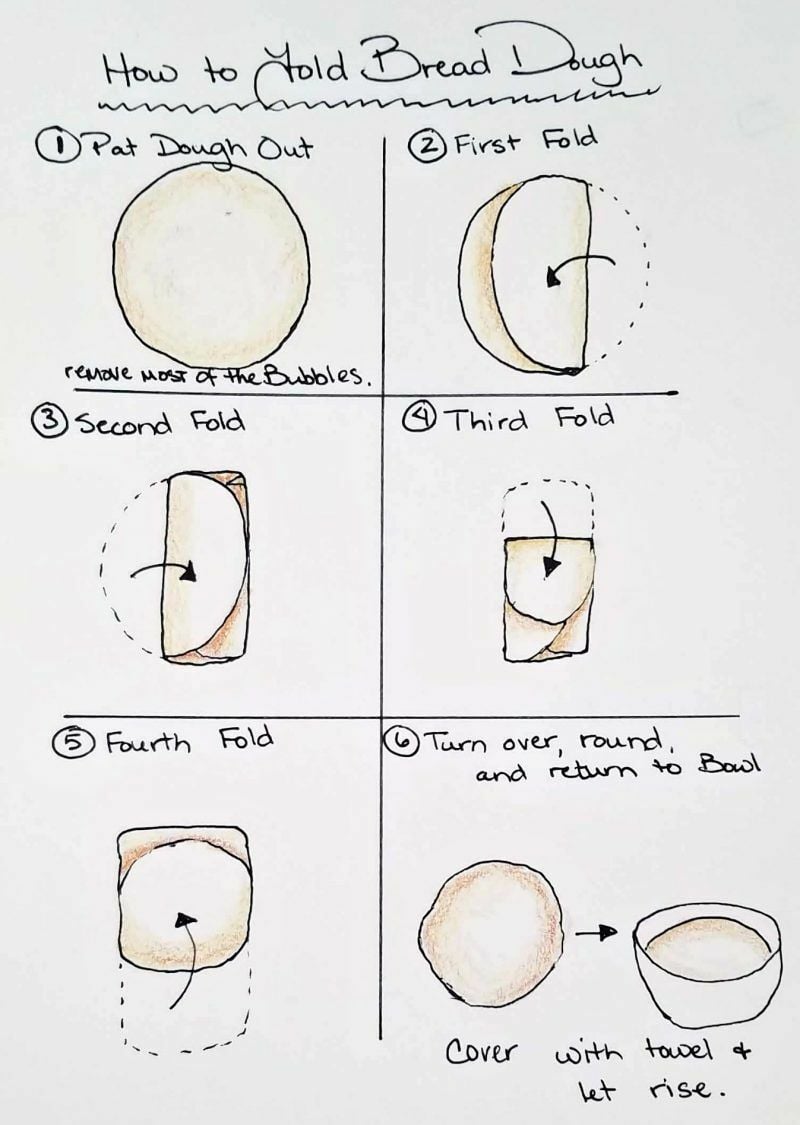
Cover and proceed with the rising process.
Re-oil the bowl with a tablespoon of oil the first two times you fold the dough.
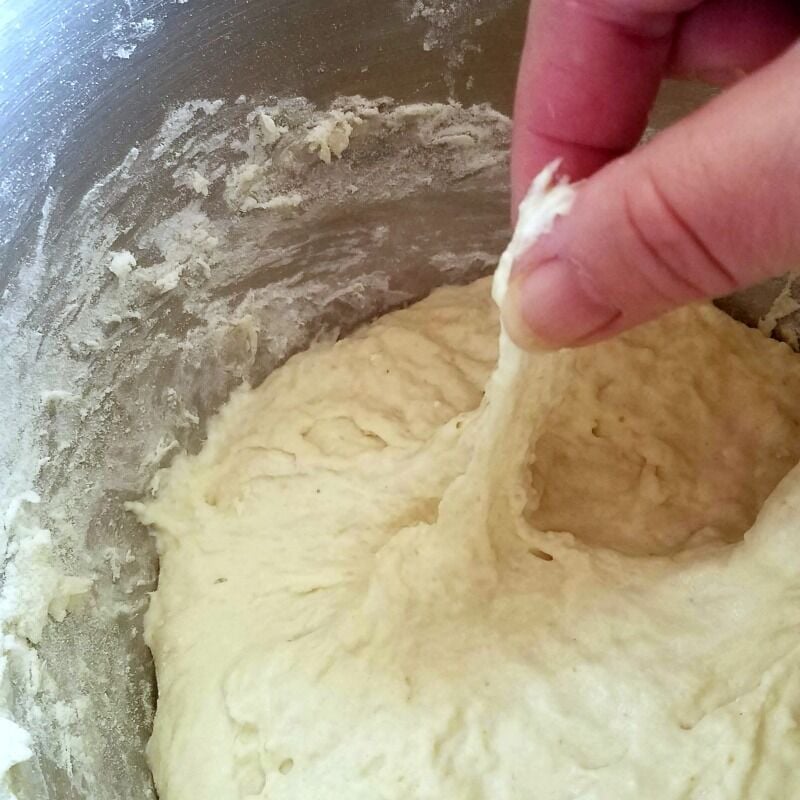
The folding at the beginning of this step helps to align those long gluten strands, and create those lovely sourdough bubbles.
You should notice a discernible change in the texture of your dough after folding the first couple of hours. By the end of this step, your dough should feel more "stretchy" and less "sticky" than when you started.
TIP: Sometimes, because this dough is so sticky, it works easier to "fold-and-stretch" your dough right in the bowl, instead of folding it on the countertop. If that works better for you, go for it.
Step 4: Proof (2nd Rise)
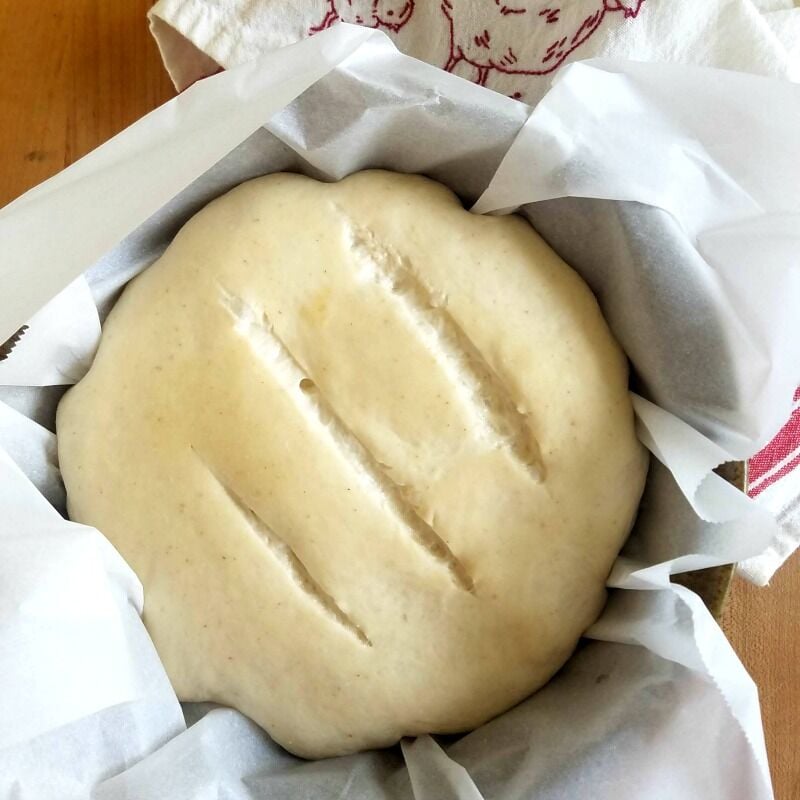
After the dough has risen for at least 6 hours (folding every 30 minutes for the first 2-2½ hours), form bread dough into a boule* and place it on a square of parchment paper.
Place the dough, parchment and all, back into the bowl.
*A boule is a round bread loaf.
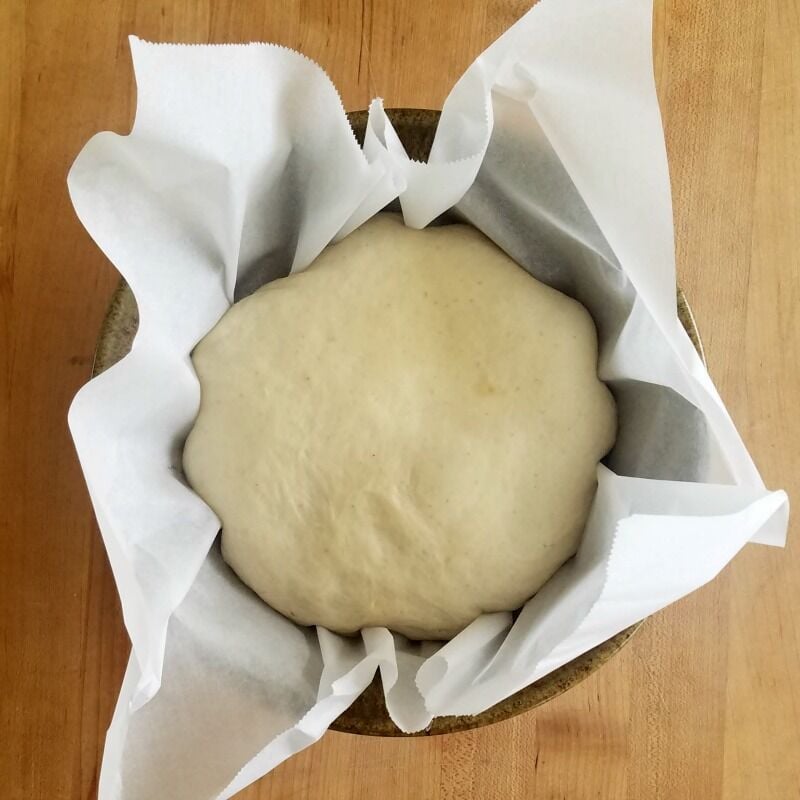
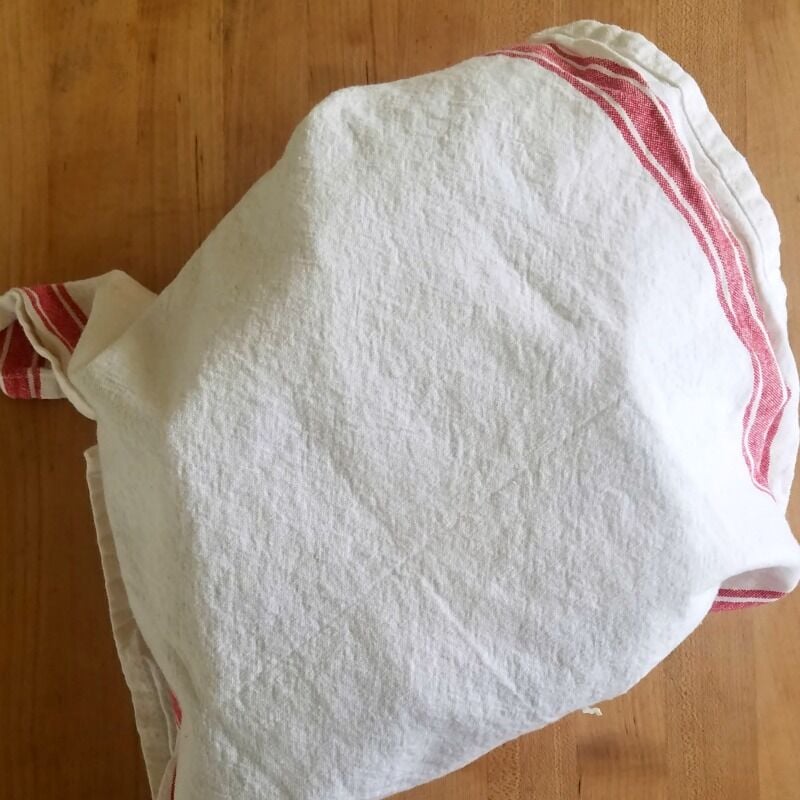
Cover loosely with a damp towel and allow to rise for 1½- 3 hours, or until it has approximately doubled.
TIP: If it is late in the day and your bread needs more time to rise, you can slow the process by allowing it to rise in the refrigerator overnight, and then baking it first thing in the morning.
In the last 30 or 40 minutes of the last rise, move your oven rack to the bottom third of oven.
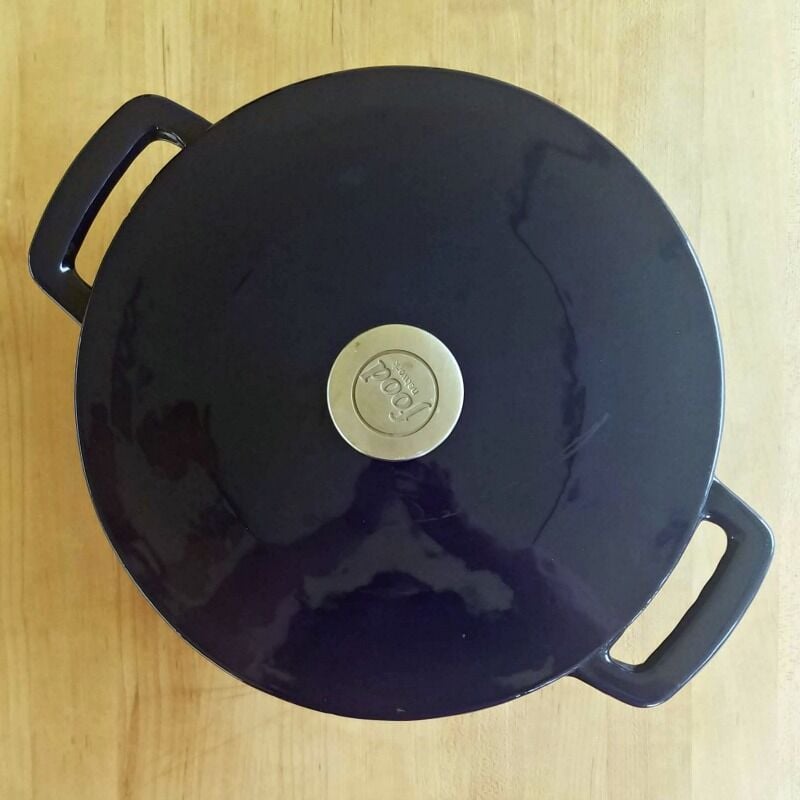
Put an empty cast iron Dutch oven with lid in the cold oven. Preheat to 500°F [260°C] for 40 minutes.
Step 5: Slash & Bake
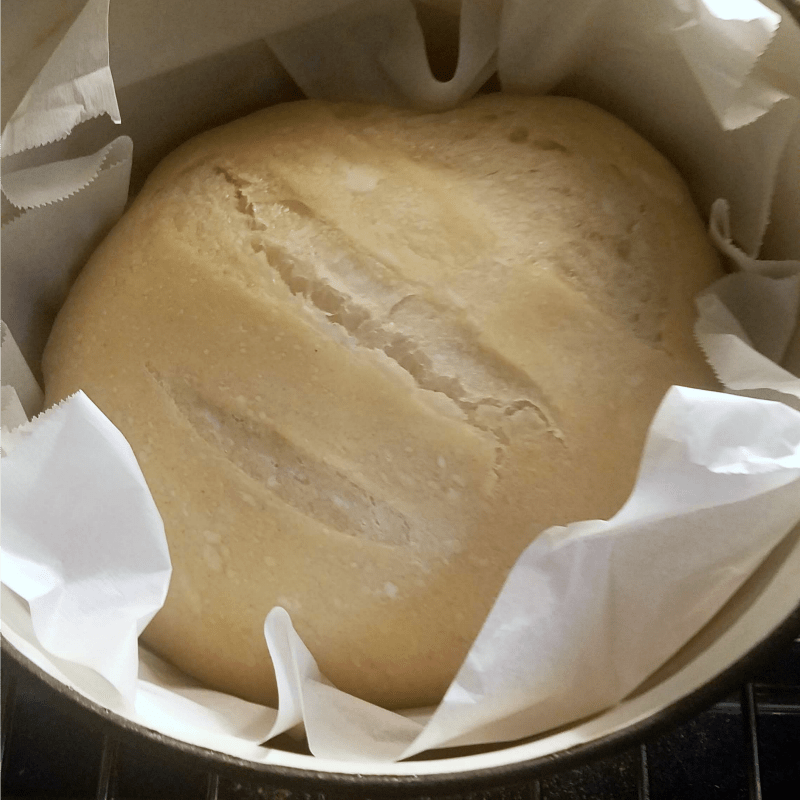
Remove the hot Dutch oven from the oven. Remove the lid from the Dutch oven and put the boule in by picking up the corners of the parchment and gently setting it in.
Be very careful - the Dutch oven and lid are very hot!
With a wet, serrated knife, cut a couple of slashes on the top of the boule. (I often forget to do this step, and everything still turns out just fine.)
Put the lid back on the Dutch oven. Put the Dutch oven back into the oven and immediately reduce oven temperature to 450° [232°C]. Bake for 13-14 minutes with the lid ON.
If you don't have a cast iron Dutch oven, you can use a baking stone. If you use a baking stone, cover the boule with a big roaster lid or something like that. The idea is to create some steam for the first part of the baking process- this is what gives it that awesome chewy crust.
Remove the lid and bake for another 13-14 minutes with the lid OFF.
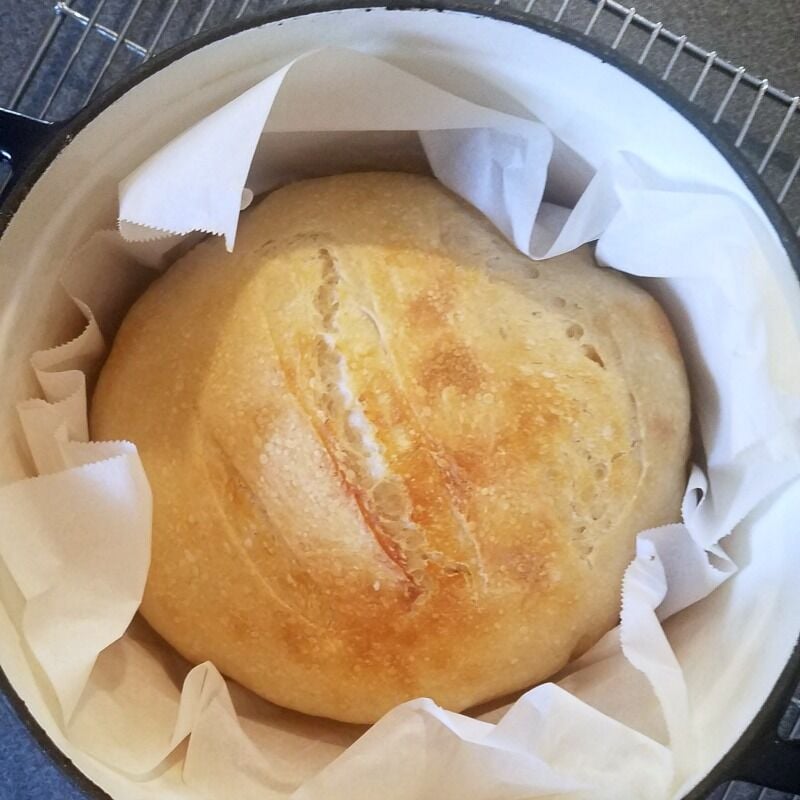
Using the parchment corners, carefully remove bread from the Dutch oven and place on a wire rack to cool for 30 minutes.
DO NOT slice the bread until it has set for 30 minutes - this resting time is part of the baking process.
Top Tip: Fold, Don't Punch
This Sourdough Bread recipe calls for you to "fold the dough" a couple of times during the bulk fermentation (first rise), and I thought it might be helpful to some people if I explained what that means. (If you are a seasoned dough-folder, you can skip this section.) The folding helps to encourage those long gluten strands, and create those lovely sourdough bubbles.
Many, if not most, bread recipes call for you to punch down the dough after rising. Punching down the dough does a number of things. Most importantly, it removes some of the gas bubbles from the dough and redistributes the yeast cells, sugars, and moisture so that they can ferment and rise again during the proofing stage.
Folding yields similar results: it too expels the carbon dioxide produced during fermentation, strengthens the dough by stretching the gluten strands, and redistributes cells, sugars, moisture and heat spots in the dough to even out the rising.
Punching dough down will result in a fine crumb, which is desirable when making sandwich breads or pastries. Folding, on the other hand, will give you a loftier rise and a looser crumb - resulting in all those lovely little air pockets in our sourdough and artisan breads that we love so much.
FAQ
Who is Kaylen, and Why is this Her Bread?
The original spark that set off my interest in sourdough baking was ignited by my BFF, Jenny. Jenny has an amazing daughter, Kaylen, who has some medically serious digestive issues. Gluten is not at all Kaylen's friend, but she missed real bread "that does not taste like sand" [Kaylen's words]. Jenny asked me about sourdough bread after reading that it might be able to help those who are gluten-intolerant.
One study using sourdough bread made with specific strains of bacteria found that it could reduce gluten intolerance in people sensitive to wheat gluten. While that doesn't mean that people diagnosed with gluten intolerance can eat sourdough bread with impunity, it does suggest that the bread is more easily digested than other breads made with wheat flour. (Reader's Digest)
Remember that long rise I mentioned earlier, when I explained what true sourdough is? Well, it is during that long rise that the wild yeast and bacteria in a sourdough starter break down some of the carbohydrates and proteins in the flour, which (in theory) makes true sourdough bread more tolerable for folks with gluten sensitivity than bread leavened with traditional yeast.
When Jenny asked me to bake some sourdough bread for Kaylen, I was all in. (I've known Kaylen since she was six and love her like my own daughter: of course I'm going to bake her bread.) After developing a new Sourdough Starter and working out the kinks in my recipe, I carefully made Kaylen a loaf, using a minimum 14-hour rise and not adding any additional flour (during folding) after Hour 4.
After I dropped off her first loaf of bread, here's what I found on Facebook when I got home:
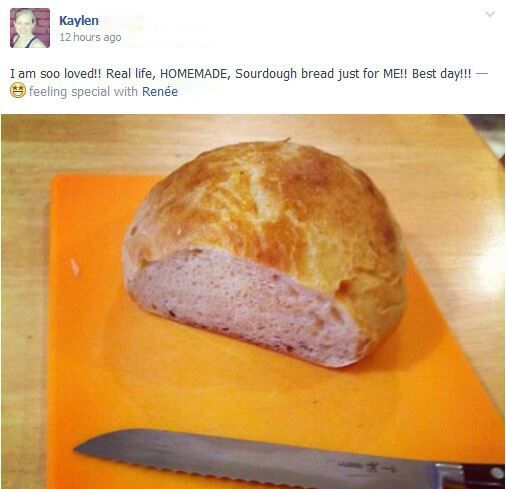
Made me cry. You just don't get a better feeling than that, you know?
Sourdough References
The references I used to develop this recipe include:
- How to Make Sourdough Bread
- Easy Sourdough Artisan Bread
- How to Make Rye Sourdough Starter
- The Art of Baking with Natural Yeast: Breads, Pancakes, Waffles, Cinnamon Rolls and Muffins (Caleb Warnock & Melissa Richardson, 2018)

If you have additional questions about this recipe, just leave a comment and I'll reply asap. Be sure to check out the comments below, too. We've had so many people share their sourdough knowledge here, and there is a lot to be learned from their experience. Like most of us, I'm here to learn, too.
Share Your First Loaf!
Since this post was first published in 2013, I've received hundreds of pictures and messages from excited new sourdough bakers who have made my bread recipe. I am so proud of and honored by everyone who has shared pictures of their "first loaf" with me over the years!
Happy baking, and I hope you love this bread as much as we do!
P.S. If you make a loaf of Kaylen's Bread, be sure to tag it with #thegoodheartedwoman #GHWfirstloaf #KaylensBread
More Sourdough Recipes
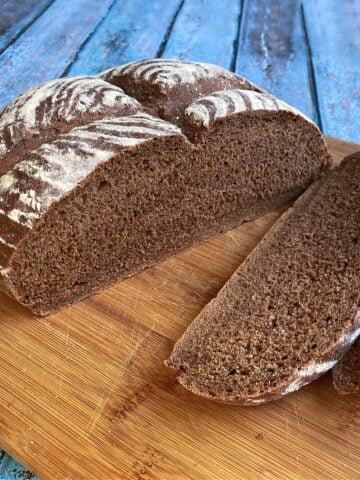
If you love heirloom bread baking, be sure to try our German Dark Rye Bread!
- Everything Sourdough Crackers (Crispy & Buttery)
- Spiced Pumpkin Sourdough Scones
- Double-Crumb Sourdough Coffee Cake
- Light & Fluffy Sourdough Pancakes (Old-Fashioned Hotcakes)

Want More Free Recipes?
Subscribe to our newsletter to get family-friendly recipes and cozy living ideas in your inbox each week!
Find us on Instagram, Pinterest, and Facebook, too.
Easy Sourdough Bread
Equipment
- 1 Wooden Spoon
Ingredients
Sourdough Bread Dough
- ¾ cup Sourdough Starter (100% Hydration) 6 ounces; unfed & room temperature
- 1⅛ cup lukewarm water 9 ounces; 105°-110°F (40°-44°C)
- 3 cups unbleached all-purpose flour
- 1 tablespoon maple syrup or honey
- 1½ teaspoons kosher salt
Additional Ingredients
- 6 tablespoons extra-light olive oil or other neutral cooking oil, for oiling bowl
Instructions
- Feed your starter 12-24 hours before beginning.
AUTOLYSE (Mix Dough)
- In a large stand-mixer bowl, mix together water, flour, syrup or honey, starter, and salt thoroughly with wooden spoon. Allow to rest for at least 15 minutes, and up to an hour. Measuring the Starter: The vigor of your Starter will affect its density. Stir Starter down before measuring, especially if use a measuring cup. (I highly recommend using a kitchen scale to get more consistent results.)
- While dough is resting, lightly coat a medium-sized bowl with olive oil. The bowl needs to be a big enough to allow the dough to double in size. I use about two tablespoons of oil to coat the bowl the first time.
KNEAD
- Put the mixer bowl on the stand-mixer. Knead dough with bread hook for 10 minutes.
- NOTE: This normally is a very sticky, soft dough. However, depending on the actual hydration of your starter, you may find that you need to add a little more flour to get things started. I often end up adding an extra ½ cup during the kneading step. Try not to add more than ½ cup of flour, though. You can work in a little more flour during the folding process if you need to.
BULK FERMENTATION (1st Rise)
- Remove dough from mixer, place on a well floured board, knead by hand a couple of times, and shape into ball.After you form the ball, it should kind of slowly settle onto the board, like an old man into a lounge chair. It won’t hold its shape for a long time, but it also shouldn’t just melt into a puddle. You need to find a happy medium.
- Put dough ball into the oiled bowl, smooth-side down first. Then flip it smooth-side up so that all sides of the dough are covered with oil. Cover bowl with plastic wrap and set in a warm place.
- Allow dough rise at least 6 hours, folding every 30 minutes for the first 2 to 2½ hours. To fold, turn dough out onto a floured surface and pat down to remove most of the air bubbles. Fold as illustrated and return to bowl, smooth side up.Cover and proceed with the rising process. Re-oil the bowl with a tablespoon or two of oil the first two times you fold the dough.
The folding at the beginning of this step helps to align those long gluten strands, and create those lovely sourdough bubbles. You should notice a discernible change in the texture of your dough after folding the first couple of hours. By the end of this step, your dough should feel more "stretchy" and less "sticky" than when you started.Sometimes, because this dough is so sticky, it works easier to "fold-and-stretch" your dough right in the bowl, instead of folding it on the countertop. If that works better for you, go for it.
PROOF (2nd Rise)
- After the dough has risen for at least 6 hours (folding every 30 minutes for the first 2-2½ hours), form bread dough into a boule* and place it on a square of parchment paper. Place the dough, parchment and all, back into the bowl. *A boule is a round bread loaf.
- Cover loosely with a damp towel and allow to rise for 1½- 3 hours, or until it has approximately doubled. If it is late in the day and your bread needs more time to rise, you can slow the process by allowing it to rise in the refrigerator overnight, and then baking it first thing in the morning.
- In the last 30 or 40 minutes of the last rise, move your oven rack to the bottom third of oven. Put an empty cast iron Dutch oven with lid in the cold oven.Preheat to 500°F [260°C] for 40 minutes.
SLASH
- Remove the hot Dutch oven from the oven. Remove the lid from the Dutch oven and put the boule in by picking up the corners of the parchment and gently setting it in. Be very careful - the Dutch oven and lid are very hot!With a wet, serrated knife, cut a couple of slashes on the top of the boule. (I often forget to do this step, and everything still turns out just fine.)
BAKE
- Put the lid back on the Dutch oven. Put the Dutch oven back into the oven.Immediately reduce oven temperature to 450° [232°C], and bake for 13-14 minutes with the lid ON. If you don't have a cast iron Dutch oven, you can use a baking stone. If you use a baking stone, cover the boule with a big roaster lid or something like that. The idea is to create some steam for the first part of the baking process- this is what gives it that awesome chewy crust.
- Remove the lid and bake for another 13-14 minutes with the lid OFF.
- Using the parchment corners, carefully remove bread from the Dutch oven and place on a wire rack to cool for 30 minutes. DO NOT slice the bread until it has set for 30 minutes - this resting time is part of the baking process.
Notes
UNFED Starter is Starter that is due to be fed right before you begin making the bread. It should have been fed in the last 12-24 hours. Unfed Starter is mature, active, and hungry for food. For comparison, FED Starter is Sourdough Starter that has been fed very recently compared to when you begin making the bread recipe. It isn't as hungry.
Nutrition
This website provides approximate nutrition information for convenience and as a courtesy only. You are solely responsible for ensuring that any nutritional information provided is accurate, complete, and useful.
Originally published September 17, 2013. Post updated with new content, images, and instructions to improve reader experience.


Chelsea says
I used your sourdough starter recipe and tried this loaf on day 5 of the starter. I made the dough yesterday then baked this morning (7pm 2nd rise - ~8am bake) Thinking maybe the starter wasn't ready even though it had been going super well cuz my loaf didnt really rise and is SUPER dense. I also maybe didnt discard enough that first discard? This is my very first ever starter and sourdough loaf!
Right now I have a little over 8oz of starter, after refeeding after doing this loaf recipe and I put it in the fridge this morning. My starter seems really thick this morning and im not sure that its bubbling anymore or as aggressively as it was? Should I be doing anything different for my starter or should I have waited longer to use my starter? Should I keep it on the counter to see if that helps it?
Thank you for the great help!
Renée B. says
Hi Chelsea,
You didn’t mess anything up. It’s just that Day 5 is a little soon for a new starter. At that stage, they can look all bubbly and exciting, but they’re usually not strong enough to do any heavy lifting yet. So instead of a light, airy loaf, you get more of a dense brick situation. We’ve all been there. Many of us more than once.
The fact that yours was “going super well” is actually a really good sign. It just needs a few more days to build strength.
I would take it back out of the fridge for now. At this stage it really benefits from staying on the counter and getting fed regularly. The fridge is great later on, once it’s predictable, but right now it’s a little like taking a cake out of the oven before it’s fully baked.
The thick texture and fewer bubbles this morning are totally part of the baby starter rollercoaster. It doesn’t mean anything is wrong. If it feels really stiff, you can loosen it with a little extra water when you feed it, but nothing fancy. I’d give it a day on the counter first, though. It may very well loosen up on its own.
What you’re looking for before baking again is this: after you feed it, it should reliably double in about 4 to 6 hours and look nice and airy. That’s when it’s ready to do the job.
Give it a couple more days and your next loaf will be a completely different story.
Lisa says
If I put it in the fridge at 5 pm and let it rest for the second time and bake 7 am the next day is that too long of a rest time?
Renée B. says
Nope, that timing should work just fine! An overnight rest of 12–14 hours in the fridge is pretty typical If it looks extra puffy in the morning, just bake it straight from the fridge – it’ll still turn out great.
Rhonda Jenkins says
My oven maximum temp is 450. Can I still do this recipe?
Renée B. says
Yes! 450°F will work just fine. Just be sure to preheat your oven (with your Dutch oven or bread pot inside) for at least an hour so everything is thoroughly heated before you bake.
Becky Hicks says
I can’t seem to find the weight measurements for your ingredients! I’m a weigher rather than a measurer!
Renée B. says
You can see weights by changing the measurements under the "Ingredients" subheading from US Customary to Metric.
Lynn says
I love this recipe but I misread and made it with starter that had been fed and doubled in about 4-6 hours. It worked fine so I am wondering if there were negatives I just wasn’t aware of. BTW very much newbie here.😊
Renée B. says
If your sourdough is overfed, it will lose some of that tangy sourdough flavor we love, and your bread might not rise quite as much as it might have otherwise. Those are the only downsides that I know of.
Liz says
I have made this bread twice, I love it! I am newish to sourdough and have been very unsuccessful until I made this bread! 😂
I’m wondering if i can use this recipe to make a loaf of sandwich bread? Would it affect the baking time?
Renée B. says
As long as you use a heavy loaf pan, and line it with parchment, it should work fine. (Admittedly, I've never made this particular recipe in loaf pan, as the dough is very soft.) In this case, use a clean spray bottle filled with water to spray the top of the loaf just after scoring the top and before putting it into the oven. The time may need to be adjusted slightly so it doesn't overcook.
Brianne Crosswhite says
Making my first loaf now! After a few other failed attempts with other recipes I’m excited for this one!
Have you done cinnamon sugar mix ins? If so which step would you start adding mix ins to the recipe?
Thanks!
Renée B. says
I don’t add any extra sugar to this recipe, as it can adversely affect the rise.
Carol Lidstrom says
This is the best sourdough bread I've made. It's reliably delicious. Friends said "This doesn't even need butter!" It's really fun to make, especially with the process of folding it every 30 minutes for the first couple of hours. You just know it's going to be good. I think the best flavor comes out with proofing the 2nd time overnight in the refrigerator. The comments and replies are great. Thank you!
Renée B. says
Comments like yours make my day, so thank you! This recipe has taken on a life of its own, and I've learned so much from the comments people leave; it's truly gratifying.
Katy says
The only thing I don't like is that the bottom of the bread is way too done. How do you avoid that?
Renée B. says
The first thing I would do is check the oven temperature with an oven thermometer. (Check both the front and back temperatures: they can differ.) If that isn't the issue, perhaps the bottom of your Dutch oven is too close to the element.
Try reducing the oven temp to 425°F instead of 450°F, and raise the oven rack one level. Bake the bread only until the internal temperature of the bread registers around 208°F (97°C), and let it cool at least an hour on a wire rack before slicing.
I hope this helps. Let us know how it goes.
KC says
A few things 🙂 if you suggest measuring why not show grams ? And when mixing with hook is it on low ? Mine is rising and I can’t wait to see how it baked up
Thank you
Renée B. says
You can view measurements in grams by simply clicking on "Metric" just below the Ingredients title on the recipe card. And yes, LOW is the proper setting for the dough hook.
Ryan L says
I've made this recipe as a boule before and it turned out great! I have since gotten a batard loaf basket - do you think this would turn out okay in that shape?! Or should I split it into 2 loaves doing it that way? Thanks!!
Renée B. says
It should work fine either way - as a large batard, or two smaller ones.
Kekentia says
Hello!
My first try at this recipe came out HEAVENLY, even my nephew, who eats NOTHING ate it n loved it! It was super light and soft and tangy and wary to make; and the smell while baking??? OMG. Anyway I am trying to again and just have a question. We want to try freezing the dough for bread bowls. Is this possible??? And at what rising should this be done? The final after the six hours?
Thanks so much!
K
Renée B. says
I have to say, your comment made my day! And congrats on feeding your persnickety eater, too!
I've never tried to freeze this particular dough, but I'm sure you can. Always freeze dough after the first rise and after you've shaped it into its final form. Because this is such a soft dough, it may slump a little in freezing, but I'm not sure. I'd love to know how it turns out - please stop back and let us know!
Jess says
Excellent! Thanks for replying! I have 2 hours left on my first rise, will split before it goes in the fridge & will bake in the morning 🙂 I’ll follow your suggestions & update after they are done! Thanks again!
Jess says
Hi! This is my go to sourdough recipe, comes out PERFECT every time! I do have a question though. Have you ever tried to split this recipe into 2 boules? If so do you have the adjusted baking time for that? I’d really like to split this into 2 smaller ones to gift to friends & family in gift baskets 🙂 I wondered if I could make split this when preparing for the second rise, what do you think?
Renée B. says
Thanks so much for the great question! I know I have split it into two boules in the past, but I can't remember the baking time/temp. Definitely do it after the first rise is complete, and before you start the proofing rise. Off the top of my head, I think it would be wise to reduce the oven temp by 25°F in all cases (i.e, preheat at 475°F, and then reduce to 425°F for the bake). I'd also reduce the baking time by about a third, and keep an eye on things so they don't over-bake. Best practices: do a test run with one boule and see how it turns out.
If you can, please circle back and let us know how it went. If things work out, I'll update the post to include the split recipe suggestions so others can have that option as well. ❤︎
Laurie says
Best recipe ever! So easy and turned out wonderful. I put it in the fridge over night. Got it out the next morning and followed directions for heating the dutch oven in the oven. 13 minutes with the lid on and 13 minutes with it off! Whalah!! Beautiful crust with soft chewy bread. I wish I could post a picture! Thanks so much for the great recipe and for all your directions. I’m new to sourdough but you made it easy.
Renée B. says
Your joy is infectious! Thank you so much for circling back to let us know how it turned out: I'm delighted the recipe worked so well for you!
P.S. You made my day!
Johanna says
Super easy bread and it turned out delicious!
Renée B. says
So glad it was a winner for you! Thanks so much for circling back!
Meg says
Can I make this recipe sugar free? Will leaving out the honey or maple syrup compromise the bread?
Renée B. says
Sorry, but you cannot leave out the sweetener. To clarify though, its purpose is not to sweeten. You need to add a little sweetener to encourage the natural yeast into full-out production, which is what makes the bread rise. Just one tablespoon is required for the entire loaf, which works out to about a half-teaspoon per serving. By the time you consume the bread, the sugars have been fully consumed by the lactic acid bacteria in the sourdough.
Meg says
Thank you so much for your reply, that is super clarifying and interesting!! Can’t wait to try it out…will definitely share a “first loaf” pic 🙂
Tracy says
Hi! I've made this several times and like it, thanks! I have 3 questions for you.....
1- if I'm making this for someone who is gluten intolerant, how do I need to alter this recipe? It's written as a max of 8 hour bulk fermentation + 3 hour proof, and you mentioned a minimum of 14 hour rise... so what rise times do you use for your first and second rise?
2- On the second rise, you just said to shape it into a boule. Is there no folding at all first or smashing bubbles? Am I to handle it minimally just to shape and avoid popping bubbles? If so wouldn't this be more like a long first rise than an actual second rise?
3- My dutch oven says not to heat it empty, so how much bake time would you add to account for it being a room-temp dutch oven instead of a pre-heated one?
Thanks!! 🙂
Renée B. says
Thanks so much for the questions: I know these clarifications help all of us! Let me answer in reverse order:
(3) In my experience, preheating a cold Dutch oven slowly in a cold oven doesn't cause it harm (i.e., cracks to the enamel, etc.); however, I can't guarantee it. I can only say that I've made dozens of loaves this way without a problem.
If you are concerned about preheating your Dutch oven empty, you could use a baking stone covered with a roasting pan.
(2) Don't be overly concerned one way or the other about how many bubbles you pop. You have been folding the dough and popping the bubbles all along as part of the first rise; the proofing stage (or "second rise") in this recipe is simply the point in the process where you shape the loaf and let it rise for one last time.
(1) The length of time spent in bulk fermentation (a more descriptive term than first rise) is really up to you and your bread goals. The instructions say: "Allow dough rise at least 6 hours, folding every 30 minutes for the first 2 to 2½ hours"; with "at least" being the operative term. You can repeat the fold-and-rise (bulk fermentation) process for as little as six and as many as 20 hours, or possibly more. (I've never let it go longer than 20 hours, so I don't know. For gluten intolerant folks, I aim for about 14 hours.)
The instructions list the prep time as 8 hours, because that is the minimum amount of time required to prep this bread, not counting the autolyse and baking times (I can't find where it says that there is a max time of 8 hours for the bulk fermentation. Can you please quote the line in a reply, so I can do a search and correct it?)
Hope all this helps. Happy Baking!
Tracy says
Thank you! You said "You can repeat the fold-and-rise (bulk fermentation) process for as little as six and as many as 20 hours..." How would one go about doing that? I just do the stretch and folds four times then leave it alone for what's left of the 6-8 hours. Are you saying I'd leave it alone up to 20 hours? Or are you saying that after 8-10 hours I'd repeat the entire step and do stretch and folds, then let it rise for 8-10 hours again?
(and I must have added in the part of maximum of 8h so never mind on that)
Renée B. says
You stretch out the process, folding every hour or two (instead of every 30 minutes) until you are ready to let it rise for the last time. I wish I could give you a more precise answer (I know you want one), but in my experience with this recipe, the process is very flexible and forgiving, so there really aren't many hard and fast Rules.
June says
Hi, this is my first time making sourdough bread, I have a couple of questions...
1. is it ok to let the first rise be up to 24 hours?
2. I don't have mixer. Would I have to increase the kneading time?
Renée B. says
Hi June - Thanks for the questions. I think that 24 hours is probably a little too long to let it rise; you may exhaust the natural yeast. However, I've never let it go this long, so I can't say for sure. You shouldn't have to increase the kneading time by much, if any. (It will be more of a stirring that a traditional kneading.)
If you are new to sourdough baking, I encourage you to read through the comments for this recipe. Many people offer good advice about making this bread that you may find helpful.
CONNIE C SMITH says
9/12/22 just made my 3rd batch; well a 3rd DOUBLE BATCH, that is. I had my great-grandmothers' cast iron dutch oven with the matching drip lid. The bread turned out GREAT ! This time, I did NOT use the lid, but instead, heated up 2 small CI skillets along with the dutch oven. Had them on the bottom rack. Filled them with BOILING WATER just as I put the dough in the dutch oven; no lid. The water creates STEAM which produces the chewy texture ! Did the usual slash & bake. Made regular bread today with store-yeast--- IT FAILED. NOT the sourdough version ! BUT my sourdough starter comes from a 102 year old man I met in VALDEZ, ALASKA IN 1975. IT HAD BEEN HANDED DOWN FROM HIS GREAT-GREAT-GRANDFATHER ! HE WAS CARRYING IT EVEN BEFORE THE GOLD RUSH DAYS !! ANYONE WANTING SOME SEND ME AN EMAIL AT MADAMSPINNER4 @ YAHOO.COM
Susan Crum says
Your recipe made a flavorful, beautiful-looking round loaf of bread. I've made it three times already. It's my favorite sourdough recipe!
Renée says
A good loaf of bread is such a gift, isn't it?
Clyde Drex says
Your recipe made an almost perfect round of sourdough bread. I had it in the fridge overnight and it came out with a nice amount of “tang.” My only issue was it was a little dense. Do you recommend an early am rise and letting it get to room temperature before baking? Maybe I was a little too rough with the folding and kneading? Can’t wait to try again!! Thanks so much!!
Renée says
I'm so glad the recipe is working for you. The dough definitely needs to be at room temp before baking. It makes sense that putting it in under room temp would make it dense, because the air pockets wouldn't heat up as fast when the loaf goes into the oven.
Farmgal87 says
Hi there! I am a fairly novice sourdough baker but do have some experience, including many flops lol. Thought your fool proof recipe would put my starter to good use. I am doing my first proof now and wanted to do a long fermentation overnight. Can I put it in fridge after doing my stretches or should I wait until the final proof? So far my dough looks and behaves as it should so I would hate to mess it up now. Thanks!
Renée says
In my experience, once you start the long rise, you can put it into the fridge to slow the process at any point.
Natalie says
Is it 3 cups of flour or 400 grams? Both are listed but 2 cups of flour measured out to 400 grams...
Renée says
According to various sources, including King Arthur Flour, one cup of all-purpose flour weighs 120 grams.
So, 3 cups of all-purpose flour weighs 360 grams, which is where the ~400 grams came from. (There is always wiggle room when it comes to how much flour to use when making bread: so many environmental factors influence it.)
Is it possible you are dipping your measuring cup directly into the flour instead of scooping the flour in? The way you dip or scoop your flour can result in an up to 20 gram measurement difference, even if you are using the same measuring cup, because dipping compacts the flour.
If you’re not already doing it, try using a flour scoop (or big spoon) to transfer the flour into your measuring cup, allowing it to settle naturally. If you scoop it in and still find it is measuring 200 grams per cup, you may need a new measuring cup... or a new scale.
Hope this helps!
Anthea says
Thanks for a great recipe! My first attempt turned into a bit of a disaster. I think my starter had been fed too recently and it didn't bake through. I made a second attempt today though and it turned out great. I have found I need to bake it much longer than in your recipe (25 mins with lid, 20 mins without).
Jill Bull says
This is my go to sourdough recipe. I love it! I live at high altitude and it has always worked for me. I usually have to add 1/3 to 1/2 a cup of flour during the 10 minute mixer knead. I’ve started adding chunks of sharp cheddar and 2 jalapeños chopped up after the mixer knead and it is amazing! I don’t have to change the recipe after the additions.
Renée says
Cheddar-Jalapeño Sourdough sounds delicious! We will definitely have to try that!
Thanks for the high-altitude tips as well!
Heather M. Whipple says
This recipe looks delicious.
Can this be done without a Dutch oven?
I do not have one and I really do not want to go out and buy one just to make only one bread recipe. Plus my husband has COVID-19
And he is here in the emergency room getting an antibody infusion that will help him to not get more sick . I do not feel like going anywhere right now. I do not feel like buying one at all even online.
Renée says
I'm so sorry things are hard right now, Heather. I hope your husband responds quickly and well to the antibody infusion.
To answer your question; no, you don't have to use a Dutch oven. I found a good post outlining three ways to make good, crusty sourdough without a Dutch oven. I've used the baking stone and bowl method outlined on it with good results. I hope this helps.
Mary Hinkle says
I have had sourdough bread making before and failed over and over. This time I was fortunate to find good starter making instructions and then this wonderful bread recipe! I had a perfect loaf the first time, (then the next week made a loaf of whole wheat by increasing the water), And my late grandmother's 1935
Dutch Oven came in handy too.
I use the base of my yogurt maker to keep it warm for rising,, I have to watch it since it actually reduces the rising time. But I still got wonderful loaves. I am so happy! Today I will try to make rolls from it. Thanks so much for giving away this recipe!!!
Renée says
I'm so glad it worked out for you, Mary! Making a good loaf of sourdough is such a satisfying feeling!
Carol says
Made this today, how do you wait the 30 minutes of cooling time before cutting into it?? That was the longest 30 minutes of my entire life! This was my very first sourdough bread making experience and I will be using this recipe again for sure!
Renée says
Congratulations on your first sourdough loaf! I’m so happy that everything worked for you!
Emily Clementson says
This bread is amazing! Thank you very much for sharing this recipe. My family and I loved it. This will be my go to recipe!
Renée says
Thanks for the kind words, Emily. I'm so glad you like it!
Erika says
So is the water measured in fl oz or just oz on my digital scale? I just realized there is a difference and the dough is not as wet!?
Renée says
It's always best to use a digital scale with sourdough, at least until you get a good feel for it. An ounce is an ounce, no matter how much space is takes up. A pound of feathers weighs the same as a pound of flour: they just take up a different amount of space. For example, an "8-ounce measuring cup" holds the amount equal to 8 ounces of water. Some liquids are more dense, others less so. Sourdough starter, for example, has a lot of air in it, so an ounce of starter will take up more space than an ounce of water.
Judy says
I think you are genius, Good Hearted. This is such an informative recipe, and you surely have covered all the bases. I've made the best bread ever with your help, but I sure would love to make 2 boules at a time, as 1 doesn't last long in our house. I was thinking that my stand mixer can handle a double run, then I would just divide the dough in half, and put it in 2 separate bowls, and continue with the process as usual. Do you think this is doable?
Thank you so much for this recipe, and for sharing so generously.
Renée says
Thank you so much for the kinds words: I'm so glad it the recipe is working for you! Yes, I think your plan to double sounds doable: the bakers' ratios would stay the same. Please come back and let us know how it worked out!
Jemma Wood says
Love this recipe- have had mostly great results! However, we have had really fluctuating weather, making my kitchen on the warm and humid side, and I’ve been experimenting with rye flour, and I think these factors may be affecting my results. It would be helpful to see a picture of what the dough should look like at the end of the first rise, and maybe some more detail on how to tell if it’s risen long enough. On a warm day it seems to puff up quickly and maybe overrise after 6-8 hours. Also wondering how much handling or flattening to do before forming the boule? Thanks for great recipe!
Renée says
You definitely need to keep an eye out toward the end of rising so that it doesn't over-proof. I will see what I can do about adding a little more clarity to these steps. Thank you for the suggestion.
Sharon says
I love sourdough for my sandwiches and this bread recipe is so easy to make that I can have it on hand all the time.
Michelle says
Can’t wait to try this recipe! Been attempting sourdough since this whole covid quarantine pandemic has me stuck at home and no yeast to be found haha. Question,,,.if the dough proofs overnight in the fridge should you let it come to room temp before baking or stick it straight into a preheated oven from the fridge? This is my fourth attempt (first time with this recipe) and so far looks very promising! ??
Renée says
Welcome to the wonderful world of sourdough, Michelle! Oh, I hope everything works out! You can bake directly from the fridge. You might want to add a minute or two to the baking time, particularly the first phase.
Tiffany says
Thank you for sharing this recipe!! I have made it twice, and both came out amazing! I want to make baguettes for a dinner party. How would I use this this recipe to make those? I am not sure about the shaping or how to bake them, since they wouldn’t fit in the Dutch oven.
Renée ♥ says
To preface, I've never tried making baguettes with this particular dough myself. However, if I was attempting it, I think I would first split the dough to form two loaves, and let each them rise separately on parchment. (You could encourage the baguette shape by nesting the formed dough between a couple of rolled kitchen towels under the parchment.) To bake, I would use a preheated pizza steel and a roasting pan lid in place of the Dutch oven to create that enclosed space for the bread for the first rise. Baking time would be affected by the change in shape and mass, so I think the second baking time might have to be adjusted. If you end up trying this, I'd love to know how they turn out!
Doris says
Do you need to cover it if you’re putting your dough in the fridge overnight?
Renée ♥ says
Always cover your dough when it's rising with plastic wrap and/or a damp towel: you don't want the exposed portions to dry out. If you put it in the fridge, use plastic.
Simara says
My husband and I used your recipe for Easy Sourdough Bread. It came out great. Very easy steps. It took almost a week but well worth the wait. We used the Dutch oven method. It makes a nice crust on the bread. This will be our go to recipe from now on.
Renée ♥ says
I'm so happy to know it worked for you!
Meg says
I have struggled so much with this recipe. The first few times I made it I was having starter issues and ended up with a very large hockey puck. Now my started is good- I can bake other things easily, but this bread is turning out very dense and glue-y on the inside. It is definitely rising a lot, but I have no bubbles and it just seems wet. I have been following the recipe, except that my dutch oven is like a non-stick pan type, not stoneware or cast iron. Is this the problem?
Renée ♥ says
The type of Dutch oven could definitely affect your outcome: I'd start there. A standard metal pan does not hold the heat like a cast iron Dutch oven. Using cast iron, you are essentially creating a smaller oven inside your larger oven, concentrating the heat and keeping in the steam. That's one reason it is essential to preheat the Dutch oven inside the oven for 30-45 minutes before putting the bread in to bake. If the internal temperature of the dough doesn't rise quickly during the initial baking time, the baking process breaks down.
To encourage more bubbles, try folding (or folding and stretching) the dough every half hour for the first 2 1/2 hours of the bulk rising time (5x). Set a timer. Each time you fold it, you want to fold it in on itself until you feel some surface tension on the dough. By the end of this 2 1/2 hours, your dough should have a notably more stretchy texture. It will still be soft, but it should not be sticking all over your hands at this point when you work with it quickly, and you should be able to easily form a boule on a lightly dusted board.
My final advice is actually the most important: If you aren't already weighing your ingredients, I strongly encourage you to do so. This can make all the difference. (I prefer to convert the recipe to metric measurements for this.)
Meg says
I will definitely try weighing the ingredients- my dough hasn't been as sticky as you or others are describing, so my measurements may be a little off. Thanks for the response!! For what it's worth, it has been coming out with an amazing flavor every time, so I have faith in your recipe!
Gemma says
Thanks so much for sharing this recipe with us. I've never tried making sourdough before, but I would love to try now I've got your recipe. I am trying to be a bit more creative in the kitchen xo
Jillian Stone says
Hi there! Thanks for posting this recipe.
I just started a new loaf this morning - with a brand new starter that I've been creating for 9 days. I just fed it the last time yesterday at noon and made the dough this morning at 8 am. It had the right consistency when I made it (old man in chair thing and sticky). It's 10:41am now and hasn't risen at all! I've been waiting for it to almost double as the instructions say, but it hasnt moved. Should I wait for it to rise or just go in on the first fold? Thanks!
Renée ♥ says
If it was me, I'd give it another hour and then fold it. It doesn't always completely double between folds, especially on the first round. Good luck!
Erin Lynch says
This recipe has been so helpful! Especially since I can't find yeast anywhere right now! Pinned so I can keep referring to this handy sourdough guide!
Mark Truman says
After seeing so many sourdough recipes that take 2-3 days, I was thrilled to find this on. I had gotten a starter from one of my neighbors and although I'd baked bread in the past I'd never attempted sourdough. It was fantastic! The process was so straightforward and quite forgiving. The bread turned out better than I would have ever hoped! We'll definitely be making more soon!!
Renée ♥ says
Thanks so much for letting us know, Mark! I'm so glad your first experience was a good one! Welcome to the wonderful world of Sourdough baking.
Kiya Thompson says
I feel like my sourdough must be too sticky. It sticks to everything - all over my fingers when I fold it, and there's no way I can actually shape it into a boulee. It just spreads on the parchment paper. And putting the slashes on the top has never worked. I'm hesitant to venture away from the recipe. My starter was 100% hydration at one time, but I've irresponsibly fed it over the course of a year and have no idea if it's even still 100% anymore. Should I be using less flour or more water? I so want to master this and am so frustrated!!!! I've made your recipe probably 10-15 times - enough to notice you just updated it today! Ha!
Renée ♥ says
It is a very sticky dough, but you may need to add a little flour. If you take it out of the bowl and fold in again on a heavily-floured board, that should probably be enough. This is a very soft dough, but folding it again on a floured board should add enough flour to form a loose ball. After it is formed, it should kind of slowly settle onto the board like and old man into a lounge chair. It won't hold its shape for a long time, but it also shouldn't just melt into a puddle on the counter. You need to find a happy medium. Sourdough is very forgiving, and it is totally ok to refold your sourdough and let it rise again. If you add additional flour, be sure to give it lots of time to rise. I literally just took a loaf out of the oven that I had to do this very thing to - it was just too sticky at first, so I added about 1/2 cup of extra flour, and then let it rise again overnight for 13 hours.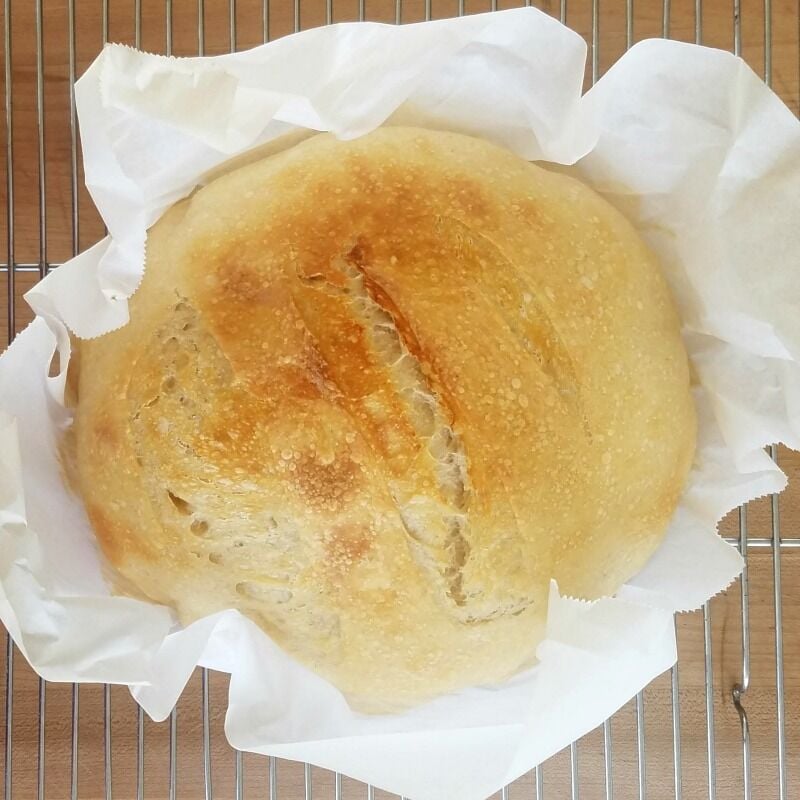
Renée ♥ says
Also, thanks for noticing the update! Did you like my new little "How to Fold..." illustration?! I'm still working on the update: I'll be adding more detailed directions and process shots in the next day or two, and hopefully that will clarify things more.
Kiya Thompson says
Your diagram is lovely! That was actually the first thing I noticed! Also, the pictures of each step are very helpful. I was wondering what the consistency of your dough was after kneading in the stand-mixer. My dough looks like #3 and I was just dumping it straight into a bowl. I think kneading on the floured surface will make a big difference and I was totally missing that step. Sidenote: every time I've made your recipe I've used the recommended unfed starter, but my sister bought me a sourdough book at Christmas recommending using the starter at its peak. I tried that with your recipe last night and I have 2 beautiful loaves that rose much better than when I've used the unfed (still with no slash marks, but I'll tackle that next)! Thanks for your help!!
Renée ♥ says
Thanks so much for the feedback, Kiya! If you are curious about why this recipe uses UNFED Starter instead of FED Starter, you might find this conversation on The Fresh Loaf helpful.
I almost always forget to slash it.
Debbie Jasper says
HI There,
I am new to sourdough bread baking. When you say unfed starter, I am unclear what you mean. If my starter has been in the fridge for several days, do I need to take it out of the fridge and feed it first and then wait for 12 hours before making the bread? Or can I just take the 3/4 cup of starter directly from the refrigerated starter and let it sit at room temperature for 12 hours?
Thank you!
Renée ♥ says
Great question! (I'm getting ready to update this post, and I'll be sure to discuss this point more clearly.)
Unlike many basic sourdough bread recipes, Kaylen's Bread does not use additional yeast to speed up the rising process. This is is a slow-rising bread - meaning it can take all total 8-14 hours to rise - and begins with Unfed Starter. (The long, slow rise is what makes this unique bread tolerable for my gluten-intolerant friends.) So, to answer your question: Just take your Starter out of the fridge and allow it to come to room temp, and then measure out 3/4 cup.
Vicki Morris says
My 2nd attempt, your recipe looked promising. BINGO!!!! I posted this all over Facebook when done. Would love to include a picture. Ahhhhhhhmazing. Especially with homemade ghee (clarified butter). Can't stop eating it. Thanks for rescuing my starter effort -- I was about to chunk it and go to Panera. This is soul-comforting! You rock!
Renée ♥ says
Thanks for the wonderful feedback, Vicki! I'm so glad the recipe worked for you. Isn't homemade sourdough bread just the best? (And ghee can only make it better!)
I'd. love to see your bread photo! Be sure to tag any posted with #thegoodheartedwoman, and I'll be sure to see them! (You can also contact me through our FB page, or on our contact page.)
Denise says
Is the dough supposed to be real sticky?
Renée ♥ says
Yes. It's pretty sticky.
Naomi de Bruin says
Hi tx for your easy directions!
Made mine yesterday and took me from 7am till 2am to finish!!!!! Did not want to rise nicely.... If I read your directions I think I knead toooooo much!!!!!! I kneaded the air out and did not then have enough time left to rise cause by 1am I was over it! And cooking time took 1hour!!!maybe my gasstove giving trouble it was on 180°C.
Do you use sourdough starter straight into a bread? My recipe says to feed starter that I took from mother starter and feed it and let it rise 6 hours, then rest of ingredients to add and mix well and let rise for another 6hours. It did wonderfully doubled in microwave with glass hot water in corner. I put it into dutch oven and let it rise yet another hour and then into oven which took forever and I had to put into electric oven for element for looked very bleak. The inside looks just like the google pics but not rise as much as theirs. Please help me, Im doing something wrong, my way is way too complicated and tooooo time consuming!!!! ~ Naomi
Renée ♥ says
Hi Naomi - I'm sorry! That sounds so frustrating. I'm currently working on a detailed update to this post, in which I hope to do a better step-by-step of this recipe and answer some of the questions that have come up. If you are signed up for our newsletter, you will receive a notice when the revised post goes live. (You can sign up for blog updates and our newsletter here.)
Melinda says
What do you do if it's not rising/ doubled in 6 hours?
Rob says
Hey Renee,
Awesome bread recipe to use unfed starter! I just started bread making and made the beginner's mistake of an out of control growing sourdough starter collection! Been whittling it down with pancakes, waffles, and other concoctions. So far this one has been the most enjoyable and satisfying. Also, made my first Stencil mark on it too!
????
Renée ♥ says
Congratulations, Rob! Glad it's working well for you!
Maggie says
Hi. What size dutch oven do you recommend? Thanks!
Jerrianne Smith says
Why do you not feed starter first? Most saved starters are only about 1 cup. Feeding doubles your starter. I have a 9 year old starter. I save a cup after feeding and proofing and use a cup in a recipe. Could you clarify?
Renée ♥ says
I'm sure that there are a number of people here who could give you a complex, scientific answer to your question, but in the interest of keeping things simple, here's the gist: you are essentially feeding your starter when you add it to your bread mix. If you feed it before adding, it won't be as "hungry," and it will take far longer for the starter to "digest" the additional flour gluten; moreover, your rise will be less effective.
hydro says
Most of the problems noted in this thread could be solved by using a digital scale and weighing ingredients instead of measuring volumes in cups. For example, I might make an 800g loaf using 500g flour and 300g water (a 60% hydration dough). If using 200g of 80% starter, that would be 111g of flour and 89g of water from the starter leaving 389g of flour and 211g of water to be added for the final dough. This should be a fairly stiff and easy to work with dough but the crumb (bubble size) will be small. More water (10 to 50g) will give a larger crumb but will make the dough harder to work (slack) but can give a larger crumb but the loaf will flatten out some. It all tastes magical!
Gaye Guillen says
Thank you for this fantastic recipe. It is delicious and never fails. My go to sourdough bread. Friends and family love it. I soak mine overnight. So easy to digest. Thanks again.
Renée ♥ says
Thank you so much for checking in, Gaye! I'm so glad it's working for you! ?
Mary Williamson says
I don't have a stand mixer, do I kneed or stir the bread?
Mel says
What is the aeration on your starter?
Renée ♥ says
I'm not quite sure what you mean by "aeration," but it's a 100% hydration starter. (100% hydration means that, feeding by weight, you feed your starter with equal weights of starter, flour, and water.)
Hannah says
This is the best I've made so far in my search for the perfect sourdough. I varied only by using bread flour. Thanks for sharing!!
Renée ♥ says
Thanks for much for checking in with your results. I'm so glad it's working for you!
Sarah says
Mine went flat.... I followed recipe exactly but live in Florida so maybe weather conditions had effect? I added more and more flour to try and get it to for a boule but it just keeps spreading thin and flat....
Renée ♥ says
Unfortunately, our weather in the PNW is so different from that of Florida that I can't even speak to this. Maybe another reader has an answer for you ???
Erin says
Hi! I'm making this bread for the second time today.... We really enjoyed the first loaf - I am finding the dough very soft and sticky even though I've let it kneed until it's satin smooth and a fully formed ball in the mixer. It's currently sitting for the long proof - I might hand kneed some more AP in?? Thoughts?
Renée ♥ says
I'd love to know how it turns out. When I've made it, the dough is definitely very sticky: I can form it, but cannot pick it up with my hands. All my actual transfers are done using parchment paper.
Vikki says
I need help my sourdough starter is out of control!
I started the starter 4 days ago, and following the recipe step-by-step exactly.
Now over the course of the last day ( fed it yesterday morning... it is now going up and over the jar I have it in a 1 gallon mason jar.( so it had room to do its magic ) It was approx. one cup of starter when I fed it yesterday ( I added 1/2 cup flour and 3/4 cup water combined and I had poured off half the starter then mixed the two with a wooden spoon.)
Something truly happened between days four and five ....it has exploded!
. I'm fearing for my life that I will be overtaken by this Sourdough starter in the middle of the night! any advice
Natalie says
Are you taking out the same amount you put in? You might not be taking enough out.
Vikki says
Yes, I'm have been removing equal amount. We've been having some humid days which is unusual for our area...can that affect the starter?
Natalie says
Yes humidity can affect the starter also. Its a wild starter right? Or are you using commercial yeast? Depending on your region, starters definitely have their own unique traits. If you are not using commercial yeast, then maybe you could take more of the starter out. I've had mine for a few months now and I use almost all of it when I bake. As long as there is a small amount, it will still grow. Also, I let mine 'grow' for a week and then I started keeping in the refrigerator so that I don't have to continue feeding it every 12 hours. It develops slower, (for my region, over the course of 5 days) so I use it once a week.
Vikki says
I have been removing am equal parts of the starter could take humidity which is unusual for our area possibly affect it ?
Renée ♥ says
Humidity absolutely affects bread making - at all stages.
Dara says
First attempt at sourdough, everything went well until the final rise on the parchment paper. It just spread out. I baked it anyway, but was disappointed with the texture. It's so dense, and missing the signature airy bubbles. Very bummed. Any idea what went wrong? Have you baked this recipe in a loaf pan? I may try that next- I like the neatness of a loaf and it may hold air better if it has the limit of a pan instead of the whole counter top.
Renée ♥ says
It should be very bubbly, and I don't think the vessel that you bake it in will make any difference. If it was runny and bubbly, I would tell you to add some extra flour, but with no bubbles, I'd have to guess that your starter needs some help. Anyone else have an idea?
m5th says
I'm making this recipe for the first time and didn't know I was supposed to set the starter out 12 hours before until I read comments. What does it mean in the directions to turn it twice? I've only just started making sourdough and trying different recipes. I hope mine turns out like the others!
Renée ♥ says
Turning means exactly that - just put both hands under the dough (like picking up a baby) and turn it over. That's it. Fingers crossed for you - Good luck!!
Natalie says
I know some were having problems with getting the dough to rise or it being too gooey so I thought I'd comment and give some pointers for those in high altitude areas. I live at about 6200 ft in elevation and I found that adding 3.5 cups of flour instead of the recipe of 3 cups, helps with the gooey-ness. I have 100% hydration starter (equal parts in weight of flour and water) and I've worked with both white flour and wheat flour, both work great! I also let the dough sit longer than normal. After the mixing of ingredients, I let it sit for a minimum of 20 minutes (step 1) then I knead it in my kitchen aid for at least 20min (step 2). Then I let it sit overnight in the oiled bowl and I do not punch it down, ever. I guess it 'gets punched' when I transfer it from the bowl to parchment. If I don't let it sit overnight or for at least 12 hrs, it does not rise as well and there are very few bubble holes in the bread. Being in a more dry environment with less oxygen and no salt in the air from the ocean breeze can make it a little more time consuming, but not impossible 🙂 I hope this helps, it's a great recipe and my family LOVES it. It also makes an amazing gift. And don't skip on the parchment- it'll burn the bread if you skip it.
Renée ♥ says
Natalie, thank you SO much for your comments. As I'm sure you well know, the amount of flour is always a bit of an estimate, baed on season, humidity, etc. Altitude adds a whole new level to baking too; one I have absolutely experience with outside of camping/ baking in a Dutch oven. This is one of my most popular posts, and your comments will be of great help to many, I assure you. Thank you again.
Sue says
As a sourdough bread beginner, i want to thank you for this awesome recipe and instructions! Made twice in two days, the family loves it!
Renée ♥ says
Thanks for the feedback, Sue - I'm so glad it's working for you!
Kristina L Shaw says
I have been making this bread several years and love it.The new changes made a big difference in bread texture.
My problem is I get a beautiful first rise,and then no second rise .
I knead on low 6- 10 minutes,and do the 6 folds.and usually let rise at room trmperature,have tried with oven light and in fridge,no difference.
Starter is really strong and fed 12 hrs out,It is 100% hydration.I also use 1/2 rye starter and 1/2 white and flour is half white and half whole wheat.I weigh all ingredients,and take temp of water.My sugar is 1-2 T. Blackstrap Molasses.I used to use honey,
If I get a good second rise,it immediately collapses when I place in Dutch Oven.I have started doing the 2nd rise on parchment,so I don't disturb the dough when transferring and I never slash it,It immediately falls.
Thank you!!!!
Jo says
Are you meant to bake the dough WITH the parchment paper?
Renée ♥ says
Yep. You just lift the dough in and and bread out by the corners.
MaryLynn says
Just finished my third slice. I can't believe I baked this delicious bread without packet yeast! Grilled cheese for lunch tomorrow! Thank you.
Renée ♥ says
I am so glad it worked out for you, MaryLynn!
MaryLynn says
So I ended up with a soupy dough also when I put it onto parchment. Didn't want 1" high bread do I plopped the parchment into a bread pan. Put a pot of hot water in oven 15 minutes before baking and left it for the first 13 then removed it.
Loaf looks good out of oven, baked loaf pan on stone and its a little dark on the bottom. Smells great, nice rise. Gonna experiment with this recipe and make good use of my beautiful homemade starter.
Chellee says
Hello, I have made this recipe twice now. The first time I made it exactly as the recipe calls and my dough was basically pudding. Completely loose and thin, had to laugh when it says to fold the dough. There was no folding, only stirring happening there. Absolutely no rising in action either. My starter is 100% hydration and I added the full 1 1/4 cup of water the first time around. I was going to just throw it out but after reading 'B. Hayes' comment I figured I would just tough it out. I don't have a Dutch oven so I used my Pampered Chef Deep Covered baker and poured, yes poured, the dough into it after putting in some parchment paper and preheating the dish. The bread actually came out amazing! I had very little hope but it was light and airy and my husband (the whole reason I ever started this sourdough attempt) loved it! Plus it was beautiful! I made it again a couple days later but added only a little less than a cup of water to the dough and though it was definitely thicker it still could never form a boule nor could it really be "folded". Anyhow, I made it exactly the same except for the water difference and my husband said it tasted nothing like sourdough but just normal bread. I am going to try again tomorrow. Do you have any suggestions or recommendations for me?
Renée ♥ says
I wish that I did. My starter is also a 100% hydration, and has the consistency of very thick pancake batter that has been left on the counter too long. As with any bread dough (at least any that I want to make), you kind of have to eyeball how much floor to put in. I usually use the flour amount listed in bread recipes as a guideline and not the final word, and this recipe is no exception. It sounds like maybe the second loaf might have been made with a starter that was too freshly fed. Is that possible?
Chellee says
No, I always prepare the amount of starter I need the day before and let it sit on the counter overnight, so at least 18 hours total before being used. My starter, when ready, is also like pancake batter consistency. I am going to make this loaf again as I did the first time with the runny dough. It did come out great which is really all that matters. I have made lots of breads in the past so I was hoping I could get this dough to somewhat resemble what I am used to. I would have to add quite a bit of extra flour to get it to form a boule and I'm afraid that will make it more dense and less sour tasting.
Roxana says
Hi
I am trying your recipe as we speak. I actually made my own sour dough starter but I made it gluten free. I also used gluten free all purpose flour. I am hoping it comes out good. Quick question. When letting the dough rise should it be in a warm area or just left out?? It's 4 degrees right now with wind chills at -12. Just worried that my kitchen isn't warm enough.
Renée ♥ says
Please forgive me for getting back to you so late: I was on a Valentine's weekend getaway with my sweetheart. Anyway, for future reference, a warm place is definitely better. I either put my dough near the fireplace if it's going, or in the oven. (I have a "Bread Proofing" setting.) Another method is to set the oven to its lowest setting, warm it up and then turn it off before putting the dough in to rise. (When I do this, I leave the oven door ajar.)
JoAnna says
If you have a fireplace or woodstove place your dough in a covered bowl on the warm hearth- amazing results
Not as good but on top of your fridge works too
Renée ♥ says
Great tip, JoAnna!
Keer says
Thank you for the great recipe! Could you tell me what you mean by unfed starter? Starter taken right out of the fridge and brought to room temperature without being fed at all? I'm an absolute beginner so I'm still unfamiliar with all these terms.
Renée ♥ says
You are exactly right - "unfed" starter means started that has sat at room temperature for at least 12 hours without being fed.
Hayley says
By the time I start this, the starter will have been fed within the past 6 hrs. What difference will that make on the bread?
Renée ♥ says
You will probably not get as good of a rise.
Vanessa L says
So I take my starter out of the fridge for 12-24 hours. Then I go straight to the first step? Your recipe says “feed your starter 24 hours before”. What exactly does that mean? Just take it out of the fridge?
Renée says
[1] Take the starter out of the fridge.
[2] Feed it.
[3] Set it out on the counter. Do not put it back into the fridge.
[4] Leave it out about 12 hours (overnight); no less than 6 and no more than 24.
[5] Make bread.
Hope this helps.
B Hayes says
Help?! I cannot get this bread to turn out right. I've made it 3 times now.
The first time, I preheated the Dutch Oven and the bottom burnt to a crisp (black), but the texture and top crust were exactly what I wanted.
Second time, I tried to increase the size of the loaf by adding 1/2 cup more starter and enough extra flour to get the dough the right texture -- came out with a soft crust like regular sandwich bread. On the second attempt, in order to get the dough more solid, I had to add more flour on the round where I was supposed to turn it into a loaf. In the process, I kneaded all the bubbles out of it, and the wonderful sourdough texture I was hoping for went to sandwich-bread texture -- no holes.
Today is my third attempt. I returned to the original recipe -- no extra anything -- and when I went to turn the dough into a loaf, it was so soft that I couldn't handle it without adding more flour... AGAIN! Right now, as it rises for the second, shorter rising, it's a puddle in the bottom of my Dutch oven. The dough is just pure goop! But when I was done kneading, it was so dry, I worried it might turn out like a brick!
What am I doing wrong? I want a chewy crust and holey texture, but I can't seem to get it unless I preheat the Dutch oven and burn the bottom crust! I'm desperate... 🙁
Renée ♥ says
I have no idea! Everyone who makes it (who checks in here) seems to get good results, and I've made it tons of times exactly like this and haven't had any problems. Maybe your starter is a little runnier than most? If so, adding some extra flour is the right thing to do. It should definitely be doughy enough to form without "puddling." Just to clarify, there is no kneading after the initial dough is created - it is just a matter of folding it a few times during the rising process. Is humidity possibly an issue where you live? I can't figure out the burning on the bottom problem at all: it is imperative that you preheat the Dutch oven for this recipe: it doesn't work well if you don't. That's why you do the last rise on parchment - so that you can lift it into the Dutch oven after it has preheated. Is it possible that your oven temp is off, or that you are baking the bread longer than 25 minutes total? I'd really like to help you get to the bottom of this. Please keep me posted.
B Hayes says
Quick notes: I live at 5900 feet elevation -- high desert in northeastern Arizona -- with humidity levels far below 20%. My starter is 100% hydration (equal portions of flour and liquid - I use Kefir milk). Your recipe doesn't say whether or not to oil the Dutch oven, but I did, because I don't use parchment paper. The dough sizzled and started to burn as soon as I placed it in the Dutch oven. I have no desire to start something I won't be able to continue, if the grid goes down, and parchment paper falls into that category. I'd rather work with a process that doesn't require a bunch of extra equipment. Do you have an option for that?
During the forming of the loaf, I couldn't even handle the dough, it was so gooey -- it was like playing with super-melted mozzarella cheese. It stretched, drooped and stuck to everything -- especially me. The first folding went fine. The second folding was a bit goopier, and by the loaf-forming stage, I couldn't handle it at all. It seems the longer it's left to rise, the goopier it gets. I let it rise for 6 hours, according to the recipe, folding it every two hours.
Oven temp tests perfect. At 350, it's 10 degrees higher than it should be, but anything over 400 tested right on.
Baking time: 13 minutes with lid on, 13 minutes with lid off.
By the way, the FLAVOR of this recipe is exactly what I'm after. The crumb was terrific on both texture and taste, and the top crust came out wonderful, although the loaf wasn't as big as I hoped it would be. But the bottom crust burnt. That can be accounted for by using oil instead of parchment paper, but I'm hoping there's another alternative. Please help me there, if you can.
Renée ♥ says
I'm stumped. I don't have any experience working at that elevation, so I don't know what typically need to be done there. I use the parchment because it is definitely too soft a dough to lift into the Dutch oven without disturbing the bubbles, and I do think it protects the dough on that initial set in the pan, but I've never had a problem with it "sizzling." I just don't know. If you figure it out, let me know. I'm sorry that I'm not more help.
B Hayes says
Well, I just got my new loaf out of the oven -- without preheating the Dutch oven -- and it looks great, so we'll see how the crust turns out. It looks like the first loaf on top, but it's too soon to turn it out of the pan -- I let it cool for at least 30 minutes before dumping it out. We'll see how we did, and I will definitely let you know how it worked this time. Thanks for trying!
Danie says
Try moving your oven rack up a slot in your oven.
rodney says
I PUT SMALL WIRE RACK IN BOTTOM OF POT,LINE RACK AND POT WITH PARCHMENT PAPER PERFECT CRUST EVERY TIME
Val says
You might need to check if your starter isn't fermented properly...I made a loaf when I was learning to make sourdough where the dough was limp with the constency of thick goo.. it didn't rise at all and baked out an inch high... but discovered my starter wasn't right and had to fix it.
Vikki says
Your story is identical to mIne. Second time around it happen again so I decided to add a half a cup of flour to it and it turned out perfectly it may just have to do with your environment .
Erika says
My loaf was nice and big after the proof but when I put in fridge till morning it shrank some and now not as tall as before...is this the fridge??
Renée says
That's a great question, Erika. Unfortunately, I never refrigerate my sourdough during the rising process, so I can't speak to this directly. However, I do know that over-proofing can degrade the gluten network, which would definitely make your loaf shrink. I'd love to know where this takes you, Erika. If you perfect refrigerator rise-time for this loaf, please come back and share it here! (I'll try to work on it myself in the near future.)
Kate says
Hey, olive oil burns at 410 degrees. You definitely had burnt oil on your bread. You don’t need to oil the Dutch oven.
Renée says
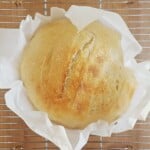
Thanks for your comment, Kate, but I'm not sure to what you are referring: nowhere in the recipe is it suggested that the Dutch oven be oiled. The only the only thing you need to do to the Dutch oven before baking its preheat it - dry. The only oil used is the oil in the bowl for the first rise. There is no "burnt oil" on the finished bread. (If you were referring to the small image of my first loaf, it's just that: my very first loaf, which was admittedly not so pretty.)
Sandra says
What if you don't have a stand mixer or bread hook?
Tranylle says
I do it by hand every time and it works just fine. Just a bit messier that way.
Renée ♥ says
Thanks for that input, Tranylle. I've made it be hand as well, and it turns out great. I've found that it's a very forgiving process.
Sandra says
Thank you Tranylle! I've never made bread in my life, so how do I know when I have kneaded it enough?
Tranylle says
I'm probably just lazy but I only knead it for about 5 minutes, let it rest for 30, then knead it a few more minutes before I let it rise overnight. It's always turned out great.
Terri A says
If you give it a couple more baker's turns during the first rising [bulk rising/fermentation] then you don't have to knead the dough at all. I've made Tartine bread and this recipe sounds very similar. I can't wait to try out this recipe.@gmail.co
Tranylle says
I just finished taking my first bite of this bread, and it's perfect!! I used bread flour instead of all-purpose, but followed everything else. It's so amazing. This is the first time I've ever made sourdough from scratch. Thanks for the recipe!!
Renée ♥ says
Thank you so much for the feedback - I'm so glad it worked for you!
Sandra says
Thank you, I'm about to make my first sourdough ever (starter has been bubbling 7 days now) and I was contemplating using bread flour! Now I will.
Tranylle says
You're welcome! Glad my comment helped 🙂
Fran says
the starter , where do get the starter?
Renée ♥ says
For the price of a couple of stamps, you can get Starter from Oregon Trail Sourdough.
sourdough baker says
A great start, just a couple of pointers. I usually slash the dough after the rise, this goes a little easier with a dusting of flour beforehand, don't worry if the cuts are not real deep or the dough 'pulls' a little. I also do not use parchment paper during the baking process, I add or rather plop the shaped dough into the heated dutch oven, seam side up. My oven temp also requires a 20 minute covered baked time, 20 minute uncovered. Who needs a bakery? Lol.
David G Anderson says
Thanks for the hint on using the Dutch oven for steam.
There is no accent on "boule."
Renée ♥ says
You're welcome - I wish I could say it was my idea, but it isn't.
Regarding the accent: there should be, but you're right.
Sincerely,
Renée
P.S. I'm a bit of a grammar diva myself. Thanks.
Lakey says
This recipe was so fast and easy, the bread was chewy on the outside and soft and fluffy on the inside. My husband, 10 year old daughter and myself devoured it in one sitting
Renée ♥ says
So glad you liked it!!
pat says
so where's the recipe for the starter you use
Renée ♥ says
There is no "recipe" for sourdough starter. If you don't have one yet, do a search for "sourdough starter" and that will get you going.