

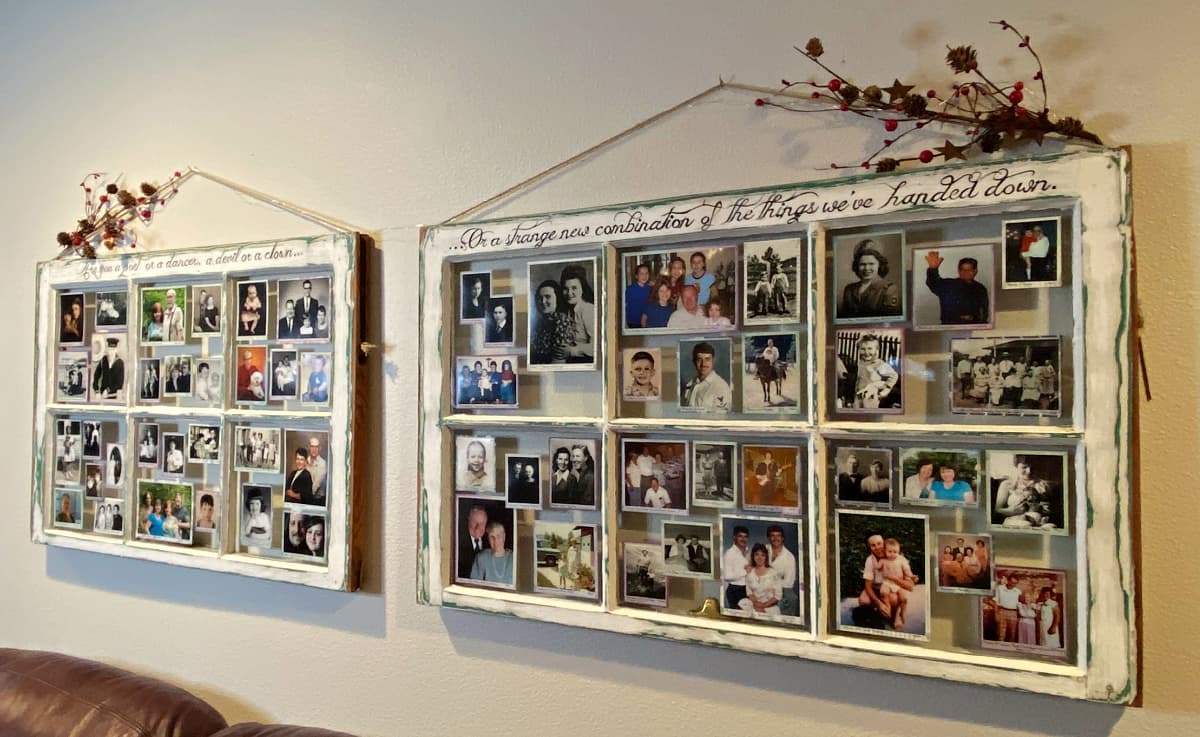
This Vintage Window DIY makes an awesome Family Picture Frame that can bring all the branches of your family tree together! This DIY takes some time, but it is easy and fun, and the results are outstanding!
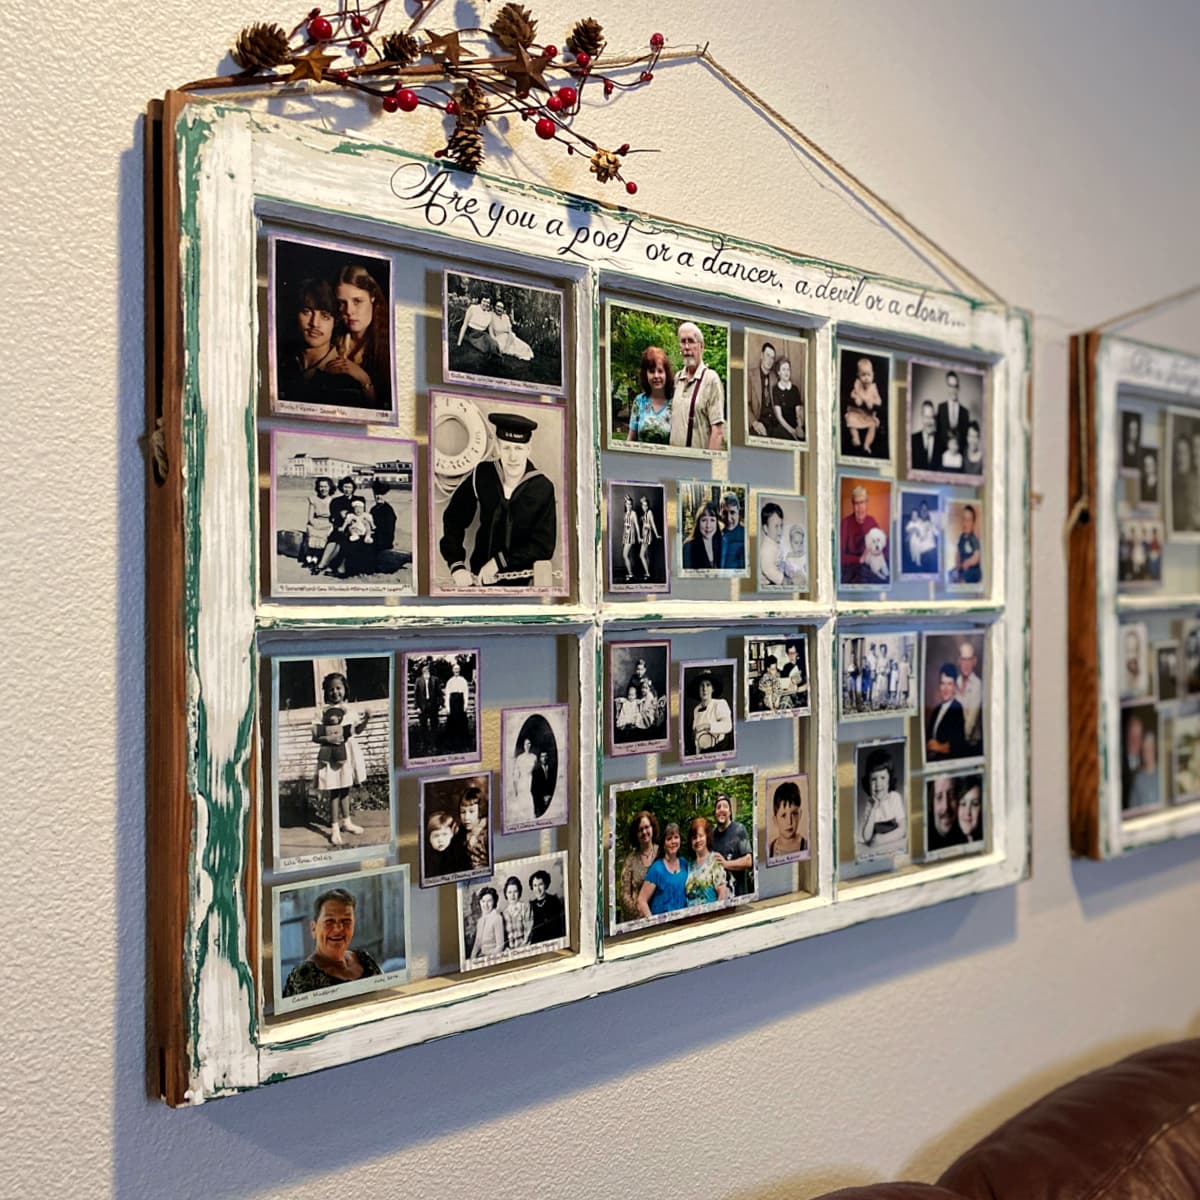
Table of contents
What's the Story on this DIY?
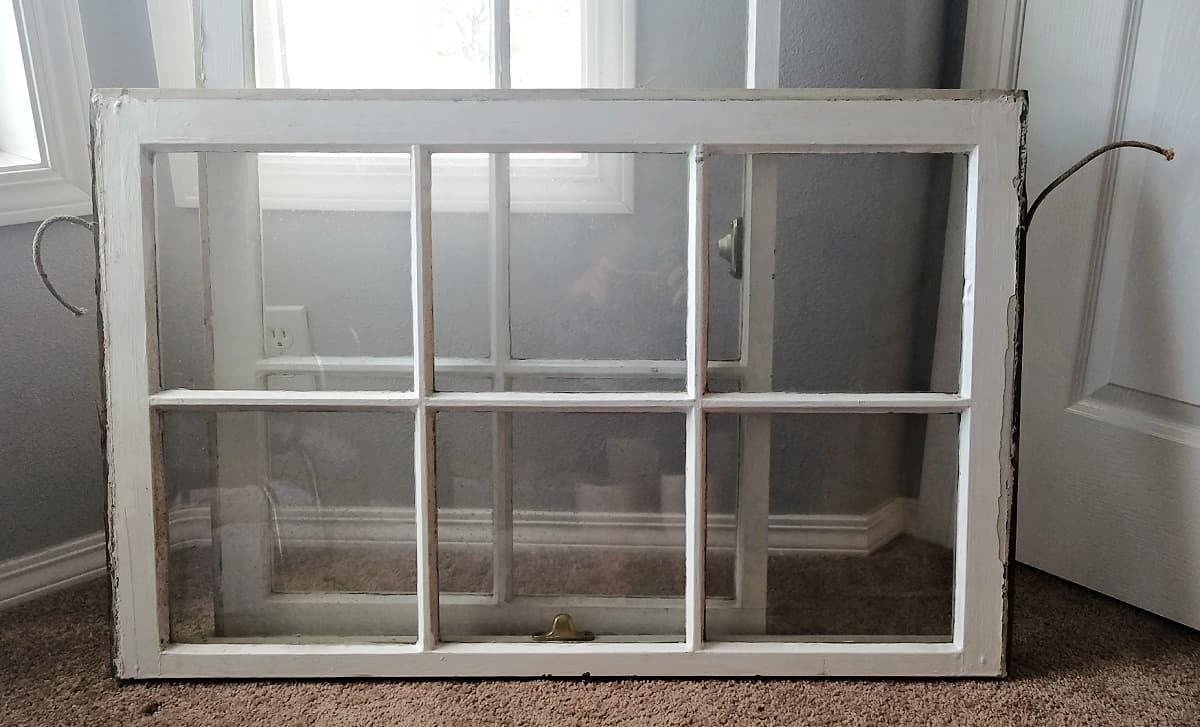
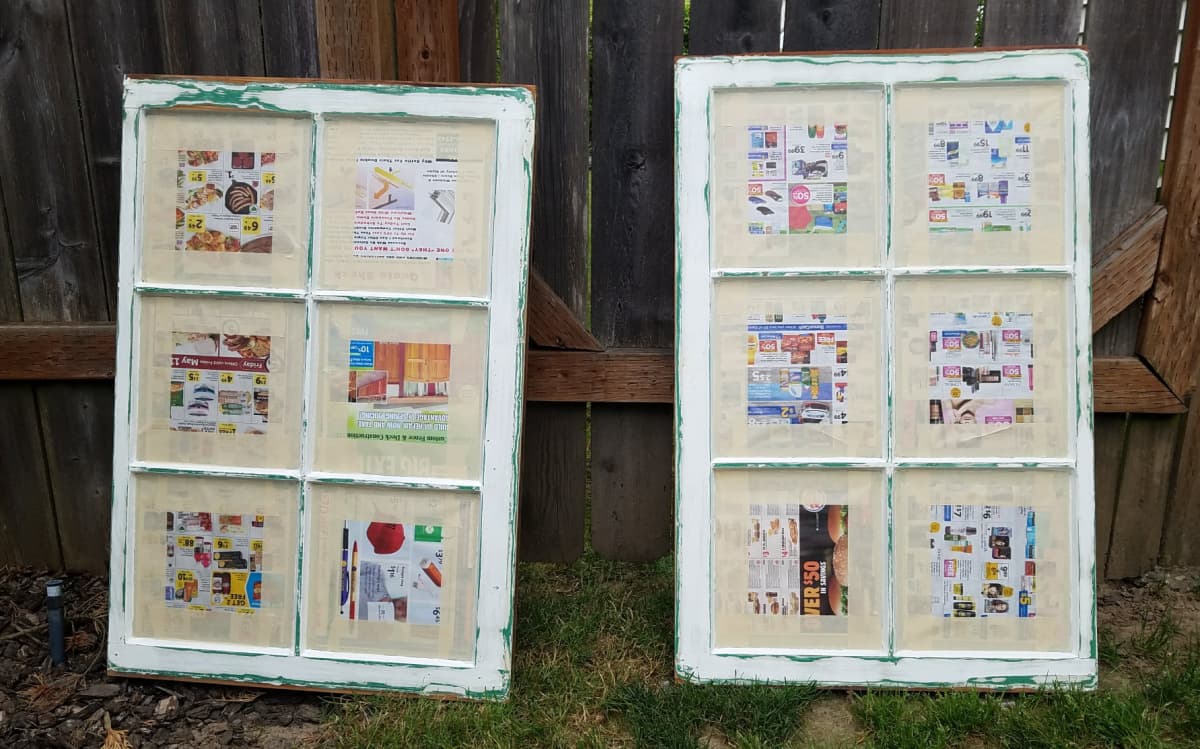
A few years ago, I bought a couple of old window frames at a local salvage store, complete with the original sashing ropes. Reclaimed from some ancient Southeast Portland home, my plan was to refinished and use them to display family photos.
My vision was a sort of "Windows to the Past;" a farmhouse-style window DIY that would display family photos from recent generations - parents, grandparents, and great grandparents - related to all our kids.
But how could everyone - all those unrelated relatives - fit into twelve little window panes and make sense?
Our family (like most families I know) doesn't really fit on the archetypal "family tree," with its perfectly spaced branches and carefully curated foliage.
Our family tree has extra branches and broken limbs, and sprigs that spring up from places we never expected.
Our family tree yields a fruit salad; created from grafted limbs, bright bursts of color, and curling sprouts reaching for the light.
Fruit Salad Family Tree
Years ago, when I raising my young family on five acres in Portland's rural suburbia, we kept a small orchard of miniature fruit trees.
Among the trees we tended was a multi-grafted apple tree, created by grafting the fruiting wood from three different fruit trees onto one rootstock, thus allowing one tree to bear three distinctly different varieties of fruit. In the spring when the apple blossoms popped, our little "fruit salad tree" was the most vibrant and colorful in the orchard.
The family that Mr B and I have created is a lot like my little tri-colored apple tree. We are a spirited mix of siblings and steps (we call them "bonuses") and halfs, in-laws and out-laws, and grands of all kinds, all grafted together onto one beautiful fruit salad family tree.
Photos Tell Our Story
It was important to me that this "Windows to the Past" family photo frame be more than just a collection of old family pictures: I wanted it to tell Our Story.
The first step in this DIY process was to let the window frames sit neglected in our craft/art/sewing/kid/guest room for about two years. I'm one of those people spends days, weeks, years puzzling out every detail of a project in my head, building it nearly to completion in theory before ever picking it up in real life. (Some people call this procrastination: I prefer creative processing.)
Initially, I considered assigning each grandparent a windowpane and keeping them in their own little box, but that didn't work for a multitude of reasons. I then considered placing the pictures chronologically, from top left window to bottom right, grouping folks in generations. Nope. That wasn't right either.
Finally, I returned to my original premise: ours is a Fruit Salad Family Tree. So I decided to toss everyone in together and mix it all up.
Like fractals in chaos, it was perfect.
For example, in a single pane of our window picture frame, you will find Mr B's Nana and her sister, my (first/birth) Mom, my Mama (the one with the spaghetti) and her sister, my little sister and brother, and my girls' paternal grandpa.
At first, the lack of obvious organization was a concern, but the more I thought about it, the more I liked the idea.
A family photo display like this opens to wonderful conversations: "See, there's Grammi when she was little, and that's Grandma Lila, and there's Poppy's Granny. She taught me to make noodles." Instead of a static exhibit of old, forgotten faces organized in time, it becomes a jumping-off point for family storytellers.
Once I had a clear vision, it was time to free our window frames from the "room of unfinished projects" and get this Vintage Window DIY started.
What You Need for this DIY
Window Frame Restoration
To restore a vintage window frame you will need:
- Old window frame
- For reference, the panes in my windows were approximately 9" square. Also, the two windows that I used for the project are similar in size, but not identical.
- Safety mask
- Palm sander (You can definitely sand this project by hand, but if you have a palm sander, it will make your life so much easier.)
- Palm sander disks or plain sandpaper (I used 80 - 120 - 240 grits)
- Masking paper to cover window panes (newspaper, mail flyers, etc)
- Masking tape
- Tack cloth: A tack cloth or tack rag is a lint-free guaze-like material that has been impregnated with a tacky substance. It is used to remove dust and dirt from surfaces (usually wood) prior to finishing. It is essential for achieving a smooth surface on a sanded wood project.
- Spray-on matte finish
- Cord and hardware for hanging frames
Photo Array
To create the photo array, you will need:
- Small, rough, b/w printout of every family photo you are considering for inclusion
- High-quality images, printed to size for frames
- Printer or other paper cut to the size of each window pane
- Glue dots (I use the 3/16" size.)
- (Optional) Backing papers to create mats for individual photos.
- (Optional) Photo splits for adhering mats to individual photos.
Quote or Lyric (Optional)
To include a quote or lyric, you will need:
- A favorite lyric or quote to establish your theme.
- Paint, Sharpie, permanent pen, or vinyl lettering to transfer your quote to the window frame.
In this case, choose whatever medium you are most comfortable with to transfer your quote or lyric.
Photo Mats (Optional)
To mat individual photos before placing them, you will need:
- Backing paper from which to cut mats.
- Photo splits or photo-safe glue.
- Small paper cutter (or a very steady hand with scissors).
How to Turn an Old Window into a Family Photo Frame
The process for restoring the window frames and repurposing them into picture frames is a bit time consuming, but relatively simple and easy.
Safety First
LEAD PAINT WARNING: DO NOT PROCEED UNTIL YOU READ.
Old painted wood window frames may contain dangerous lead in the paint. Lead exposure can cause serious illness, especially in children.
To determine if the paint on your window frame contains lead, you can purchase a cheap-n-easy 3-M Lead Check Test Kit. To use, you simply rub the test swab on the paint in question: If the swab is yellow, you're in the clear. If the swab turns red, you've got lead.
If the window frames were removed from a home built before 1978, assume that the paint you are working with contains lead until/unless you test them.
For more information related safety and procedures for working on items that may have been finished with lead-based paint, check out Everything You Need to Know about Vintage Decor & Lead Paint.
When sanding or painting the frame:
- Wear a safety mask. (If lead paint may be issue, be sure to get a mask or ventilator designed for use with lead paint removal.)
- Work outside or in a well-ventilated area.
- Keep children out of the immediate area.
Step 1 - Sand & Seal Window Frames
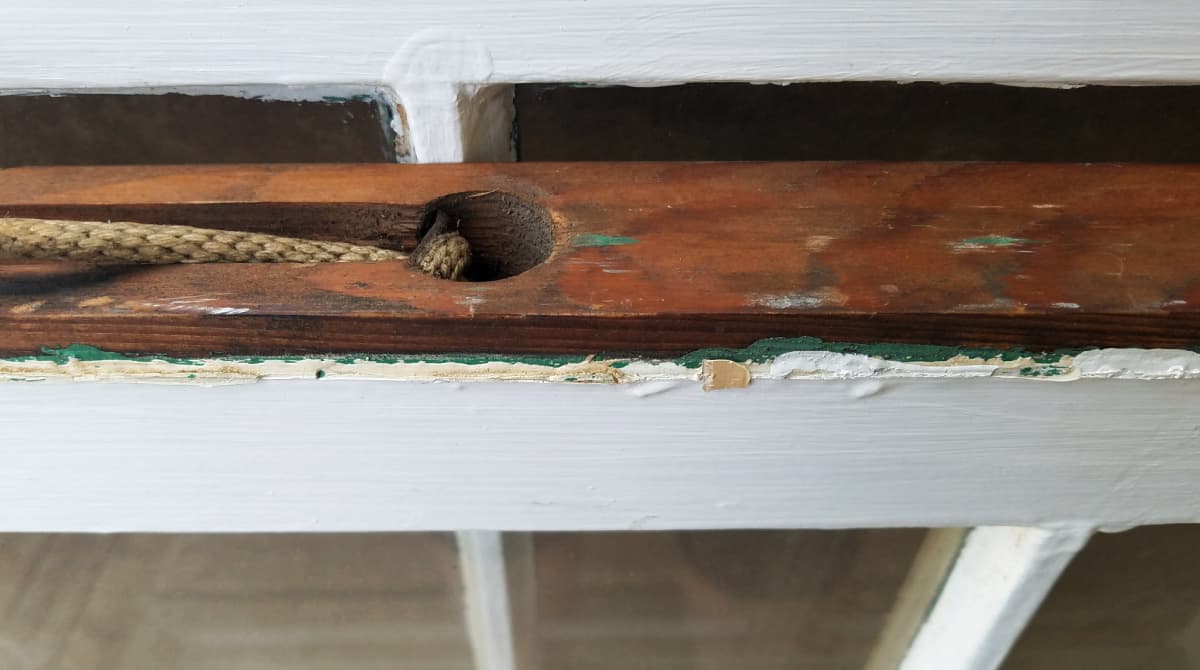
A. Remove sash cords and any extra pieces of frame that you will not be using for the final piece.
B. Cover the panes with newspaper or other masking paper and secure with masking tape.
C. Using a palm sander, sand the frame until smooth. (We did this is three phases, using increasingly fine grades of sandpaper for each phase. [80 - 120 - 240])
D. Carefully wipe the frame with a tack cloth to remove dust. (Do not use a damp cloth: it will raise the woodgrain and cause the finish on your final project to be rough.)
E. Wipe frame again with tack cloth. (Yes, really - do it twice.)
F. Spray with one coat of spray-on matte finish. Allow to dry completely.
G. Resand surfaces with fine grit sandpaper.
H. Repeat Steps D thru G at least two more times, for a total of at least three coats of finish.
Allow frames to dry completely, sand one more time, and remove masking paper and tape.
NOTE: After I finished sanding and sealing, I used the sashing holes to secure a new cord for hanging.
If your window frame does not offer this option, you can easily hang them using hooks and eyes.
Step 2 - Add a Theme or Quote (Optional)
Adding a quote to your family photo frame is totally optional, but it brings the project together in a personal way.
To do this, choose a favorite lyric or quote to establish the theme of your family photo display.
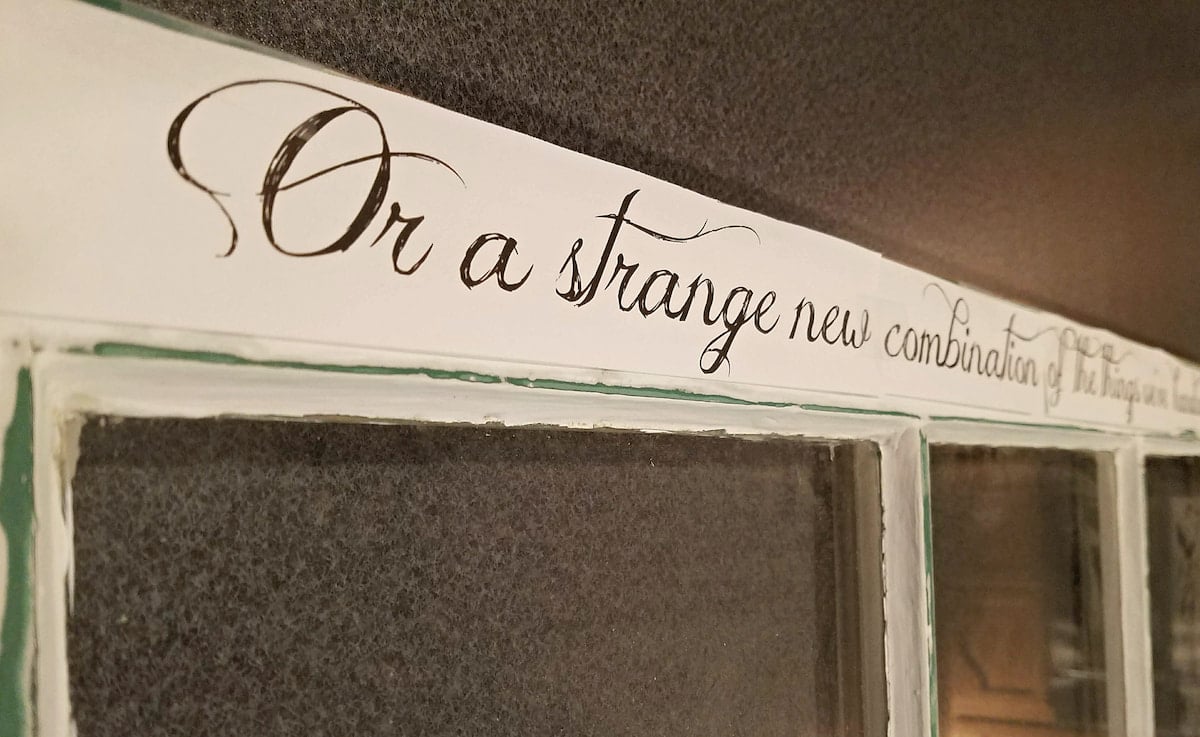
For our family photo frame, I chose a few lines from "The Things We've Handed Down" by Marc Cohn, one of the most beautiful songs about family history ever written. (If you aren't familiar with the full lyrics to this song, we encourage you to check them out.)
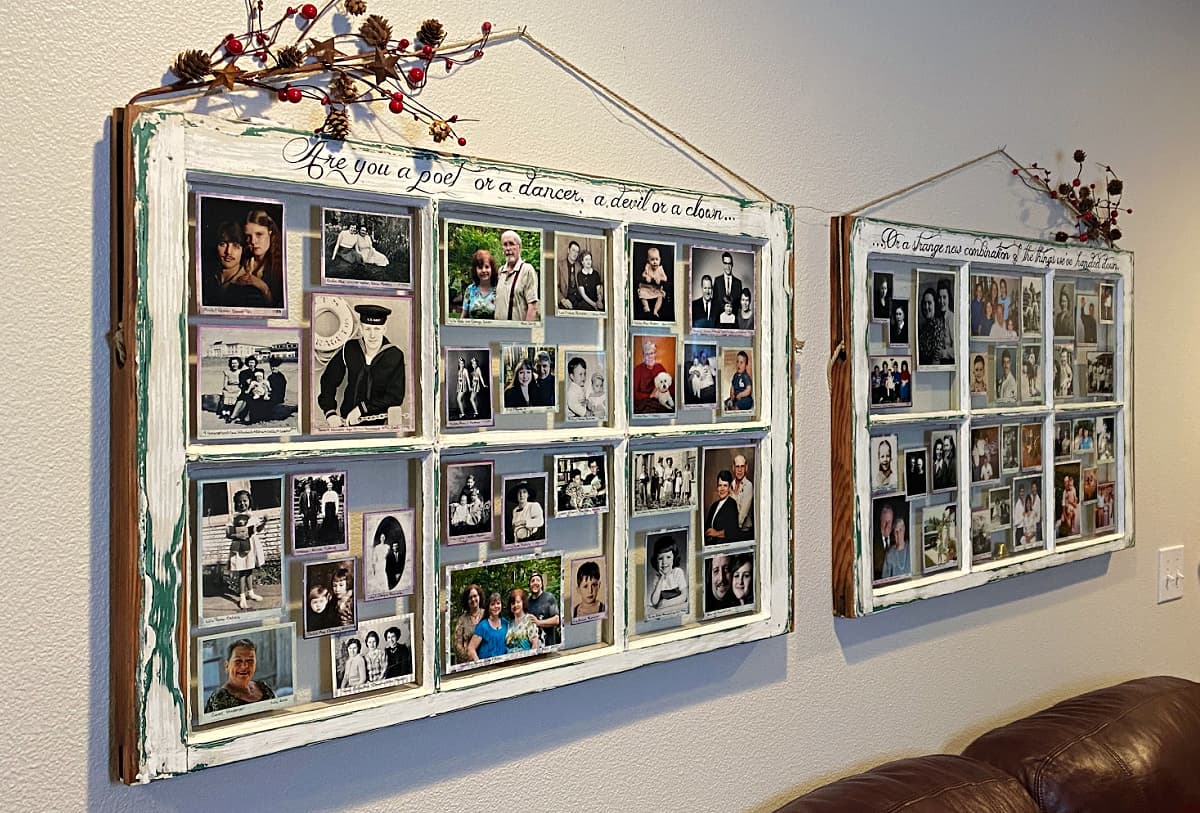
Are you a poet or a dancer, a devil or a clown -
Or a strange new combination of the things we've handed down?~ Marc Cohn, The Things We've Handed Down
I added these lines to my window frames by meticulously painting them across the top of each windowpane, which turned out alright, but was a super-tedious way to do it.
In retrospect, it would have been much easier to have used a Sharpie, or asked one of my Cricutting friends to cut me some vinyl letters.
If you choose to add a quote or lyric, use the medium with which you are most comfortable.
Step 3 - Add Pictures to Window Panes
Decide Which Photos to Use
This step should have been the easiest part of this Vintage Window DIY. It wasn't. Learn from my mistakes.
A. You first need to decide the scope of your family photo display. How many generations will you include? Will you include aunts and uncles, or just direct ancestors?
In keeping with the "Windows to the Past" theme, I decided to include only our own generation, our children's grandparents, great-grandparents, and a few great-great-grands. We did not include any of our grandchildren in the display, and included pictures of our own children only as youngsters.
B. Find and scan every picture you think you might want to use before you start to make any decisions.
C. Print out a small, rough b/w copy of each picture that you are thinking of including, especially if you plan to use many images.
I started with almost a 100 pictures and ended up using about 65 of them in the finished frames.
You do not have to print them out, but... I can only share my own experience: if I had done this to begin with, I would have saved myself a lot of time and struggle.
D. Separate the pictures into window-pane groups, choosing 1 - 7 pictures per pane, depending on the window pane size and the aesthetic you are going for.
Determine Photo Print Sizes
E. Once you have the images grouped, arrange them in a way that makes you happy, and decide how big each one needs to be for the finished project.
F. Reprint the images to size.
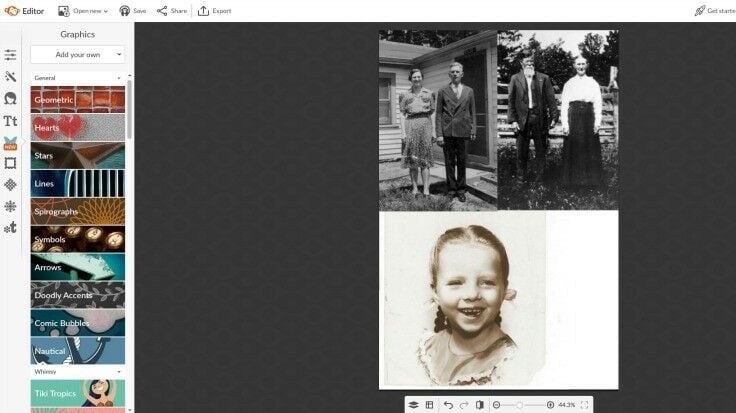
For this step, I used PicMonkey to create multiple-image prints using their "Design" feature. (You can also do this in Photoshop or Canva, but for this kind of thing, I find PicMonkey to be faster.)
Because my printer isn't great with photos, I got my images professionally printed. To do this, I created a 4x6 design canvas (300 dpi = 1200x1800 px) in PicMonkey, and then added my images as graphic overlays, sizing them on the design canvas as needed. That way, I could get multiple images on a single print - in the exact sizes I wanted them.
If you print your images at home, you can do this same thing by creating an 8.5x11 inch (300dpi = 2550x3300 px) canvas and sizing pictures onto it.
Tip: If you choose to have your pictures professionally printed, opt for a non-glossy finish. For example, if you use Costco photo developing, choose "Lustre" for your print finish. Lustre prints are slightly glossy, which helps enhance the image's color and details, but also feature a very fine texture to help reduce problems associated with glare and fingerprints.
G. Carefully clean each window pane so that it is free of dust and smudges.
H. Arrange images on a paper square cut to the same size as the destination window pane, paying attention to layout atheistic and image overlap. This will be your "image placement map" when you begin to adhere the pictures to the window frame panes.
Mat Individual Photos (Optional)
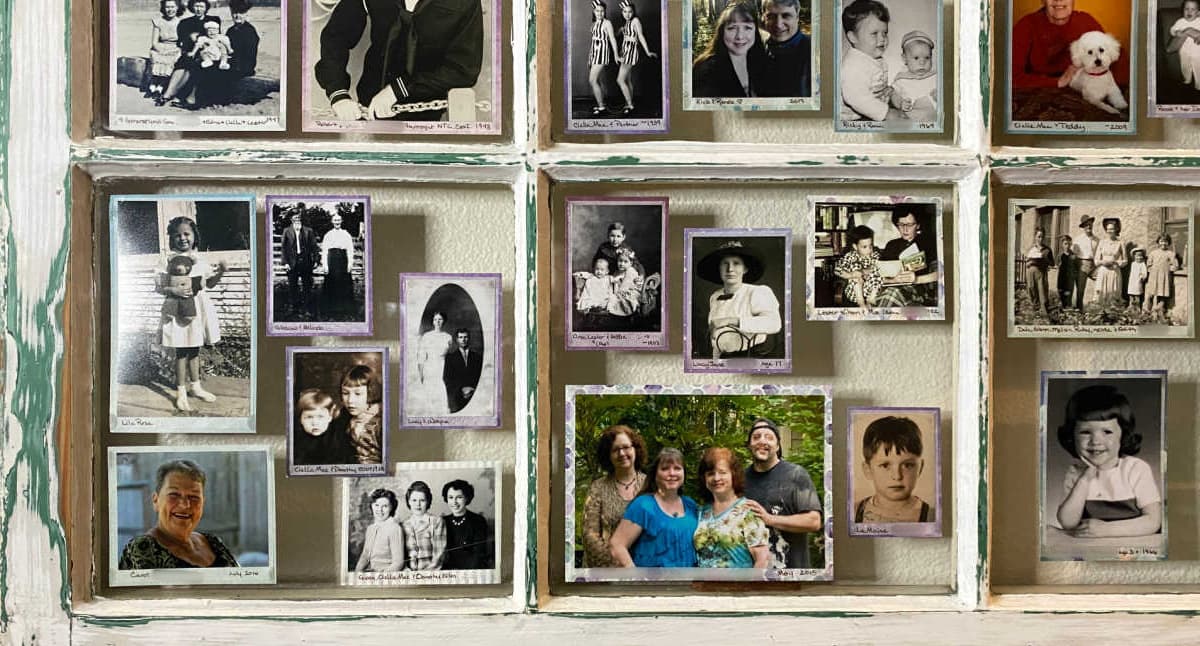
Some time after I had this all put together and hung it on the wall, I decided that I wanted to include names and approximate dates on each picture.
I ended up creating a little mat for each photo, which was tedious, but I am so happy I took the time. The individual picture frames really make a difference and improve the overall presentation.
This was my basic process:
To back the photos, I cut a small frame for each one out of parchment paper. I left an extra eighth-inch on the bottom of the mat to print basic information (i.e., name, place if relevant, and approximate year the picture was taken) and mounted it on the back with photo splits.
I then cut a larger frame from a small multi-paper pad; the kind craft stores sell for scrapbooking and crafting and mounted that with photo splits. Buying the backing papers in a pad insures that they all coordinate and stay with your basic theme.
Proceed once all the photos are matted.
Adhere one tiny glue dot to each corner on the FRONT of the picture, for a total of four dots on each picture.
From the back of the window pane, place the image as desired. Use your image map from Step 3-H as a guide.
Make sure that the image is square to the frame and spaced the way you want it in relationship to the rest of the images.
- Once all of the pictures for that pane are placed, confirm that they are all in the right place.
- Press the corners of each image in the pane from the back to make sure it is firmly adhered.
TIP: One of the great things about using tiny glue dots is that you can add or change a single picture any time without having to redo the entire display.
This came in particularly handy when we couldn't find Mr B's baby pictures. I completed the project, hung it in the hall, and simply added his baby pics pictures when we found them.
More Easy DIY Projects
- Fabric Tortilla Warmer (Step-by-Step Tutorial)
- Mason Jar Fairy Lantern DIY
- Simple Vertical Garden Plans (Step-by-Step)
- Redwork Chicken Tea Towel (Free Pattern)

Want More Free Recipes?
Subscribe to our newsletter to get family-friendly recipes and cozy living ideas in your inbox each week!
Find us on Instagram, Pinterest, and Facebook, too.
Epic Family Picture Frame from Vintage Windows

Turn a reclaimed vintage window frame into an epic Family Picture Frame with this easy DIY, and bring all the branches of your family tree together!
Materials
To restore a vintage window frame:
- Old window frame
- Masking paper to cover window panes (newspaper, mail flyers, etc)
- Masking tape
- Palm sander disks (or plain sandpaper)
- Tack cloth
- Spray-on matte finish
- Cord and hardware for hanging frames
To create the photo array:
- Small, rough, b/w printout of every family photo you are considering for inclusion
- High-quality images, printed to size for frames
- Printer or other paper cut to the size of each window pane
- Glue dots - 3/16"
- (Optional) Backing papers to create mats for individual photos
- (Optional) Photo splits for adhering mats to individual photos
To include a quote or lyric on your project (optional):
- Favorite lyric or quote
To mat individual photos (optional):
Tools
To restore a vintage window frame:
To create the photo array:
To include a quote or lyric on your project (optional):
- Paint, Sharpie, permanent pen, or vinyl lettering to transfer your quote to the window frame.
Instructions
Sand & Seal Window Frames
A. Remove sash cords and any extra pieces of frame that you will not be using for the final piece.
B. Cover the panes with newspaper or other masking paper and secure with masking tape.
C. Using a palm sander, sand the frame until smooth. (We did this is three phases, using increasingly fine grades of sandpaper for each phase. [80 - 120 - 240])
D. Carefully wipe the frame with a tack cloth to remove dust. (Do not use a damp cloth: it will raise the woodgrain and cause the finish on your final project to be rough.)
E. Wipe frame again with tack cloth. (Yes, really - do it twice.)
F. Spray with one coat of spray-on matte finish. Allow to dry completely.
G. Resand surfaces with fine grit sandpaper.
H. Repeat Steps D thru G at least two more times, for a total of at least three coats of finish.
Allow frames to dry completely, sand one more time, and remove masking paper and tape.
After sanding and sealing, use the sashing holes to secure a new cord for hanging. If your window frame does not offer this option, you can easily hang the frame using hooks and eyes.
Add a Theme or Quote (Optional)
This step is totally optional, but it brings the project together in a personal way.
To do this, choose a favorite lyric or quote to establish the theme of your family photo display.
For our family photo frame, I chose a few lines from “The Things We’ve Handed Down" by Marc Cohn, one of the most beautiful songs about family history ever written. (If you aren't familiar with the full lyrics to this song, we encourage you to check them out.
I added these lines to my window frames by meticulously painting them across the top of each windowpane, which turned out alright, but was a super-tedious way to do it.
In retrospect, it would have been much easier to have used a Sharpie, or asked one of my Cricutting friends to cut me some vinyl letters. If you choose to add a quote or lyric, use the medium with which you are most comfortable.
Add Pictures to the Window Panes
Decide Which Photos to Use
A. You first need to decide the scope of your family photo display. How many generations will you include? Will you include aunts and uncles, or just direct ancestors?
In keeping with the "Windows to the Past" theme, I decided to include only our own generation, our children's grandparents, great-grandparents, and a few great-great-grands. We did not include any of our grandchildren in the display, and included pictures of our own children only as youngsters.
B. Find and scan every picture you think you might want to use before you start to make any decisions.
C. Print out a small, rough b/w copy of each picture that you are thinking of including, especially if you plan to use many images.
I started with almost a 100 pictures and ended up using about 65 of them in the finished frames.
You do not have to print out a draft of every photo, but... I can only share my own experience: if I had done this to begin with, I would have saved myself a lot of time and struggle.
D. Separate the pictures into window-pane groups, choosing 1 - 7 pictures per pane, depending on the window pane size and the aesthetic you are going for.
Determine Photo Print Sizes
E. Once you have the images grouped, arrange them in a way that makes you happy, and decide how big each one needs to be for the finished project.
F. Reprint the images to size.
For this step, I used PicMonkey to create multiple-image prints using their "Design" feature. (You can also do this in Photoshop or Canva, but for this kind of thing, I find PicMonkey to be faster.)
Because my printer isn't great with photos, I got my images professionally printed. To do this, I created a 4x6 design canvas (300 dpi = 1200x1800 px) in PicMonkey, and then added my images as graphic overlays, sizing them on the design canvas as needed. That way, I could get multiple images on a single print - in the exact sizes I wanted them.
If you print your images at home, you can do this same thing by creating an 8.5x11 inch (300dpi = 2550x3300 px) canvas and sizing pictures onto it.
G. Carefully clean each window pane so that it is free of dust and smudges.
H. Arrange images on a paper square cut to the same size as the destination window pane, paying attention to layout atheistic and image overlap. This will be your "image placement map" when you begin to adhere the pictures to the window frame panes.
Mat Individual Photos (Optional)
Some time after I had this all put together and hung it on the wall, I decided that I wanted to include names and approximate dates on each picture.
I ended up creating a little mat for each photo, which was tedious, but I am so happy I took the time. The individual picture frames really make a difference and improve the overall presentation.
Basic process:
To back the photos, cut a small frame for each one out of parchment paper. If you want to add personal information to the photos, leave an extra eighth- to quarter inch on the bottom of the mat to print basic information. Mount to parchment mat to the back of the photo with photo splits.
Then cut a slightly larger mat from the small multi-paper pad. Adhere it to the back of the parchment frame with photo splits.
Proceed once all the photos are matted.
Adhere one small glue dot to each corner on the FRONT of each prepared picture, for a total of four dots on the front of each picture.
From the back of the window pane, place the image as desired. Use your image map from Step 3-H as a guide. Make sure that the image is square to the frame and spaced the way you want it in relationship to the rest of the images.
Once all of the pictures for that pane are placed, confirm that they are all in the right place. Press the corners of each image in the pane from the back to make sure it is firmly adhered.
The only thing left to do is hang it on the wall!
Notes
LEAD PAINT WARNING: DO NOT PROCEED UNTIL YOU READ.
Old painted wood window frames may contain dangerous lead in the paint. Lead exposure can cause serious illness, especially in children.
To determine if the paint on your window frame contains lead, you can purchase a cheap-n-easy 3-M Lead Check Test Kit.. To use, you simply rub the test swab on the paint in question: If the swab is yellow, you’re in the clear. If the swab turns red, you’ve got lead.
If the window frames were removed from a home built before 1978, assume that the paint you are working with contains lead until/unless you test them.
For more information related safety and procedures for working on items that may have been finished with lead-based paint, check out Everything You Need to Know about Vintage Decor & Lead Paint.
When sanding or painting the frame:
- Wear a safety mask (If lead paint may be issue, be sure to get a mask or ventilator designed for use with lead paint removal.)
- Work outside or in a well-ventilated area.
- Keep children out of the immediate area.
Thank you for visiting the Good Hearted Woman. Remember to bookmark this site, and come back soon!

Karen Cook says
❤️❤️❤️MY ALL TIME FAVORITE PINTEREST POST❤️❤️❤️I love everything about this. Your narrative is beautifully written (wasn’t surprised see that you are a novel author) as so many of us do have “fruit salad” families and we love every one of them. What a beautiful way to describe it! Thank you so much for sharing this with the world. God bless you❣️
Renée B. says
Thank you so much for your heartfelt comment! ❤️ Your kind words made my day - they mean the world to me. I'm so glad the post resonated with you and that you found the "fruit salad" family description relatable. 🥰 Sharing this project and the story behind it was such a joy, and knowing it’s inspired someone as lovely as you is so gratifying. Wishing you all the best with your own creative endeavors!
Lisa says
When mounting the pictures what did you use and can you see it when you look at the frame?
Renée B. says
I used adhesive scrapbooking squares (i.e., photo splits) to mat the individual photos, and then 3/16-inch glue dots to mount the pictures to the glass. You can see the glue dots if you look very closely, but I'm pretty particular about such things, and I don't have any issue with it. This is, of course, a matter of personal preference. (All of the materials used are listed under the heading that describes that part of the process.)
Althea says
How did you use to attach the pictures to the glass?
Renée B. says
I used 3/16” glue dots. You can find more info, including the products used, in the “Photo Array” section.
Angela says
I love this idea! these are all so gorgeous too such creative ways to repurpose windows!!!
Renée ♥ says
Thank you! It's really easy to do.
Marta says
This is the sweetest! I love how you've decorated with such sentimental images.
Renée ♥ says
Thanks, Marta. Choosing the images was definitely a labor of love. It's so good to be able see everyone in one place now.
Amber Myers says
Oh my gosh, I love this idea. I have tons of photos that I want to display, so this is perfect.
Ashley Rollins says
I love old window frames! I have one in my house that I added cursive words onto. This is a great way to decorate but also add photos .
Heather says
I love this SOOOOO much! I have to do something like this for our new house.
Junell DuBois says
What a fun project! Such a cute way to use old windows.
Sarah says
I lover this idea! Now I just need to find some old window frames!!
Mary says
Ohhhh I LOVE this idea so much. I have two old windows EXACTLY like the ones you used (probably same dimensions and everything), but they've just been sitting in my garage for the last 2 years while I wait to finally decide how to use them. This is the idea I've been waiting for! Thanks for the inspiration!
Renée ♥ says
Glad I could provide a spark for you, Mary! I'd love to see how yours turns out.
Erin @ Platings and Pairings says
What a fun and stunning photograph display! I can see this fitting well into any home decor and being the spotlight of a hallway!
Catherine @ To & Fro Fam says
Oh my goodness, this display is so epic and beautiful. I am certain anyone who comes into your home would pause to take it all in. I love what you did and the care you took with your family history!
Leanne Wong | SEO + Blogging Strategist says
I love how these vintage windows look! Nice way to add a little personal touch to the frames.
Geeky Daddy says
I love those! So unique and awesome way to tie in the family history!
Kelsey says
How cool! I love your vision and philosophy of the fruit salad family. It's true that we can find a lot of joy and love in accepting our family even if things aren't as linear as one might expect.
Megan Joy says
They turned out beautifully. What a lovely way to show off family memories. I love this rustic look and it's a bonus that it's much for affordable than buying one at a store!
Marlynn | Urban Bliss Life says
This is such a beautiful way to frame a family tree! I always see gorgeous weathered windows when I go thrift shopping and this would be such a lovely gift that I think my parents would appreciate. Thanks so much for the creative tutorial!
Shannah says
These are beautiful! I love the concept and the writing. I’m not very crafty but I’m going to use your ideas and try this as a family project. Thanks!
Gail Gustafson says
Those are truly beautiful tributes to both your creative & artistic talents, and to your "fruit salad" family! How lucky they are to have you in the mix! You inspire me!
Renée ♥ says
Thanks so much, Gail! ?